Showing posts with label Baking With Fruits. Show all posts

Tuesday 27 December 2011

Fruit And Muesli Muffins

Before this post, I have only seen and read "Muesli" in supermarkets and recipe books. It is only until I try out these wonderful "cereal" from VOGEL's which consists of uncooked rolled oats, real dried fruits and nuts that I totally fell in love with them. In fact I have replace my usual breakfast cornflakes to these yummy muesli for my milk, cooked oats, yoghurt and bakes.

Here I am sharing a 3 Steps:- Stir, Mix and Bake wholesome 
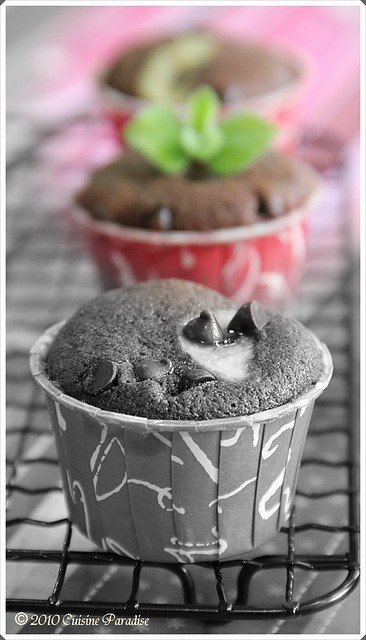
Fruit And Muesli Muffins recipe which you could bake anytime of the day and keep the extra in the freezer for up to 3 months. But if you love fruits and nuts, I promise these muffins would gone even without you notice them.

These Muesli are made mainly using ingredients such as grains, fruits, nuts and seeds from New Zealand which are free from artificial flavours or colours. VOGEL's mueslis combine the natural, less processed ingredients with those that pack essential healthy boosting components such as antioxidants, fibre, protein, vitamins and minerals.

Friday 11 November 2011

Kiwifruit & Lime Cupcakes

Pin It
As much as you read about my passion on using fresh fruits in both my dishes and bakes I am rather excited with my new love on using "kiwifruit" as one of the key ingredient. Before my recent encounter with ZESPRI kiwifruit, I didn't know that kiwifruit has so much health benefits or rather it could be so versatile to use in creating our daily meals.

Below is another way that you could in-cooperate kiwifruit in baking some delicious cupcakes to impressive your guests with minimum steps and effort. These serve great for afternoon tea with cup of fragrant tea to balance it's zesty taste.


KIWIFRUIT AND LIME CUPCAKES


We love the texture of this cupcake which is soft, moist and infuse with hint of sweet and sour zesty flavour from the green kiwifruit and lime syrup. And it really taste great while eating it warm as a tea-cake or as after meal dessert which gives you a refreshing taste and comfort feeling especially during cold nights.

(makes: 6 | Preparation: 10 minutes | Cooking: 25 minutes)

Ingredients:
75g Self-raising Flour
40g Plain Flour
50g Ground Almond
80g Caster Sugar
62g Unsalted Butter, melted and cooled
1 Large Egg
60ml Milk
1 1/2 Ripe Green Kiwifruit, cut into cubes
1/2 Green Kiwifruit, sliced for garnishing


Method:-
1. Preheat oven to 180°C. Place combined flours, almond meal and sugar in a large mixing bowl. Stir well.

2. Whisk egg and milk together with melt butter and slowly stir into the flour ingredients follow by the cubed kiwifruit.

3. Using a spatula, mix well and spoon mixture into paper cases and bake in preheated oven for 25 - 30 minutes till golden and skewer inserted and comes out clean.

4. Cool in pan for 10 minutes before turning onto wire rack to cool further.


LIME SYRUP


Lime syrup is great to act as an addition toppings to enhance the flavour of  many dessert dishes or as an accompaniment to certain drinks which needs a zesty lift. This syrup can be served warmed or cold with desserts or cold. For a combination you could also used half portion of lime juice mixed with lemon juice instead of using one type of fruit.

(Preparation: 5 minutes | Cooking: 10 minutes)

Ingredients:
Zest of 1 Lime
90ml Lime Juice(about 2 - 3 limes)
80g Caster Sugar


Method:-
1. To make the lime syrup, place lime rind, lime juice and sugar in a small saucepan. Stir over low heat until sugar dissolves.

2. Simmer over medium low heat for 8 - 10 minutes until thickened.

3. Cool the syrup slightly. Use a skewer make holes over the cakes before spooning the sryup over cakes and top with sliced kiwifruit.

4. You could also un-mould cake on serving plates, spoon over extra lime syrup and serve warm.

It has being a few months since my last submission for the monthly Aspiring Bakers event and since this month's theme is pretty easy which base on cupcakes. I would like to submit this quick and easy Kiwifruit And Lime Cupcakes for Aspiring Bakers #13: Enjoy Cupcakes! (November 2011) hosted by Min of Min's Blog.


ZESPRI KIWIFRUIT GOODIE BAGS GIVEAWAY
(SINGAPORE ONLY)


Lastly I have a good news for all my Singapore readers. The folks from ZESPRI and Edelman team are giving us some complimentary ZESPRI Goodie Bags for 3 Lucky Winners which includes fresh kiwifruit, 2GB Kiwi thumb drive and etc delivered to your doorsteps.

In order to win a set of this goodie bag, leave a comment stating 2 Goodness of ZESPRI kiwifruit(answer can be found from my ZESPRI kiwifruit post HERE) together with your name and a valid email address. To double up your chance, you could also pop over to my facebook page HERE and "Like" the photo together with a comment on how you usually eats your kiwifruit.

Closing Date for this giveaway will be on Monday, 14 November 2011(Noon).

~~~~~~~~~~~
(updated on 14 Nov 2011)


GIVEAWAY WINNERS


Friday 2 September 2011

Lemon Yogurt Butter Cake

Pin It
Time flies when you're busy so with another weekend approaching I would like to share a quick tea-cake recipe which you can bake for your family using common ingredients like lemon and plain yogurt. It has being quite sometime since I last baked butter cake(Chocolate Pumpkin Butter Cake) for tea-snack and I sure miss that buttery taste together with a cup of English Tea.

Monday 25 July 2011

Mixed Berry Cake with Raspberry Cream Cheese Frosting

As you can see from most of my "bakes" I seldom do cake with frosting because my skill level of frosting is totally unbearable. I can't seems to frost a whole cake evenly with smooth finishing or at least something presentable. But after seeing Celes's mouthwatering "Blueberry Cake with Cheesecake Frosting" photo on twitter and facebook I decided to give her recipe a try.

So with a twist to her recipe, I have made a Mixed Berry Cake together with some Cupcakes frosted with fresh Raspberry Cream Cheese.

Recipe adapted from Celes @ Celestial Delish

Ingredients: (make one 7" size cake and 6 medium cupcakes)
180g Butter, soften
170g Caster Sugar
3 Large Eggs
225g Self Raising Flour
1 Teaspoon Baking Powder
1 Teaspoon Vanilla essence
250g Sour Cream
200g Blueberries
125g Raspberries, reserve 1/4 for cream frosting and decoration


Mixed Berry Cupcakes made with half portion of the batter resting on the cooling rack.

Method:-
1. Preheat the oven to 170 degree.

2. Cream butter and sugar for 1 minute, add in flour, baking powder and vanilla and continue to beat for another 2 minutes on low speed until thick and creamy.

3. Next beat in 4 heap tablespoons of sour cream then stir in the mixed-berry using a spatula or wooden spoon till well mixed.

4. Scoop the mixture evenly into a 7" disposal round case and the remaining batter into 6 holes muffins tray line with paper cups liner.

5. Bake the cake for 50 minutes or until skewer insert and comes out clean; OR

* Bake the 6 holes muffins tray batch at 20 minutes or till skewer insert and comes out clean.

6. Cool for cake/cupcake on the cooling rack till completely cold when touch before proceeding to the frosting.


The Original recipe calls only cream cheese, icing sugar and sour cream but in order to make the frosting more colourful and presentable. I added about 10 raspberries into the beaten cream to enhance the taste, texture as well as visual effect to the frosting.

RASPBERRY CREAM CHEESE FROSTING

Ingredients:
200g tub Philadelphia cheese
100g icing sugar
Remaining Sour Cream, leftover from the cake batter
10 Raspberry, roughly chopped

Method:-
1. Beat the soft cream cheese with the icing sugar and the remaining soured cream in a bowl until smooth and creamy.

2. Add in chopped raspberries and give it a quick stir or two till mixture is well combined.

3. Spread cheese mixture over the top of the completely cooled cake and scatter with some extra berries on top as decoration. OR

* Spoon a few tablespoons of prepared cream mixture into a pipping bag with a "Wilton 2D" pipping nozzle attached and pipe rose design starting from the middle of the cupcake in clockwise direction.

Mixed Berry Cake with Raspberry Cream Cheese Frosting on FoodistaMixed Berry Cake with Raspberry Cream Cheese Frosting

Overall this is a very soft, light and moist cake made with fresh berries that makes you feel irresistible with its fruity flavour cream cheese topping. And according to Celes, these frosted cake can keep well in the fridge for a couple of days. But before serving, it will be best to bring it to room temperature so that the texture will be soft and moist instead of harden and dry due to storing in the fridge.

Lastly I would like to thanks Celes for sharing this wonderful recipe as well as her patience in walking through the steps and sharing of handy tips in the baking process.


Saturday 14 May 2011

Spongy Banana Cake

This is one of the most simplest Banana Cake recipe which I have come across using quick sponge cake method without any egg separation. And furthermore you do not need to incur extra washing on those mixing bowls and utensils. All you need is to put all the necessary ingredients into a big mixing bowl and beat till stiff/ribbon stage before folding in the flour mixture and oil.

As you can notice from the photo above, this Banana Cake is very light, spongy and fluffy. And mine was so soft that it crumbles quite while I am trying to cut it into slices. You can also take a look at some other bloggers who tried this recipe such as "Nasi Lemak Lover" and "袅袅烘焙香" on their lovely bakes.

(Recipe adapted from Wen's Delight, original recipe by Richard Goh)
Ingredients: 
3 Medium Eggs
130g Sugar
200g Banana, lightly mashed
150g Cake Flour
1/2 Teaspoon Baking powder
1/4 Teaspoon Baking soda
100g Corn Oil
1/4 Teaspoon RUM


Method:-
1. Preheat oven to 160 degree C. Grease baking tin and line with baking paper. (I omitted this step as I used disposal baking tray)

2. Sieve flour, baking powder and baking soda together at least twice, set aside.

3. Using electric beater whisk eggs, sugar and banana at maximum speed till stiff/ribbon stage.

4. Fold in flour mixture using spatula and mix well.

5. Slowly swirl in oil and mix till batter is shiny and flowing.

6. Bake for 40 - 45 minutes. (I baked it for around 35 minutes using 3 disposal tray)


Since this is a Mother's Day gift that I made for my mum and aunt, I have also decorated it with some banana slices and pumpkin seeds. And both family who tried this agreed that this recipe is indeed a keeper. And I would use it to make some chocolate banana cake for my boy and bestie soon.


Aprons Giveaway
by My Kitchen Snippets


If you love to cook/bake, perhaps you will be interested to win one of these lovely Apron from My Kitchen Snippets Giveaway event. Closing date is on 17th May 2011 at 6.00pm (Eastern Time). So wait no more,  quickly hope over to participate and stand a chance to win. (Link HERE)


Wednesday 6 October 2010

Chocolate Banana Muffins

Last month I have made some “Banana & Oreo Muffin” where you can make use of those oreo cookies in a new way rather than dipping them in fresh milk for snack. With the same concept, I replace the oreo cookies with some cocoa powder and mini chocolate chips to create another lovely flavour for chocolate lovers.

As you can notice from most of my posts, I love to make muffins especially those mini or mouthful size type. I find making these makes it easier for my kid to have it as tea snack or sometime it can be also act as a lovely gift for friends too.

Wednesday 29 September 2010

Lemon Butter Muffins

Recently my mum has such a great craving for Lemon Butter Cake that she kept reminding me for a suitable recipe where she can try making some to share with her friends. So from her requirements, I managed to come out with some Lemon Butter Muffins which are full of lemon fragrant, taste and sponge cake like texture.

These are some of the photos of the ingredients and steps on how to prepare the batter.

Friday 3 September 2010

Banana & Oreo Muffin

Muffin is common American term of bread that is baked in small portions. Somehow or rather it looks like cake or cupcake in shape but usually it is not as sweet as cupcakes and generally without any frosting.

Baking muffins is always an enjoyment time for me and my kid. Since it does not required much procedures I can always let him handle most of the task, which in a way helps to build up his self-confident too. And moreover I love that facial expression of him waiting patiently near the oven for the muffins to be ready.

Wednesday 26 May 2010

Eggless Durian Tiramisu

It has being such a long time since my last making of Tiramisu. This yummy dessert is often one of my choices while dinning in most western restaurants if they have this dessert available in their menu section. Today’s recipe is specially made for one of my best friend, whom Rey and I wish to cheer her up by using one of her favorite fruit “Durian” as ingredient. So let’s take get ready and take a look at this Eggless & Sugarless East-West Fusion type of Tiramisu whereby Fresh Durian Paste is used in this recipe.

Tiramisu is one of the most popular Italian cakes whereby Savoiardi is dipped into Strong Coffee then layered with the whipped mixture of Egg Yolk and Mascarpone. But today our ingredients will be slightly different whereby we will use Durian and Chocolate Milk to replace the usual Strong Coffee and Egg Yolk. So I am sure this is a great recipe for durian lover as well as those who don't prefer using raw egg yolk as one of the ingredients.

This is a very simple recipe that you can prepare in the morning and served it as dessert after dinner or during gathering. I am sure everyone will be able to follow the steps and made your very own Tiramisu without any hiccups. If you don’t prefer Durian you can always exchange it with other fruits like mango, strawberry, raspberry or etc just let your imagination run wild……

Ingredients: serves 8
1 Packet of Sponge Fingers (24 savoiardi)
250g Mascarpone
300ml Whipping Cream
300g Fresh Durian Flesh
200ml Chocolate Milk
Dutch Cocoa, for dusting

Method:
1. Pour chocolate milk into a shallow dish. Set aside.
2. Beat the durian paste and whipping cream in a large bowl with electric beaters for about 15 seconds till thick and creamy.
3. Add in mascarpone and give it a quick whisk until just combined.
4. Dip Sponge Fingers biscuits, 1 at a time into the chocolate milk then arrange in a single layer over the base of the container. (do not dip the sponge fingers for too long or else it will be too soggy and spoilt the taste of the tiramisu)
5.Cover the biscuits with a layer of the mascarpone mixture and repeat another layer on top, ending with the cream.
6. Cover with plastic wrap and refrigerate for at least 2 hours. Dust generously with cocoa and serve.

Note:
~ This recipe can make two 12 x 12 cm square plastic containers.
~ You can Thickened Cream instead of Whipping Cream if you prefer a more creamy texture.
~ Chocolate Milk can be replace with plain low-fat or full cream milk.


So by looking at this….. Are you interested to try out my combination of Tiramisu whereby you can have “Durian + Cheese + Cocoa” together in one dessert :) And most important it is without any trace of Raw Egg and extra Sugar…… And if you are interested in more chocolate and cheese dessert maybe you would like to take a look at this "
Durian Cheesecake With Chocolate Fudge" too! Posted by Picasa


Saturday 11 July 2009

Banana & Passion Fruit Chiffon Cake

Em... this should be the last Chiffon Cake recipe that I going to post for the time being even though I still have a few on the list to try out :p Since my mum love the combination of Passion Fruit with Banana, I decided to bake this for her over the weekend together with some of her favourite Banana & Passion Fruit Jam.

Thursday 25 June 2009

Durian Chocolate Chiffon Cake

This is 2nd Chiffon Cake recipe that I experiment and tested. I used the combination of Cocoa Powder + 70% Dark Chocolate + fresh DURIAN as main ingredients. So you can imagine having a bite on this slice of cake with such combination where you can actually smell and taste the baked durian in a rich cocoa content. Since this is a chiffon cake, you will find the texture of the cake to be light, spongy and fluffy rather than that greasy and dense compare to cake.

Sunday 30 November 2008

Baked Mango & Salmon Salad

Salmon Baked Rice for Saturday Lunch and now we have Bake Mango & Salmon Salad using the remaining Salmon cutlet that I have left over from making the Salmon Bake Rice. Hahaha! This is one of the bad-point when preparing meal if there are less people at home as we tends to have some extra ingredient left over from making the previous dish.


This is a very refreshing and colouring dish there consists more than 5 colours: 1) Pink for salmon, 2) Yellow for mango and lemon, 3) Brown for Shimeiji mushroom and cashew nuts, 4) Green for cucumber and seaweed flakes, 5) Red for tomato 6) White for mayonnaise sauce and cheese. This dish is very easy to prepare all you need is about 15 - 20 minutes of cutting and baking time.Posted by Picasa

Ingredients: (serves 2)
8 Pieces of 1" cube size Salmon
1/2 Bundle of Shimeiji Mushrooms
1/2 Japanese Cucumber, cut into half cubes
1/2 Medium Size Mango, cut into cubes
1/2 Tomato, cut into 1/4 wedges
3 -4 Thin Lemon Slices
Some roasted Cashew Nuts
Some Japanese Mayonnaise Sauce
Some Seaweeds Flakes, optional
1 Tablespoon Shredded Cheese, optional

Methods:
1. Pre-heat a small saucepan with 1/2 teaspoon of olive and and stir-fry the Shimeiji for 30 seconds and remove, set aside.
2. Next lightly pan-fry the salmon cube for about 30 seconds on each side until it's almost cooked through, remove and set aside.
3. Arrange in alternate way using the salmon cubes, cucumber, mango, tomato, shimeiji mushroom, lemon and some shredded cheese in a baking dish.(refer to the 2nd picture, 1st row picture 2 and 3)
4. On the top layer, drizzle some Japanese mayonnaise, shredded cheese and cashew nuts then pop it into the toaster oven for about 5 minutes until cheese melt.
5. Serve it as a starter or side dish and you can sprinkler some seaweeds flakes on it.

Notes:
a) You can purchase those small packed of snack roasted cashew nuts from supermarkets.
b) Rinse and cut the Shimeiji mushroom into single stalk.
c) You can omit using cheese if you don't not have them or you are not a fan of cheese.
d) You can replace the mango with avocado cubes instead.....

Sunday 2 November 2008

Bake Choco Banana With Prata Skin

Tata.... My 1st dessert upon the re-opening of Cuisine Paradise Foodblogs after the restructure of blog layouts. Have you ever tried the combination of chocolate and banana before. I guess most of you have tried Banana Chocolate Cake in most of the bakery shop before and the taste it perfectly well match right?


This afternoon I made this Bake Choco Banana with Prata Skin for our tea-break. I spread a thin layer of Nutella on a piece of frozen Prata Skin and wrapped it up with banana. After baking into golden parcel, I served it with some orange wedges and drizzle the banana parcel with some white chocolate and dust with chocolate powder. You can also served it with an extra scoop of ice-cream for a more sinful treats.Posted by Picasa

Ingredients:
1 Piece of Frozen Prata Skin
1 Medium Size Banana, not too ripe
Some Nutella Spread
Melted White Chocolate, optional
Orange Wedges
Some Strawberry Jam, optional
Cocoa Powder for dusting

Methods:
1. Spread a thin layer of Nutella onto a Frozen Prata Skin and place the banana on one end of the skin and roll it up like a sausage roll.
2. You can tuck in both sides of the pastry so that the chocolate will not leak out during baking.
3. You can baked in a pre-heat, 180 degree oven for about 10 minutes, turning about 5 minutes to bake it evenly and let it have a nice and even golden brown.
4. For my case, I baked it in a oven toast so it took a longer time to get the whole parcel evenly brown which is about 15 minutes.
5. When the parcel is slightly cool, arrange it on the place, drizzle it with melted white chocolate and serve with some extra orange wedges and strawberry jam.

Notes:
a) You can get any brand of frozen Prata Skin from any leading supermarket in Singapore.
b) If you don't prefer Orange wedges, you can serve it with any fruit of your choice.
c) If you wan it to cook in a faster way, you can cut the banana into slices and arrange on one side of the prata skin then fold the skin into half like a semi-circle and bake.


Thursday 9 October 2008

Baked Plum & Rum Cake

I had never being a fan of "Plum" before until Tracy gave me the Plum Chutney and I started to fall in love with it. I find that these little plum taste even better when baked or even made into Plum Jam. In this recipe I would like to share with you on how to make use of plum which is in season to make it into a mini plum cake that will melt in your mouth and taste sort of like Baked Japanese Cheesecake.

You can use any kind of plum that is in season either red or black. For this recipe, I happen to have these sweet red plum in the fridge so I decided to try out this recipe. The texture of the cake is very soft, fine and cotton like and guess what, most of my friends who tried it comments that it taste like baked cheesecake despite that there is isn't any cream cheese content. Posted by Picasa

Ingredients: (makes about 15 mini cakes)
80g Butter, room temperature
60g Sugar
1 Medium Size egg, lightly beaten
100g Plain Yogurt(thick creamy type)
100g Cake Flour
1/2 Teaspoon Baking Powder
Apricot Glazing Gel, (Optional)

Methods:
1. Sift the flour and baking powder in a mixing bowl and set aside.
2. Cream the butter and sugar till creamy and white (about 5 mins), then slowly add in the egg mixture in 2 addition after beating into the butter mixture.
3. Next add in 1 tablespoon of the RUM mixture, 1/3 of the plain yogurt and 1/3 of the flour mixture and beat well.
4. Repeat the procedure until all the mixture is used up.
5. Next spoon or pipe almost 3/4 full of the batter into the cup case and top it with one or two slices of the RUM plum.
6. Repeat for the rest of the cup till all the batter use up.
7. Baked in the preheat 170 degree oven for about 15 - 18 minutes depending on the size of the cake.
8. When the cakes are slightly warm, brush the top with some Apricot glazing to give it a shiny look.

Plum Topping:
3 Red Plum, cut into wedges
50ml RUM
2 Tablespoons Brown Sugar

Methods:
1. Cut the plum into wedges of 6 each and mixed well with the RUM and brown sugar and set aside in the fridge to absorb the favour for at least 30 minutes.
2. Removed the plum wedges from the RUM mixture and drain well to remove any excess liquid then reserved the RUM mixture.

Note:
a) You can get either Pauls - Natural Yogurt or Farmers Union Greek Style Yogurt.
b) If you do not have any Apricot Glazing Gel, you can replace it with 4 tablespoons Apricot jam that is warm up with 1/2 tablespoon for hot water in microwave up medium heat.


Saturday 27 September 2008

PassionMisu

I guess you have either heard or tried making or eating Tiramisu before. It is actually one of the most popular Italian desserts which is made of savoiardi (lady fingers) dipped in coffee and mascarpone cream. But for our this week menu, I am trying something new which I called it PassionMisu. The key ingredient use it Passionfruit as this weekend my blogging is base on cookign with FRESH FRUIT. This PassionMisu is to serve with the main course known as Salmon with Passionfruit Sauce.

For this PassionMisu dessert, I used mini sponge cake (kueh Bolu) instead of the traditional savoiardi (lady fingers). I dipped it in Mango juice and spread it with layers of Passionfruit yogurt cream. This is indeed one of the Quick and Easy way to make an easy and impressive dessert for guest.

If you are not keen with passionfruit, you can always replaced it with the traditional Tiramisu ingredients like coffee and mascarpone cream. Or you can use this method by changing the type of fruits to either strawberries, mango or even durian and you can get a wonderful and easy dessert in no time. Posted by Picasa

Ingredients: (serves 2)
80ml Fresh Mango/Passionfruit Juice
10 - 15 Mini Sponge Cake(kueh bolu)
1/2 or more Tablespoon of Cocoa Powder, dusting

Methods:
1. Cut the passionfruits into halves and remove the pulps and set aside.
2. Cut the sponge cake into halves (side-way) then gently dip the cut side in the juice and arranged it in base of the serving cups or container.
3. Spread a layer of the passionfruit yogurt cream on top and top with another layer of sponge cake dipped with juice.
4. Repeat the top with another layer of the yogurt cream.
5. Wrap the top with clear wrap and put in the freezer for about 10 minutes to get the top almost firm to touch.
6. Dust with generous amount of cocoa powder and decorate with some fruits or extra passionfruit pulp if desire.

Ingredients for Passionfruit Yogurt Cream:
2 Fresh Passionfruits, collect about 3 1/2 tablespoons of pulps
150g Mango/Plain Yogurt
1/2 Teaspoon of Sugar
30ml Mango Juice/Plain Water
1 1/2 Teaspoons of Gelatin Powder

Methods:
1. Dissolve the gelatin powder in the mango juice over simmering water or microwave on medium heat for 30 seconds(stop in between 10 second and stir till dissolve).
2. Next, mix the yogurt and passionfruit pulp together till well combine then stir in sugar and melted gelatin solution.
3. Set aside the mixture for spreading on the sponge cake.

Notes:
a) I arranged mine in a 2 oval baking dish which is 12cm by 8cm in measurement.


ShareThis