Showing posts with label Finger Food. Show all posts

Wednesday 1 August 2012

Deep-fried Banana with Popiah Skin

This is a yummy finger food that mum taught me while we are having a conversation about how to use those banana that I always stock up for our weekly fruit supply. She mentioned that she saw a Taiwan cooking clip from youtube which use fresh "popiah skin" to wrap banana with some Japanese mayonnaise and deep-fried till golden brown.

So without hesitate, I bought some fresh popiah skin and start making some for our morning tea.  After which when I posted this photo on my "Instagram", someone comment that it looks similar to one of their Philippines dessert which is known as Turon or Banana Lumpia.  And when I did a Google, it shows that Turon is a Philippine snack made of thinly sliced bananas and a slice of jackfruit which dusted with brown sugar and rolled in spring roll wrapper and deep-fried.

Wednesday 2 May 2012

Rosemary Honey Chicken Drumlets


There are many ways you can enjoy honey either on it's own, mix it with water or juice, drizzle on fruits and pancakes or use it for baking cake or savoury food. No matter which method you prefer, a daily dose of honey in whichever way is good to boost the body's supply of antioxidants which is therefore essential for protecting against free radicals.

In my last related honey post, I have shared a "Honey Lemonade" recipe which is good for flushing out your body system and gives it a boost to increase your daily energy. And in this post, I will be sharing another finger licking recipe using honey to enhance it taste and colours.


ROSEMARY HONEY CHICKEN DRUMLETS


If drumlets is not your preference you can always replace it with mid-joints or even chicken maryland for a hearty serving portion together with some mashed potato or garden salad to complete the meal.


(Serves: 2-3 |      Preparation: 5 minutes |         Cooking: 30 - 40 minutes)

Ingredients:
10 - 12 Chicken Drumlets
1 Tablespoon Honey Sheep Lemon West Coast Honey
1/2 Tablespoon Oyster Sauce
1/2 Tablespoon Cooking Wine
1/2 Teaspoon Dark Soy Sauce
1/2 Teaspoon Freshly Ground Black Pepper
2 Sprigs Rosemary, remove leaves and roughly chopped

Method:-
1. Trim the bone end of each chicken drumlets, remove skin around the bone and push the down the flesh to the head of the drumlet to form a cluster.

2. Marinate the drumlets with honey, oyster sauce, dark soy sauce, cooking wine, pepper and rosemary leaves. Set aside in the fridge for at least 30 minutes or overnight.

3. Line baking tray with baking paper or aluminum foil, arrange marinated chicken drumlets(remove from the fridge 10 - 15 minuets before cooking)on it and bake in oven toaster for about 30 minutes(flipping the drumlets two to three time during cooking to even the brown colours)

ALTERNATIVELY:-
~ Bake in a preheated 200° Celsius(400 degrees Fahrenheit) oven for about 30 - 40 minutes or till cooked through.

4. Next brush chicken drumlets with some extra honey lemon during the last 5 minutes of cooking time to enhance the colour and flavour of the drumlets.

5. When done, remove from oven and serve immediately.

Personally I love this hassle free recipe which consists of light fruity flavors of lemon with fresh herbs and honey which makes it an refreshing starter for parties or even main dish. And in conjunction with the Food Revolution Day mentioned below, I would like to encourage more readers or food lovers to choose and eat your food wisely. Nothing beats homecook food which use fresh ingredients, I am sure with some simple recipe(s) such as this Rosemary Honey Chicken Drumblets above, you are able to feed your loved ones with fresh and healthier meals anytime of the day.


HOPE TO SEE YOU THERE


Recently there is a wave about this "Food Revolution Day" which is going to take place on 19th May 2012 in different parts of the world. Initially this project is bought up by Jaime Olive to bring awareness across food consumers on proper diet habits using fresh ingredients rather than processed food which are high in sugar, unnatural preservatives and unknown chemicals. And here in Singapore we also have a group of food lovers who gets together to support this event, and this would be held on 19th May 2012 at The Lawn.

So all food lovers in Singapore, come and join with us on Food Revolution Day where all food lovers gather for a dinner party, share and learn about their knowledge about food! To find out more, you can hope over to Facebook or Twitter now to get the latest updates! Cya there!

Saturday 28 January 2012

Caramel Popcorn

Pin It
Popcorn or popping corn is corn (maize) which expands from the kernel and puffs up when heated. There are many techniques for popping corn from either normal kitchen pan/pot, microwave to large scale popcorn machines. Usually Popcorn is eaten in movie theatres that served in choices such as salted or sweetened. But now instead of having it only in the cinema, we could also easily make them at home or purchase in major supermarkets.

About a year ago "Garrett Popcorn" which is a chain of popcorn outlets open it's first outlet in Resort World Sentosa and now they have many other outlets located in Singapore too. (detail HERE). I love their Caramel Flavour with Macadamia Nuts where I could enjoy my favourite nuts and popcorn coated with delicious caramel.


CARAMEL POPCORN


My boy prefers popcorn which is sweeten like those sold in the "cinema" compared to those available in the commercial shops (either nuts, chocolate,  cheese, colouring and etc). And since it is pretty easier to make "popcorn" at home using minimum ingredients and a cooking pot (or home type popcorn machine), we always "pop" some whenever we crave for them.


(serves: 4 | Preparation: 5 minutes | Cooking: 10 minutes)

Ingredients:
2 Tablespoons Vegetable Oil
1/2 Cup Corn Kernel

Caramel Sauce:
1/4 Cup Honey
1/4 Cup Golden Syrup
3/4 Cup Caster Sugar
100g Butter Chopped


Method:-
1. Line a big baking tray with baking papers, allowing 2cm overhang at long ends.

2. Heat oil in HCP(or any cooking pan) over medium heat. Add 2 - 3 corn kernels to test the heat. (Oil is hot enough when corn turns slowly in a circle)

3. Add remaining corn, cover and lock the pan(if using HCP). Shake pan gently when corn starts popping.

4. Remove from heat when corn stops popping. Transfer to a bowl and discard un-popped corn.

5. To make Caramel Sauce:- Clean the pan using kitchen paper towel after removing the popcorn. Place honey, golden syrup, sugar and butter in the pan. Stir and cook over very low heat for about 6 minutes or until sugar dissolved.

6. Next bring the mixture to boil without stirring for another 5 minutes or until light golden.

7. Work quickly, pour mixture over popcorn and stir to combine. Rest caramel popcorn in prepared lined baking tray to cool completely.

8. Break into pieces and served or stored in air-tight containers.


Although this recipe is done using Happy Call Pan (HCP) but you still can apply the same method using any heavy duty pan/pot to achieve the similar results. Have a lovely weekend everyone!!! Cheers!

Thursday 13 October 2011

{Giveaway plus Review} Easy Thai Cooking by Robert Danhi

Last month while lasing with Bee's Easy Chinese Recipes cookbook giveaway with Tuttle Publishing, Margaret from the team suggest if I would like to review Chef Robert Danhi's cookbook on Easy Thai Cooking. (more information at www.chefdanhi.com). I was thrilled and immediately accepted the offer because my family (especially my mum) love Thai cuisines.

In this post I would be sharing 3 dishes (with a complimentary recipes) which I have tried a few days back from Chef Robert's Easy Thai Cooking cookbook. With the step-by-step photos and sample recipes you can easily follow the preparation on these delicious dishes shown below.

Wednesday 20 July 2011

Chicken Karaage

Sorry for the lack of post(s) these few weeks because I was pretty busy with a few projects on hand. I would try to get all the draft post(s) published as soon as possible but to compensate, I have invited a few well-known bloggers to guest post(s) some of their home-style dishes and bakes.

Today's let put our hands together and welcome Nami from "Just One Cookbook". I know Nami through her comments on my blog a few months back. From her blog link I also get to know her better as well as exploring her wonderful recipes collection on her home-style Japanese Cuisines. She is also the one who help me to look up recipes on Japanese website regarding the Japanese Steamed Cake which I wish to learn more about it. Today I am so happy to invite Nami to Cuisine Paradise to share her classic “Chicken Karaage” recipe with us and I sure you would like it as much as we do. Enjoy!

Hello readers of Cuisine Paradise! Usually, I’m just the same as you, a fan enjoying Ellena’s delicious creations. She was generous to invite me to contribute a recipe on her site so today I will share one of my family’s favorite Japanese dish, Chicken Karaage (鶏の唐揚げ) recipe. I am a dedicated visitor to Ellena’s site and her mouth watering photos always make me hungry. With her extensive library of recipes from around the world, I learned so much from Ellena and especially Chinese and Southeast Asian cooking techniques. Personally I’ve used multiple recipes from her site to feed my family lunch and dinner and her website has been a great inspirational resource.

Chicken Karaage is a classic Japanese fried chicken dish. It’s a very common Japanese home cooking recipe and many Japanese restaurants including Izakaya (Japanese tapas) offer it in many countries all over the world. You might also find them as a main dish in lunch teishoku (meal set) at restaurants or bento box (lunch box) you buy from Japanese supermarkets. Usually the chicken is marinated in a mix of soy sauce, garlic, ginger, and lightly coated with potato/corn starch mix, then finally deep fried. However, each family has different way of preparing it, and here is mine that my family loves.

I hope you enjoy my Chicken Karaage recipe and thank you so much Ellena for having me!


Chicken Karaage


Difficulty: Modearate
Cooking Time: 60 minutes (excluding marinade time)
Makes: 5-8 servings

Ingredients:
5-10 Chicken thigh fillets, cut into 2 inch pieces (make sure each piece is about the same size so it takes about the same amount of time to deep fry.)

Seasonings
¼ onion, grated
½ Tbsp. ginger (1.5 inch ginger), grated
2 cloves garlic, minced
1 egg yolk
2 Tbsp. cooking sake
1 Tbsp. soy sauce
1 Tbsp. sesame oil
1 tsp. salt
Freshly ground black pepper

¼ cup corn starch (Please adjust if necessary. If you use 10 chicken thighs, probably about ½ cup)

Oil for deep frying

A couple of lemon wedges
Ichimi Togarashi (Japanese red chili pepper flakes) (optional)
Green onion for garnish (optional)


Directions:
1. Put chicken in a Ziploc bag and combine all the ingredients for Seasonings in a bowl and mix all together.

2. Pour the Seasonings into the Ziploc bag and rub the chicken well with hands. Keep it in the fridge for at least 1 hour, preferably 3-4 hours.

3. In a wok, add oil to about half way full and heat it on medium high heat. When you put a chopstick in the oil and bubbles start to appear around the tip, the oil temperature is now around 180C (356F) and ready for deep frying.

4. When oil is ready, take out the Ziploc bag from the fridge and transfer the chicken into a bowl and discard the marinade (liquid). Then add corn starch and mix quickly. You don’t need to mix it evenly (as you see in the picture below). The uneven coating gives each piece its unique texture.

5. Place each piece of chicken separately into the oil. Do not overcrowd the wok, fry maximum 5 pieces at a time. If you put a lot of chicken in the oil, the temperature will drop quickly and chicken end up absorbing too much oil. Make sure the oil temperature stays around 180C (356F) at all time.

  1. Deep fry for 90 seconds.
  2. Transfer the chicken onto a wire rack (if not, paper towel) to drain the oil for 4 minutes,
  3. Deep fry again for 45 seconds, or until golden brown.

Transfer the chicken onto a wire rack to drain the oil. Before you start the next batch, skim/remove leftover crumbs from the oil in order to keep it clean.

6. Serve the chicken with lemon wedges. Squeeze the lemon right before you eat. You can dip in Ichimi Togarashi if you enjoy spicy chicken.


For more Japanese home-sytle recipes, you can refer to Nami website at Just One Cookbook for more recipe ideas.


Tuesday 12 April 2011

[Gyoza Mold Giveaway!!!] 3 Ways of Eating Dumpling or Wonton

Continue from the previous post on the "Steamed Dumplings with Assorted Vegetables". Here I will be giving away a set of "Gyoza Mold" which you can use it to wrap either Japanese Gyoza or Chinese Dumpling/Wonton. This is a handy and easy to use mold by just placing a gyoza or wonton wrapper on top of the press (mold), add in fillings, close and press tight to form a perfect sealed gyoza or dumpling.

If you are interested to win a set of this "Gyoza Mold", just leave your Name and which type of dumpling you prefer (steamed, pan-fried, boiled  or deep-fried) "I love xxxxx" in the comment box and I will pick one TWO Lucky winners on Tuesday, 19 April 2011. Do check the result after Noon, 19 April.


For this Dumpling/Wonton post, I will be sharing another two different ways of cooking dumpling/wonton dish which you could try it out anytime at home. First let's take a look at this "Chicken Dumplings with Chili Oil - 紅油抽手". This is one of the common dumplings dish that you can easily order from most Chinese Ramen and Steamed Bun Restaurants. Usually the ingredients are shrimp and pork mince that are wrapped in thin layer of handmade dumpling skin and serve with the unique spicy chili oil sauce.


CHICKEN DUMPLINGS WITH CHILI OIL - 紅油抽手

Ingredients: (makes 10 Dumplings and 15 Wonton)
150g Mince Chicken Meat
20g Carrot, finely chopped/grated
2 Shallots, finely chopped
3 Fresh Water Chestnut, skin remove and finely chopped
1/2 Tablespoon Chopped Spring Onion

Seasonings:
1/2 Tablespoon Light Soy Sauce
1 Teaspoon Sesame Oil
1 Teaspoon Cooking Wine
Dash of Fish Sauce, optional
Dash of Pepper
1/2 Teaspoon Cornflour


Method:-
1. Put all the ingredients in a medium bowl, mix well with seasonings and marinate in the refrigerate for at least 20 minutes or more.

2. Refer to the photo above, place 1 piece of round dumpling wrapper on the gyoza mold, top with meat fillings, close and press tight to form a perfect sealed dumpling.

3. Repeat the same process and makes about 10 dumplings using the gyoza mold.

4. Next bring a pot of 1.5 litres of water to boil with 1/2 teaspoon of oil. Slowly drop in the wrapped dumplings and cook over medium heat.

5. Once the dumplings float on the surface, lower the heat and continue to simmer for another minute. Remove the cooked dumplings and place it in a bowl of water to stand for another 1 minute.

6. Drain well and place the cooked dumpling in a serving plate. Drizzle some sesame oil then pour over the prepared spicy chili oil and top with some extra chopped spring onion and serve.


I use the Lao Gan Ma(老干妈) Chili Flavoured Oil(油辣椒) which you could purchased from either Sheng Siong(昇菘超市) or any provision shop in the wet market to create this Spicy Sauce for my dumplings.(Price:- range from S$1.95 - S$2.50)

Spicy Chili Oil Ingredients:-
2 Tablespoon of Lao Gan Man Chili Flavoured Oil
80ml Hot Water
1/2 Teaspoon Sugar
1/2 Teaspoon of Vinegar, optional

Method:-
1. Using a microwave safe bowl, reheat the chili flavoured oil on medium heat for about 1 minute or until warm through.

2. Dissolve 1/2 teaspoon of sugar in 80ml of hot water then add it into the prepared chili oil (add vinegar if using) and stir till well combine. Set aside.


Chicken Dumplings With Chili Oil - 紅油抽手


These fried Wontons will definitely be a great finger food or snacks during party or gathering and it goes well with cool icy beer too. You can prepared these ahead by wrapping the dumplings and keep them in the fridge for a few hours or a day before cooking. And these can be a very addictive finger food too... so beware!


DEEP-DRIED WONTONS

Method:-
1. Prepare the same fillings using the above ingredients shown for the dumplings.

2. Refer to the photo above, place about 1 teaspoon of meat filling in the middle of the square wonton wrapper.

3. Brush some water on the top 2 corner of the wrapper, fold it into half to form a triangle.  Pull the 2 edge below to form a diamond shape by sticking the two edge together.

4. Repeat the process to make about 7 Triangles and Diamond shape wontons.

5. Preheat a pot of oil and deep-fried the prepared wonton on medium heat till golden brown, remove and drain well.

6. Serve with desire dipping sauce.


With a little effort done, you can whipped out two homecook dishes by just using one prepared meat fillings. Isn't this wonderful! I am sure your family will loves these quick and simple dish. If spicy food is not your choice, you can always replace it with just light soy sauce.

Non-Spicy Sauce Ingredients:
3/4 Tablespoon of Light Soy Sauce
80ml Hot Water
1/2 Teaspoon Sesame Oil

Method:-
1. Mix all the ingredients together and pour over to the cooked dumplings.


Total cost for these two dishes is about S$4.00 with breakdown shown below:-
Cost of Ingredients:
~ 150g Mince Chicken Meat = S$1.50
~ 3 Water Chestnut = S$0.50
Wonton Wrapper = S$1.00
~ Carrot, Spring Onion, Shallot = S$0.50
~ Chili Flavour Oil = S$0.50


Updates: I am so happy that many of you are interested in this "Gyoza Mold". So in order to increase the chance of winning, I will be giving away "2 Sets" instead of 1 to "2 Lucky" winners. Good Luck, everyone!


GIVEAWAY RESULTS!!!!!


GIVEAWAY RESULTS ARE OUT!
Are you the Lucky One!!!!!

Monday 4 April 2011

Chicken And Mushroom Salad Cups using YIFON Bottled Mushrooms plus Recipe Booklets

From a glance at this photo does it reminds you on something similar to the "Nonya Kueh Pie Tee" which is usually filled with shredded turnips, carrot, hard boiled egg, chopped peanuts and etc. Here instead of  using the traditional Kueh Pie Tee shells, I replaced it with "Sui Gow Wrappers" that are baked in mini muffin tray to form a small shell cases.

With a twist from the traditional way of making Kueh Pie Tee, I used boiled shredded chicken breast meat with some YIFON bottled mushroom, tossed the mixtures together using some refreshing lime juice, cut chili and chopped peanuts.

Friday 18 March 2011

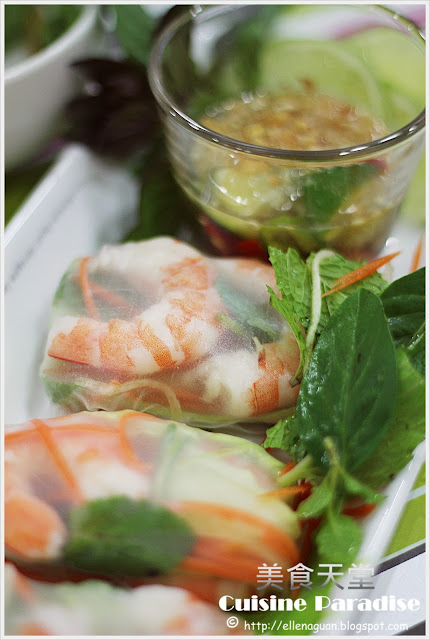
Vietnamese Spring Roll (Gỏi cuốn)

In Vietnam there is a non-fried and refreshing spring roll known as "Gỏi cuốn" which include ingredients such as boiled or fried pork, shrimp, chicken, fresh herbs, lettuce, cucumber, rice vermicelli and etc. All the ingredients are all wrapped in moistened rice paper and eaten with a cold dipping sauce.

Here is my version of preparing this Vietnamese Spring Roll using cooked prawns, vegetables and fresh herbs.

Ingredients: (makes 6 rolls)
6 Sheets of Large Vietnamese Rice Paper
12 Medium Cooked Prawns, shell removed
1/2 Medium Carrot, peeled and julienned
1 Small Japanese Cucumber, peeled and julienned
24 Mint Leaves
Handful of Thai Basil Leaves
Some Lettuce Leaves, tear into small portion


Method:-
1. Fill a large dish or bowl with warm water, soak each sheet of rice paper for a second or two then transfer to a slightly damp cotton dish towel.

2. To assemble, arrange 2 cooked prawns, carrot, cucumber, lettuce, 2 mint leaves and some basil leaves at about 1/3 of the way from the edge nearest you.(refer to the photo above)

3. Roll from the edge nearest you and tuck in the sides as you go near to the other end. Carefully not to tear the wrapper with too much strength.

4. Serve whole or diagonally cut in half with dipping sauce.


There are a few ways to prepare this dipping sauce for the Vietnamese Spring Roll but here we love this version without minced garlic and instead I add in some chopped peanuts to enhance the flavour and texture.

Ingredients For Dipping Sauce:
2 Tablespoon Lime Juice
1 Tablespoon of Fish Sauce
60ml Hot Water
1 Teaspoon of Caster/Brown Sugar
1 Small Red Chili, seeds removed and slices
1 Small Green Chili, seeds removed and slices
1/2 Tablespoon of Chopped Peanut, optional


Method:-
1. Whisk together all ingredients until sugar is dissolved. Set aside.


Although this might seems a bit troublesome to prepare as it used many ingredients as an appetizer or salad but trying it can be worth for getting away with our usual food routine. For this you can use all kind of vegetables according to your preference and if you do not like the taste of raw herbs, you can omit them in this recipe too. Moreover eating this Vietnamese Spring Rolls can be lots of fun too as you can mix and match the ingredients, wrap it and enjoy a light and refreshing meal while chatting with group of friends around the table. 


Tuesday 18 January 2011

Baked Sweet Chili Chicken

Continue from last week Philips, MyKitchen (www.philips.com.sg/kitchen) recipe post on the "Red Cabbage Salad with Filet of Duck Breast", this week I would like to share with you this super quick and simple Sweet Chili Chicken which is perfect for BBQ function or served as finger food during party.


Sweet Chili Chicken Mid-Joint


Preparation Time: 60 Minutes                  Cooking Time: 25 Minutes

Ingredients: (Makes 10 Mid-Joint)
1/2 Tablespoon honey
2 Tablespoons Sweet Chili Sauce
1 Tablespoons Soy Sauce
10 Chicken Mid-Joint Wing

For working mothers who don't have the luxury of time to spend an hour marinating the chicken. The quicker way would be doing it the night before or spending around 5 - 8 minutes in the morning preparing it ahead and leave them in the fridge till evening time.

Method:
1. In a large bowl, mix together the honey, sweet chili sauce and soy sauce.
2. Place chicken mid-joint wings into the bowl. Cover and refrigerate at least 1 hour.
3. Preheat oven to 180 degree on grill function, arrange the mid-joint wings on baking tray and bake for about 10 minutes.
4. Turn the wings over, baste with marinade and continue to bake for another 10 minutes.
5. Adjust the oven to 200 degree fan-forced mode on upper and low heat, bake for the last 5 minutes to achieve the golden and char-grilled colour.


ORIGINAL RECIPE FROM PHILIPS (MyKitchen):

Sweet Chilli Chicken Drumsticks


Preparation Time: 60 Minutes                  Cooking Time: 20 Minutes

Ingredients: (Makes 12 Drumsticks)
1 Tablespoon honey
5 Tablespoons Sweet Chili Sauce
3 Tablespoons Soy Sauce
12 Chicken Drumsticks

Method:
1. In a large bowl, mix together the honey, sweet chili sauce and soy sauce. Set aside a small dish of the marinade for basting.
2. Place chicken drumsticks into the bowl. Cover and refrigerate at least 1 hour.
3. Preheat barbecue for medium high heat.
4. Lightly oil the barbecue cooking grate. Arrange drumsticks on the grate and cook for 10 minutes per side, or until cooked through.
5. Baste frequently with the reserved sauce during the last 5 minutes.


With such a quick and easy recipe above I am sure you would like to explore more recipes from Philips MyKitchen at www.philips.com.sg/kitchen for coming Chinese New Year too. Stay tune for more recipe idea from MyKitchen on next week post which I would share a recipe for a delicious dessert.


Friday 10 December 2010

CP Food's Latest "Chicky" Products

Recently I have shared post on how to use some CP Thai Shrimp Cake to prepare 4 quick and easy finger food and one dish meal recipes. If you are interested to read more about this releated post, you can the link HERE. As for this post I would once again loves to share with you some simple ways of preparing different type of CP Chicken Products in less than 30 minutes.

These are the colleage photos of the ingredients and steps to prepare the "Claypot Chicken Rice".

Ingredients: (Serves 2)
6 - 8 Pieces of CP Charcoal-Grilled Chicken
160g (1 Rice Cooker Cup) Uncook Rice
320ml Water
Some Baby Bok Choy
1 Egg, optional
1 Teaspoon Sesame Oil
Dried Shallot and Chopped Spring Onion for Garnishing

Method:
1.Rinse the uncooked rice with tap water for a few rounds, drained well and add in suitable amount of water to cook the rice.
2. Place the claypot with rice over the stove, bring it to boil and low the heat to simmer the mixture till the water is half way dried off.
3. Next place the frozen CP Charcoal-Grilled Chicken starts from the middle and some baby bok choy along  the side.
4. Use can use two leaves from the bok choy to act as a base to support the egg before cracking it onto the rice.
5. Drizzle 1 teaspoon of sesame oil over the top of the vegetable and egg then cover and let it continue to simmer on very low heat for about 5 - 7 minutes till the chicken is heat through and egg is half way cooked.
6. Serve warm with dried shallot, chopped spring onion and drizzle of dark soy sauce according to your preference.

Note:-
~ You can also cook this dish using rice cooker. Just cook the rice as per usual then place the ingredient on top of the half-way cooked through mixture and let it cook and keep warm the the chicken is warm through.


This soft and tender CP Charcoal-Grilled Chicken is marinated in a distinctive Japanese-style sauce and slowly grilled over real charcoal fire. These pieces of charcoal grilled chicken is made using quality chicken leg meat that contins 0 Trans Fat and most important fact it contain no preservatives which most parents like us concern of.

This is one of our quick and easy one-dish meal for lunch busy busy weekends where my kid needs to rush for enrichment classes or when I am too lazy to cook 2 - 3 courses meal. So with a pack of these delicious and charcoal-grilled chicken you can either use it for making claypot rice like me or, microwave it till done and served with blanched noodles will be a great deal too.

This small bite-size CP Chicken Cake makes a great finger food for parties or gatherings which is easier for the guest to pick up and go. The ingredients of these chicken cakes consists of minced chicken meat and corn bits as well as some stands of vermicelli for extra crunch. You can either deep-fried, oven toast or microwave it but for me I prefer pan-fried which used lesser oil but it would give it a nice golden coating.

To have something refreshing to go with the Chicken Cake I came out with some "Century Egg Salad" which goes pretty well with it.

Ingredients: (Serves 2)
1 Century Egg, cut into small cubes
2 Small Shallot, thinly sliced
1 Small Red Chilli, roughly chopped
1 Medium Tomato, cut into small cubes
1/4 Japanese Cucumber, cut into small cubes
1/2 Tablespoon Frozen/Fresh Corn Kernels, optional
1 Teaspoon of Oil

Method:
1. Preheat a small saucepan with 1 teaspoon of oil and sauté the sliced shallot and chopped chilli till fragrant.
2. Toss in all the rest of the ingredients and give it a quick stir to heat them through.
3. Remove from heat and serve warm together with the Chicken Cakes.


Do you like fried chicken? I am sure most of you would rise up your hands and say yes. There are so many fried chicken fast food outlets around such as "KFC", "Wendy", "Popeye Chicken" and etc. But what about those frozen Fried Chicken that available in the local supermarkets, have you ever tried them before? Here, I have use the CP Fried Chicken (Original Flavour) to prepare this cute little "Chicky Bento" which I personally think that these fried chicken pieces taste just as good as those selling in the fast food outlets. For more details about this Chicky Bento, do check back for the upcoming recipe soon.


ShareThis