Sunday 20 August 2006

Rice With Durian

Since young I had this habit of eating Durian with warm white rice. For some of you, you might share the same interest as me while for other you might think... Er.... "Durian and White"! Actually, it really taste great to eat durian with rice, especially when you had those top grade can creamy durian. Do give it a try if you happen to have rice and durian at the same time..... It taste as great as the Thai "Durian with Glutinous Rice" dessert.....Posted by Picasa

Friday 18 August 2006

Tracy's Special Homemade Dishes

Tracy is one of my best blogger friend and also the only one that I had mit up with so far. She is a very 
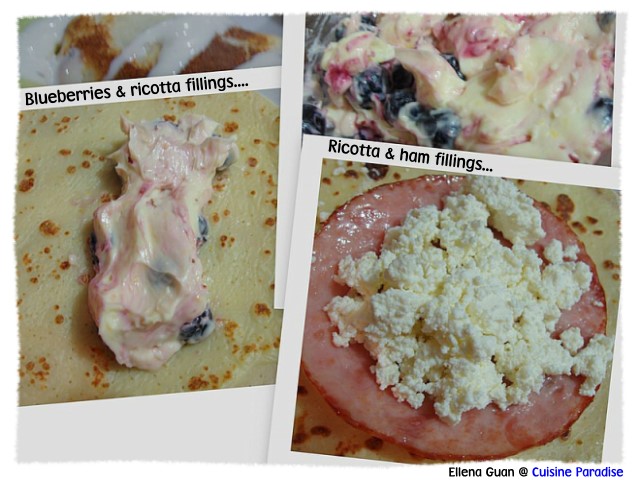
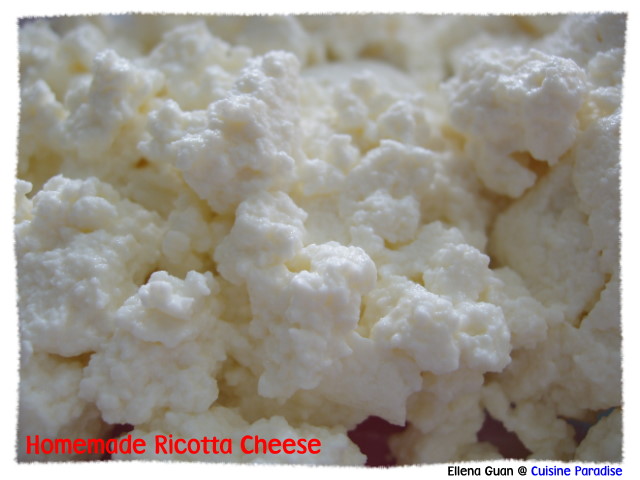
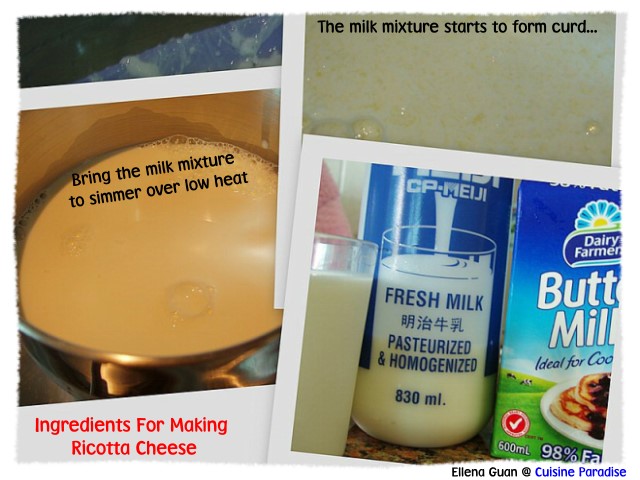
Enthusiastic person who always try out new recipes. She can even whip up a dessert late in the night or wakes up early in the morning to bake or prepare dishes. I really admire her way of doing things and she really encourage me a lot during my downtimes and pushing me trying all those interesting recipes. Like now, I do not need to buy any commercial ricotta cheese because she is the one who taught me how to make it. Thanks pal.

Recently I bought my son over to her house and she is really very warm hearted hosts who whip up a wonderful meal and dessert for us. We really appreciate it so after I came back, I decide to try cooking these two dishes which we had eaten at her place. The 1-2-3 Chicken Stew is a recipe that is pass down to her from her mum, it's a really easy and wonderful dish that everyone should give it a try. The original recipe contains only chicken or chicken with potatoes but I add in some greens and tomato to enhance the colour and give it some extra flavour.


1-2-3 Chicken Stew
Ingredients:
500g Chicken Pieces, cut into bite size
4-6 Cloves Of Garlic, finely chopped
1 Tablespoon Tau Cheong Paste, 豆酱
2 Tablespoons Sugar
3 Tablespoons Black Vinegar,黑醋
1/2 - 1 Teaspoon Dark Soy Sauce
1 Packet Of Sweet Peas,甜豆
1 Medium Potato, cut into small cubes
1 Small Carrot, cut into small cubes
1 Medium Tomato, cut into wedges
1/2 Cup Water

Methods:
1. Wash and clean the peas then saute it in a pan with some oil, garlic and half the tomato wedges for 1 minutes, dish and set aside.
2. Cut, wash and drain the chicken pieces then set aside.
3. Preheat the pan with 1 tablespoon of oil then saute the garlic, tau cheong paste, sugar and black vinegar until fragrant then add in the chicken pieces.
4. Stir-fry the chicken for about 30 seconds then add in the potato, carrot and tomato.
5. Next add in some water, cover and simmer the chicken for about 5 minutes till the potato and carrot are tender.
6. Lastly thicken the sauce with some cornstarch water and serve.

Notes:
I used 2 chicken drumsticks and 3 chicken wings.
You can use this recipe to cook pork ribs instead of chicken too.


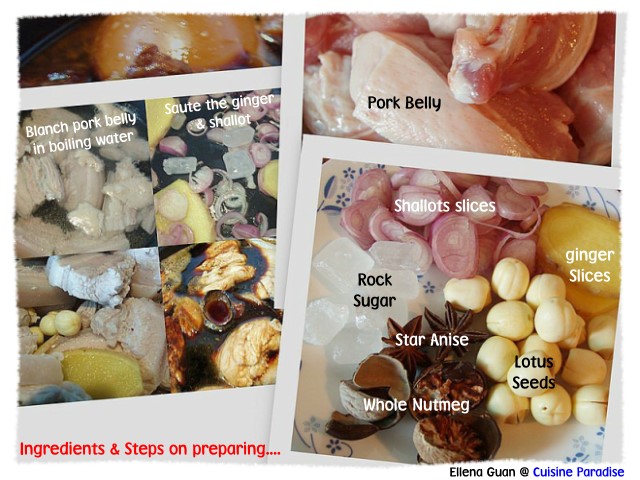
Other than the chicken stew, this is one of their family favourite dish which is the Stew Pork Belly. She aslo gave me some fresh whole nutmeg which I had never come across in Singapore. The whole Nutmeg looks similar like a chestnut which wrap in a shell.

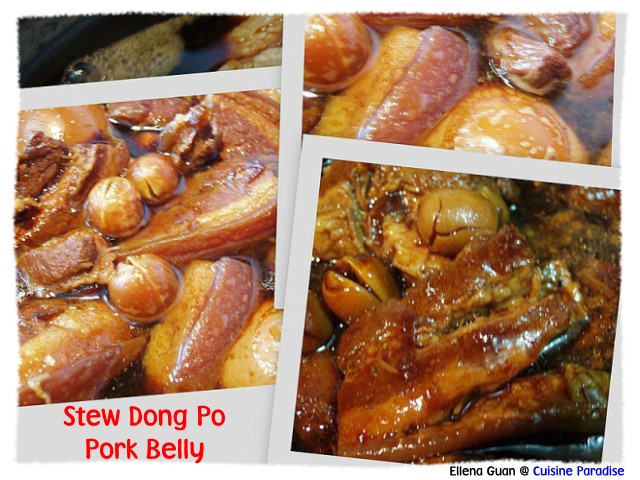
This stew pork belly dish is very different from those that I had eaten before. This fragrant of the nutmeg make this dish very refreshing and the taste is more towards the sweeter side rather than the salty pork belly that we eaten outside. For those who loves stew pork belly, maybe you can give this dish a try but you must be prepared because this is not a salty dish.

Stew Dong Po Pork Belly
Ingredients:
500g Pork Belly(三层肉), blanched and cut into 3 sections
3 Slices Of Ginger
2 Nutmeg(豆蔻)
2 Star Anise(八角)
20g Lotus Seeds(莲子), soaked till soft
6-8 Shallot, sliced
15g Rock Sugar
2 Tablespoons Dark Soy Sauce
200ml Rice Wine/Cooking Wine
200ml Water
Some Cornstarch water

Methods:
1. Wash and cut the pork belly strips into 3 sections then blanched in boiling water, drained and set aside.
2. Soak the lotus seeds in warm water until soft, drain and set aside.
3. Preheat a claypot with 1 tablespoon of oil then saute the ginger, shallot, star anise and nutnug until fragrant then add in the blanched pork belly and lotus seeds.
4. Saute the above for 1 - 2 minutes then add in dark soy sauce, rice wine and water.
5. Simmer the mixture over lowest heat until pork is tender and fragrant for about 3 hours.
6. Thicken the sauce with some cornstarch water and serve.

Note: You can add in hard boiled eggs or firm doufu according to your preference. Posted by Picasa

Monday 14 August 2006

Cherry Clafoutis

Saw this very interesting cherries recipe from Obachan's Kitchen. Since cherries are in season now, I decided to get some and try out this recipe. In the original recipe, they called for 1kg of cherries, but I only used about 500g and I already think that it's a lot.


As like what she had mention, she soaked her pitted cherries in Sherry. But for my case, I soaked them in Grand Mariner(orange liqueur) to make enhance the cherries favour in a better way.

Overall, this cake is very moist and soft. It had a slightly light almond scent fragrant because of the added almond essence. But for those who is not an almond fan, then I think you should omit it or else you won't like the scent of the cake.

In the recipe itself, it said used 1 cup of milk for the flour batter, but I only used about 1/2 cup because I found that my flour batter is already quite watery. So if you do want to try out this recipe, please add in the milk slowly and stir until an pouring cake batter consistency. Posted by Picasa


Friday 11 August 2006

Double Boil Herbal Chicken Essence

For those who had went thru the traditional confinement food, you might have try this Herbal/DOM Chicken Essence before. This soup contains pure chicken juice with herbs and DOM instead of water soup. It's a very "PU(朴)" herbal soup that not only suitable for confinement mum but also can be taken about once a month after the menstruation period.


The way I did my double boil is by placing another pot into the slow-cooker and switch to auto heat to cook. Because I am too lazy to stood by the side on and off to check the heat and water level for normal stove double-boil.

Ingredients: (serve 1 or 2)
I Black Chicken,黑鸡
1 Tablespoon Gou Qizi(枸杞子), reserve 1/2 tablespoon
4 Red Dates(红枣), reserve 2 red dates
1 Slice Of BeiQi(北耆), cut into 3 small pieces
3 Slices Of Dang Gui(当归)
1 Small Stalk Of Dang Shen(当参), cut into small 1"
1 Slice Of Huai Shan(淮山), break into 3 sections
40ml Of DOM Wine(法国廊酒), pour in after cooking 2.5 hrs

Methods:
1. Wash and trim all the fast and skin away from the chicken.
2. Cut into 4 sections and pound finely with the back of the knife. Keep aside.
3. Rinse and drain all the herbs then place it in the middle of the double-boil pot. Use a medium saucer or rice bowl to cover the herbs.
4. Place the pounded chicken pieces over the top of the sauce(refer to the picture above).
5. Lastly sprinkler the reserved qou qizi and red dates on top, covered and place it in the slow cooker.
6. Add enough boiling water to cover almost 3/4 or more of the double-boil pot then cook over low heat for approximately 2.5 hrs then open and drizzle the DOM evenly on the chicken.
7. Continue to cook for another 30 - 45 minutes. Serve immediately.

Notes: You can used either Kampung Chicken or Black Chicken for this soup. Posted by Picasa

Tuesday 8 August 2006

Pumpkin & Ricotta Cheese Pizza

Haha.. Another recipe using Ricotta Cheese..... You bet I love this Homemade Ricotta Cheese so much. It's really easy to make and taste great with all kinds of combination. This Pumpkin & Ricotta Pizza really taste something different from those usual cheese pizza. The texture of the crumb cheese is still visible after baking and it's taste just as good with those pizza filling, especially the sweet pumpkin.


Other than the Pumpkin Ricotta Pizza, I also made the ham, pineapple and Mozzarella Hawaiian pizza. This pizza base was abit different from what I had made before. This one is more thinner and with a very crispy crust.

Ingredients For Pizza Base:(makes 4 small pizza)
1 Teaspoon Active Dry Yeast
160ml(2/3 Cup) Warm Water
1 Teaspoon Of Sugar
270g(2 Cups) Plain Flour
Pinch Of Salt
1 Tablespoon Olive Oil

Methods:
1. Place the yeast, sugar and water in a bowl and set side until bubbles form.(about 5 - 10 minutes)
2. Add the flour, salt in a big mixing bowl, then slowly add in the yeast water and stir till water used up.
3. Next add in the olive oil and mix to form a dough and knead for about 10 minutes or until dough is smooth and elastic.
4. Place dough in a clean, oiled bowl, cover with cling wrap and allow to stand in a warm place for 30 minutes or until doubled in size.

Assemble:
Semolina For Dusting
1. Lay non-stick baking paper on the baking tray and dust evenly with some semolina(about half tablespoons).
2. Divide the pizza dough into 4 portion and roll out 2 – 3mm thick and place on the baking paper that dust with semolina.
3. Spread some base sauce and top with desire ingredients and bake in preheat 200 degree oven for about 15 minutes or till golden brown.

Notes:
I tried to use 200g Plain Flour and 70g Bread Flour instead of 270g plain flour from the original recipe.

Recipe from Donna Hay, Modern Classics 1Posted by Picasa

Monday 7 August 2006

Assorted Ricotta Crepes

Crepe is a thin pancake, a meal made of wheat popular throughout Europe and elsewhere. The common ingredients include flour, eggs, milk, butter and a pinch of salt. Crepes are usually of two types: sweet crepe made with wheat flour, and savory galettes made with buckwheat flour.

So for dinner, I decided to make both savory and Sweet Crepe using the Ricotta Cheese that I made. For the savory type, I wrapped honey ham with some ricotta and serve with some cherry tomato and avocado slices over some Caesar Dressing. While for the sweet dessert crepes, I used the filling with the mixture of some lemon juice, lemon rind, icing sugar, blueberries and some ricotta. Then I serve it with some melted dark chocolate and icing sugar.


Ingredients For Crepe: (make 8)
1 Cup Plain Flour
2 Medium Eggs
Pinch Of Salt
1 1/2 Cup Buttermilk/Fresh Milk
1 Tablespoon Cooking Oil/Olive Oil

Methods:
1. Lightly whisk the egg in a mixing bowl, then slowly whisk in the buttermilk till combine.
2. Add the salt and slowly add in the flour and whisk till all the flour had used all and the mixture is smooth without any dry ingredients.
3. Add in the oil and stir well.
4. Or you can blend all the ingredients in a food processor till combined.
5. Chill for at least 1 hour or you can prepare up to 1 day ahead.
6. Preheat and grease the pan, then stir the batter a while and scoop about 1/3 cup each time and swirl to fry into a thin crepe. Posted by Picasa


Homemade Ricotta Cheese

Can you "Guess What Is This Cloud Like" thing in the picture? I bet you can't right, you might think that is the cooked egg white or some over whipped cream. Actually this is my 1st Homemade Ricotta Cheese which is introduce by Tracy base of her research on some blog sites.

Ricotta is an Italian cheese made from the whey which results when making cheeses such as mozzarella or provolone. The name "ricotta" means "cooked again" in Italian, referring to the second processing of the liquid to produce the cheese. Ricotta is similar in texture to cottage cheese though considerably lighter and is a key ingredient in cheesecake, lasagna and many cannolis. It is often served mixed with sugar, cinnamon and occasionally chocolate shavings as a dessert in Italian household

For those who is interested in trying out, you might take some reference from these blogs Lex Culinaria blog, Fias Co Farm, Ricotta Making. For my case, after some simple conversion and calculation, I starts trying on using small amount of milk and I made two different batches of ricotta cheese by using buttermilk and lemon juice separately. The finally result from using lemon juice is much finer and smooth compare to the buttermilk.


Ingredients: (make about 125g ricotta cheese)
120ml Buttermilk/55ml Fresh Lemon Juice
480ml Fresh Whole Milk

Methods:
1. In a small milk saucepan, simmer the fresh whole milk over low heat until around 90 - 95 degree.(you need to have a themometer that reads up to 100 degrees or more, if not you have to estimate the timing when you saw a lot of steam rising and it's almost going to boil)
2. Slowly add in the buttermilk or lemon juice and give it a gentle stir.(do not over stir it or you will break up the large ricotta pieces)
3. You will see very tiny white particles floating in the whey.
4. Remove the pot from the heat and set it aside, covered to rest undisturbed for about 15 minutes.
5. Line a big container or mixing bowl with muslin/cheese cloth.
6. Slowly pour the whole whey mixture into the prepared bowl and drained until the no liquid left on the cloth.(the more milk you used, the longer it will take to drain)
7. When it has drained, place the ricotta in a clean contain and you can keep it in the fridge for up to one week.

Notes:
You can season the ricotta with either salt or salt depending what you wanted to used it as.

You can use it for pizza filling, crepes or making ricotta cheese cake or muffin. Posted by Picasa


Wednesday 2 August 2006

Blueberry Cream Cheese Muffins

Em.... After seeing Evan making all sorts of muffins, I also having this mood of making some with reyon. So this morning, we made this for our breakfast. These mini muffins include some cream cheese, blueberry jam as a stuffing inside. So you can taste some extra cheesy and it's moist in texture because of some extra jam fillings.

It's really very easy to prepare muffins, but for this cream cheese muffin you need to do abit more of the wash-up. This recipe stated below can make 12 mini size muffins.

Ingredients:
145g Self-Raising Flour, sifted
50g Caster Sugar
50g Butter, melted and cooled
85ml Fresh Milk
1 Egg, lightly whisked
1/2 Teaspoon Vanilla Essence
75g Fresh/Frozen Blueberries
30g Cream Cheese, cut into small cubes
Some Blueberry Jam

Methods:
1. Preheat the oven to 200 degree, grease mini muffin pan or use disposable muffin cups.
2. Combine flour and sugar in a bowl, make a well in the center.
3. Whisk butter, milk, egg and vanilla essence in a jar or bowl.
4. Pour butter mixture into flour mixture, add blueberries and gently fold until just combined.(Do not over-mixed and there should be no trace of any dried ingredients)
5. Half fill muffin holes with mixture, top with cream cheese, 1/2 teaspoon jam, cover with some batter about slightly more than 3/4 full.
6. Bake for about 20 minutes, remove from oven and let it rest on tray for 5 minutes.
7. Remove and serve warm. Posted by Picasa


Assorted Hakka Abacus Seeds

This Hakka Abacus Seeds dish, where mashed yam is mixed with flour and shaped into round pellets that look like abacus seeds. The beads are usually stir fried with a simple sauce of minced garlic, shallot pork, dried shrimps, firm beancurd and shitake mushrooms.

My mother-in-law is a Hakka and she used to make this dish for us at least once a month. And after eating her version of abacus seeds, actually I had wanted to try it out very long ago. So after seeing the Pumpkin Abacus Seeds from MyCoffee blog. I decided to give this dish a try by making two different types of flavour in one go.


So for my Assorted Abacus Seeds, I had the traditional Hakka Yam beads as well as the Pumpkin beads from MyCoffee's blog. As for the side ingredients, I had include those that my mother-in-law used to put in. Finally, I had my own version of Assorted Hakka Abacus Seeds from Cuisine Paradise Kitchen......It tastes very Q and Spongy which my mum and hubby loves.....

Ingredients For Yam Abacus Seeds:(make about 30-35)
300g Yam, cut into small slices
100g - 150g Tapioca Flour
1/4 Teaspoon Pepper
1/4 Teaspoon Salt
1/2 Tablespoon Light Soy Sauce
2 Tablespoons Vegetable Oil
A Pot Of Ice Water

Methods:
1. Steam the yam slices until soft then mash it while still hot.
2. Slowly stir in tapioca flour till combined(you might not need all the flour, it all depend on the wetness of the mashed yam) then add in the rest of the seasoning and oil and knead into a smooth dough.
3. From small round balls and make a dent in each one with your thumb to from the abacus seed shape(about 2cm wide) and set aside.
4. Bring half pot of water to boil then cook the beads until float, remove and plunge into the pot of iced water(this is to stop the cooking process of the beads and make it more Q and spongy) for 1 - 2 minutes then drained and set aside.

Notes:
Do not put too many beads into the boiling water at one time, allow some room for them to float around.

Used the same ingredients and methods for the Pumpkin beads, replace the yam slices with pumpkin slices and you might need more tapicoa flour(about 200g-250g) because mashed pumpkin contains more moisture than the yam.

Ingredients For Side Fillings: (enough for 50-60 beads)
300g Pork Mince/Belly Pork
2 Pieces Of Small Firm Beancurds, shredded
4 Dried Mushroom, soaked till soften
50g Black Fungs, soaked till soften
50g Dried Shrimps, soaked till soften
5 Cloves Garlics, finely chopped
4 Shallots, finely sliced
Sauce:
100ml Of Water, from soaking mushroom
1/2 Teaspoon Chicken Stock Granules
1/2 Teaspoon Dark Soy Sauce
For Garnish:
1 Stalk Spring Onion, finely chopped
3-4 Small Chillies, finely sliced
1 Tablespoon Dried Shallot
Some Pepper

Methods:
1. Marinate the pork minced with 1 Tablespoon Fish Sauce, 1/2 Tablespoon Sesame Oil, 1/4 Teaspoon Pepper and 1 Teaspoon cornstarch, set aside in the fridge to marinate for about 30 minutes or more.
2. Shredded the soaked mushroom(reserved the water), black fungus and lightly pound the dried shrimp and set aside.
3. Preheat the pan with some oil then saute the shredded beancurd until golden brown, drained and set aside.
4. Add about 2 Tablespoons Of Oil in a pan, add in the sliced shallots and saute until slightly golden brown, add in garlic and pork mince.
5. Saute the pork until almost cooked then add in mushroom, black fungs, dried shrimp and continue to stir until fragrant and cooked through.
6. Next add in the beancurd and sauce upon boiling add in the cooked abacus beads and simmer for another 2 minutes on low heat.
7. Serve hot with garnish. Posted by Picasa

Tuesday 1 August 2006

Hot & Fragrant Snapper

This is a very fragrant and appetizing dish that Tracy had introduce to us. It taste sort of like those Thai dishes because of the lime, kaffir lime leave and fish sauce. You need to blend all the ingredients to create a marinade sauce for the fish and allow it to marinate for a while before grilling it.

For my case, I used White Snapper fish and place it on some banana leaves and grilled until done. You had to serve this dish hot so that the aroma of the marinate will be great on the fish.


Ingredients:
2 Large Fresh Chillies, Roughly Chopped
5 Shallots, Peeled
5 Garlic Cloves, Peeled
2 Tablespoons Lime Juice
2 Tablespoons Thai Fish Sauce
1 Tablespoon Palm Sugar Or Molasses
4 - 6 Kaffir Lime Leaves, Rolled Into Cigarette Shapes And Finely Sliced
1 Trout, About 450g Each, Cleaned

Methods:
1. Wrap the chillies, shallots and garlic cloves in a foil package.
2. Place under a hot grill for 10 minutes, until the vegetables have softened.
3. As soon as the foil package is cool enough to handle, unwrap it and tip the contents into food process.
4. Mix the lime juice, fish sauce, sugar and lime leaves together.
5. Add 1 - 2 teaspoon of the lime juice mixture to the chilli mixture and blend till a paste.
6. Remove the chilli paste and stir well with the rest of the lime juice mixture.
7. With a teaspoon, stuff this paste inside the fish. Smear a little on the skin too.
8. Grill the fish for about 8 minutes on each side, until just cooked through.(the timing depends on the size and the thickness of the fish.)
9. Carefully lift the fish onto a platter. Serve with rice.

Notes:
I used 1 red and two green chilliles.(It all depend whether u want it to be hot or mild)
You can used any type of fish that you prefer like Seabass, Seabream or Snapper. Posted by Picasa

Thursday 27 July 2006

Prawn Pullao

Saw this easy to prepare one dish meal from Stefanie's Cumin & Coriander Blog where she introduce this Prawn Pullao recipe. It simple taste great with all those common spices that we can get from those Indian stall in our neighbourhood market area.


Instant of using basmati rice for this recipe, I just used the normal long rice grains that we commonly used at home. I can said the combination of spices for this dish was not very strong type, it's just nice for our family. And thanks to Tracy who introduce me to this web.....

Other than following the ingredients given from the site, I also add in some golden raisins to cook with the rice. Then upon serving, I spinkler some ready bought toasted cashew nut to increase the crunch of the dish. You can serve this with some chicken or mutton curry if you want so extra gravy to go with the rice.

Wednesday 26 July 2006

Assorted Sweet Potato & Red Bean Rice

Sometime rather than a bowl of plain white rice, you can actually come up with different combination of ingredients to make it more tasty and interesting. For eg: This Assorted Sweet Potato & Red Bean Rice. The sweetness and aroma of the sweet potatoes together with some crunch of the red bean will sure made you wants to have a few more spoonful of it.

Sweet Potato are rich in dietary fiber, vitamin A, vitamin C, and vitamin B6. Sweet potato varieties with dark orange flesh are richer in Vitamin A.


Ingredients:
1 Cup Uncooked Brown Rice Mixture/Rice
100g Sweet Potatoes
50g Red Bean, soaked till soften

Methods:
1. Rinse the rice accordingly and soak with the cooking water for about 30 minutes.
2. Rinse red beans in a few changes of water then put it in a small pan cover with water lever above the bean, bring to boil and switch off the heat when it boiled.
3. Let it soaked for about 10 minutes, pour away the water, rinse and repeat the cooking process for about 3 times.(this is shorten the process of cooking the red beans, as well as remove the raw taste and smell of the beans)
4. When it's time to cook the rice, wash and peel the sweet potatoes then cut it into small cubes.
5. Add all the ingredients into the rice cooker, add water and cook until done.

Notes: If you prefer you can add in pumpkin instead of sweet potatoes.Posted by Picasa

Monday 24 July 2006

Doggie Malted Cookies

Look are these cute little "Doggie Malted Cookies".... Isn't it too adorable to be eaten? Saw these cookies from MyCoffee's Blog and m4m forum(accordingly to the forum, you can on the link for the recipe). So after getting all the ingredients I decided to give it a try since the recipe mention it contains no Egg and Sugar.

I made two batches of these cookies base on the recipe given and come out to a total of 92 cookies for my son to bring to his playgroup class tomorrow. The process creaming and shape is rather easy, but the most time consuming part is the decoration on the eyes where you need to use the chocolate rice to stick on each cookie.

When you bite on the cookie, it's very crunchy and the fragrant of the horlicks really make it "Yummy"! I think this cookie recipe is good to be make together with your kids and I am sure it's a all time favour of both adults and kids. Even for my son and hubby who is very choosy on cookies ate 4 or 5 straight away when it's out from the oven.... :) Because it's really very irresistible when you start popping in one.

Tips:
For those who interested to make this cookies. Maybe you can take note of these:
1. Top Flour = Hong Kong Flour
2. You can wrap each individual 10g dough with chocolate chips filling first.
3. Upon finished the dough, then you take out the chocolate chips(from the fridge in case it melt) and add on the nose, then the eyes and lastly the ears.
4. When baking, it depend on your oven, so it might take more than 25 minutes to brown the cookies, do check after 25 minutes if still not ok, bake for another 5 - 10 minutes. Posted by Picasa


ShareThis