Thursday, 29 June 2006

Cranberries Cinnamon Roll

Opps! Another bread collection for Today's Breakfast. As I was making a batch of the Cranberries Cream Cheese Bread for my aunty, I decided to use half of the dough to make this Cranberries Cinnamon Roll. It's indeed very easy to prepare, just need to sprinkle some brown sugar and cinnamon powder to it.... so simple and yet so delicious........Sometime I think bread making is very simple and full of creative ideas, just as long as you get hold of the kneading process of the dough. Then with the dough, you can creative different kinds of bread according to your creation.

Ingredients: (make about 7 buns)
150g Bread Flour
50g Plain Flour
10g Milk Powder
30g Sugar
1 Medium Egg
½ Teaspoon Salt
1 Teaspoon Instant Dry Yeast
85ml Ice Water
25g Butter/Margarine
40g Dried Cranberries, finely chopped

Methods:
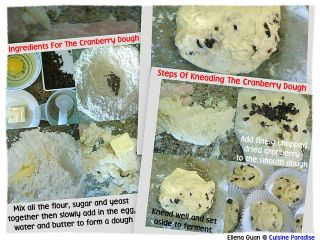
1. Mix bread flour, plain flour, milk powder, salt, sugar and dry yeast till well blended in a big mixing bowl.
2. Next add in Egg, and use finger to mix it well and slowly add in the cold water while you knead the mixture till combine then add in the butter and knead to form a pliable & elastic dough.(you might not need all the ice water, just add slowly while kneading so that it will come to a rough dough consistency then add in the butter)
3. This process may take quite a while, about 30 mins or so.
4. The dough will be wet & sticky at first (and kinda messy as well), but keep on kneading (without adding oil or water) until dough no longer sticks to fingers & is glossy on surface.
5. And if you're about to give up just like I did, DON'T!
6. When the dough is done, add in the chopped cranberries slowly and mix till well combine.
7. Place the dough in the mixing bowl, wrap it up and set aside in a warm place to allow dough to fermentate, approx. 45 minutes - 60minutess,(depend on the weather, or you can place it in the oven with a bowl of hot water beside it) the dough must at least double in size after fermentation.

For The Cinnamon Fillings:
1/2 Tablespoon Or more Cinnamon Powder
1 Tablespoon Brown Sugar
1 Tablespoon Soft Butter
1 Egg, lightly beaten
Some Almond Flakes

Methods:
1. Roll the fermented dough roughly into a 30cm by 25cm rectangle shape.
2. Spread a thin layer of butter on the dough surface and sprinkle some cinnamon powder and brown sugar evenly around the surface.(Adjust the amount by personal preference.)
3. Roll up the dough on the wider side downwards evenly, cut the rolled up dough into 6 or 7 equal parts.
4. Place the cut dough into paper mould with the cut surface facing upwards.
5. Leave it to continue ferment until it fill 80% of the mould.
6. Brush the dough with egg wash and sprinkle some almond flakes on the surface, you can spinkle some extra cinnamon powder if you prefer.
7. Bake in a preheat 180 degree oven for about 15 minutes or till golden brown, remove and set aside to cool. Posted by Picasa


Green Carrot & Cordyceps Soup

Last few weeks it seems abit difficult to find Green Carrot around my area. So when I managed to get hold of one yesterday, I decided to use it for this Green Carrot & Cordyceps Soup. With the Green Carrot and Cordyceps stem, this soup give up a very fragrant, refreshing and sweet taste which make you wanted to have a second refill in the soup bowl. You might want to give this a try during hot weather as it's a very good soup to clear the heats in the body.


Ingredients:
300g Pork Ribs(排骨)/2 Chicken Drumsticks
1 Medium Fresh Huai Shan(鲜淮山), around 200g
1 Medium Red Carrot(红萝卜)
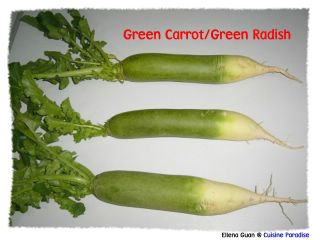
1 Medium Green Carrot/Green Radish(青萝卜)
1/2 Tablespoon Gou Qizi(枸杞子)
4 Red Dates(红枣)
2 Tablespoons Foxnuts(茨实)
1.5 Tablespoons Cordyceps Stems(干冬虫草)

Methods:
1. Wash and blanch the pork ribs in boiling water, rinse and set aside.
2. Wash, peel and cut the red carrot, green carrots and huai shan into thick sections.
3. Rinse the rest of the herbs ingredient and set aside.
4. Bring a pot of 1.5 litres of water to boil and add in all ingredients, boil on medium heat for 10 minutes then simmer on low heat for about 1.5 hours.
5. Or you can transfer to a slow cooker on Low heat and simmer for 2 - 3 hours.
6. Season with some salt or chicken stock cubes and serve warm.Posted by Picasa
This is the picture of Green Carrot/Green Radish. You can find it in most vegetable stalls in the wet market. It will give out a very refreshing and sweet taste when used to make soup.

Monday, 26 June 2006

Bacon, Mushroom & Cheese Tart

Make this Bacon, Mushroom and Cheese Tarts for my guest yesterday night dinner and everyone love it very much. The taste of the filling is just right and the case is very crisp and yummy. Thank Tazz for sharing this wonderful recipe.... Another test proof recipe from Tazz's kitchen.....

For my version, I actually pan-fry the chopped bacon in some olive oil for a while till fragrant then I spread it evenly onto the tart case itself. As I thought this might make the bacon more fragrant when bake..... Posted by Picasa

Vareniki Dumplings

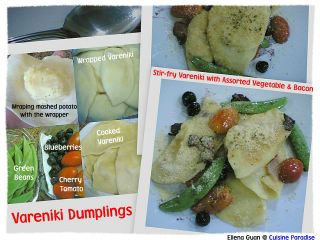
Made this as dinner for my friend who visited us yesterday. Wow..... You must be wondering what is "Vareniki Dumplings". You might have heard of Pork Dumplings, Shrimp Dumpling, Vegetable Dumplings or etc.... But what is Vareniki Dumplings?

Vareniki are square or crescent shaped dumplings of unleavened dough, stuffed with cheese, mashed potatoes, cabbage, meat or hard-boiled eggs or sometime with fruit filling. It's very popular in Russia as a quick-fix dish. During preparation, the filling is wrapped with dough, boiled for several minutes, and then covered with oil. So in another word, it is a Russian Dumpling just similar to our Asian Pork Dumpling but stuff with different filling and cooking method.


I come across this interesting recipe from one of blog that my friend Tracy introduce to me. It consists of alot of interesting recipes which Suyin records all her cooking adventure during her study in Australia. You can find the original recipe from her link which also include with a cooking video. For my version, I add in some extra vegetables, fruits and Parmesan cheese for extra colour and favour.

Ingredients For Dough: (make about 20 wrappers)
1 Cup Plain Flour, sifted
1 Teaspoon Salt
1/2 Tablespoon Olive Oil
1 Egg Yolk
100ml Of Drinking Water

Methods:
1. Sift the flour into a large mixing bowl, then stir in the salt.
2. Make a well in the middle of the dry ingredients and add the egg yolk and oil.
3. Using a wooden spoon, stir in the egg, gradually drawing in the flour. After a few minutes the dough will be too stiff to use a spoon and you will need to use your fingers.
4. Once all the flour has been incorporated, turn the dough out on to a floured surface and knead for about 3-5 minutes, until the dough is smooth and elastic.
5. If you find the dough is too wet, add a little more flour and continue kneading. But if the dough is too dry, then sprinkle some water and knead till smooth.
6. Cover with cling wrap and set aside for at least 15-20 minutes.
7. The dough is now ready, roll the dough out into thin sheet then use a round cutter(8cm) to cut into round wrappers.
8. Wrap each wrapper with 1 Tablespoon Of Potato mixture and repeat it with the rest of the wrappers.
9. Bring a big pot of water with 1 teaspoon of salt and olive oil to boil, then add in the wrapped dumplings.
10. Continue to simmer until all the dumplings floats up, remove, rinse with tap water and drain well. (put around 6 dumpling at a time, don't over crowded the pot)
11. Set aside for later use.

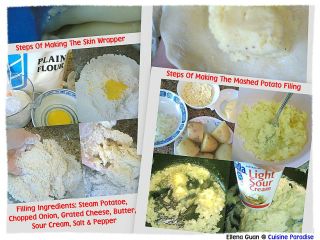
Potato Filling: (can make 50 dumplings)
3 Medium Size Potatoes
30g Soft Butter
1/2 Onion, finely diced
1/2 Cup Grated Mozzarella/Cheddar
2 Tablespoons Sour Cream
Some Black Pepper & Salt

Methods:
1. Wash the potatoes, cut into half then steam it for about 15 - 20 minutes until tender.
2. Scoop out the potato flesh into a mixing bowl then mash it with a fork until smooth.
3. Preheat a pan with butter then saute the diced onion till soft and fragrant.
4. Remove from heat, add in the mashed potato, and stir till combine, then add in cheese, sour cream, pepper and salt.
5. Continue to stir till all mixture is well combined then set aside for the wrapping.

Assemble:
50g Of Bacon, cut into slices
1/2 Packet Of Sweet Bean
6 Cherry Tomato
100g Blueberry, optional
Parmesan Cheese Powder
Extra Virgin Olive Oil

Methods:
1. Preheat the pan with 1 Tablespoons of Olive Oil, then saute the bacon until fragrant then add in the cooked dumpling in two batches.
2. Pan-fry until both sides are golden brown then remove and place on serving plate. Continua with the rest.
3. Add in some extra olive oil, then stir-fry the sweet bean and cherry tomato till fragrant then add in the blueberry and stir for another minute.
4. Remove and divide it evenly onto the top of serving dumpling then sprinkle with some extra virgin olive oil and Parmesan cheese powder and serve.

Notes:
The original Vareniki Dumpling is served with drizzle oil on top but for my version, I add in extra bacon, vegetables and cheese to give it more favour.

As for the left over potato fillings, you can either kept in the fridge for making a 2nd batche or you can make half of the recipe instead. Sometime it depend on the size of the potatoes or the amount of fillings you wanted to wrap. Posted by Picasa

Sunday, 25 June 2006

Meme - 10 Things I Miss of Mum's Cooking

Wow... never thought I had a chance to tag on this MEME game as well. I had read it from a few of the food blogger friends that I knew and I really find it very interesting. And now I am so surpised to be tag by Margaret(jingle26) for participating this.

But when it's my turn to write this Meme, it seems to be a lost. As I don't know how or where to start........ 10 Things... em..... since primary school till I grown up and get married, my mum had being working either morning/afternoon shift work so most of the cooking are done by my dad. So this Meme is sort of a bit hard for me to come out 10 items....lolz....but I will try my best.....


1. Haninese Chicken Rice - Since my mum is a Haninese she this is one of her Super Dish of the family. She used to cook it twice a month and the fragrant of the rice, the taste of the tender chicken and most of all the dipping chilli sauce.....all of these are so much better than those selling outside.

2. Haninese Pork Chop - Other than her Chicken Rice, this is one of her special dish that grandpa passed to her. It's their famous Haninese Pork Chop, it's so crispy outside and yet the meat is so tender and juice. Really miss those crunch, I used to fight those pieces of pork chop with my brother.

3. Salted Fish Meatball With Cabbage- This is another simple and easy soup that my mum used to cook. She will mixed the chopped salted fish with pork minced, marinate and shape it into round shape and cook with cabbage and fishball for soup.

4. Stir-fry Prawn With Oyster Sauce - I love this dish very much, and I often cook this dish when my friend come to my place and they loves the sauce to go with the rice.

5. Ngoh Hiang - Last time my mum only used to make this during Chinese New Year time, and her Ngoh Hiang is always the most popular dishes in the new year feast.

6. Steam Ji Dan Gao - My mum used to steam a few big bamboo basket of these steam egg cake before Chinese new year to pray the ancestors. Her steam egg cake is very fragrant and spongy which is very different from those selling outside.

7. Sweet and Sour Pork - One of the regular dish that my mum used to cook on weekend because my brother loves it so much.

8. Nonya Chicken Curry - My mum used to make her own curry paste instead of those instant pre-pack one that we are using now. I love to eat this with French loaf.

9. Soya Sauce Duck - I love the taste of the sauce and the duck meat is tender, it's so fragrant and not the oily. I always eat this with white porridge because it can actually bring out the taste of this dish.

10. Vegetarian Dishes - Since my mum is a Buddhism, she always prepare a few vegetarian dishes during the 1st day of Chinese New Year or during the 1st and the 15th day of the Luna Month.

Wow... finally I managed to list 10 things that my mum used to cook. Because since my dad had pass a way and we are all grown up and not around by her side. She don't really cook all these wonderful food anymore. :(

Now... I should let Pamy, and Shirley to tell you more about what they had miss on their mum's cooking.

Friday, 23 June 2006

Cranberries & Cream Cheese Bread

Since today is Friday and I am preparing a very simple dish for today's dinner. I took so time on and off during my son's afternoon naptime to prepare this Cranberries & Cream Cheese Bread. I used half of the previous dough ingredients that Evan suggested and add some dried cranberry in it. This bread is wonder with the cream cheese filling and some assorted jam spread on top. Although it might look complicated but it is indeed very easy to prepare.


Ingredients: (make 7 buns)
150g Bread Flour
50g Plain Flour
10g Milk Powder
30g Sugar
1 Medium Egg
½ Teaspoon Salt
1 Teaspoon Instant Dry Yeast
85ml Ice Water
25g Butter/Margarine
40g Dried Cranberries, finely chopped

Methods:
1. Mix bread flour, plain flour, milk powder, salt, sugar and dry yeast till well blended in a big mixing bowl.
2. Next add in Egg, and use finger to mix it well and slowly add in the cold water while you knead the mixture till combine then add in the butter and knead to form a pliable & elastic dough.
3. This process may take quite a while, about 30 mins or so.
4. The dough will be wet & sticky at first (and kinda messy as well), but keep on kneading (without adding oil or water) until dough no longer sticks to fingers & is glossy on surface.
5. And if you're about to give up just like I did, DON'T!
6. When the dough is done, add in the chopped cranberries slowly and mix till well combine.
7. Place the dough in the mixing bowl, wrap it up and set aside in a warm place to allow dough to fermentate, approx. 45 minutes - 60 minutes,(depend on the weather, or you can place it in the oven with a bowl of hot water beside it) the dough must at least double in size after fermentation.

Nowsday, you can find alot of bread with cranberry as one of the mixture from most bakery. Cranberries are a source of polyphenol antioxidants, chemicals which are known to provide certain health benefits to the cardiovascular system and immune system. By adding these chopped dried cranberries to the bread, it really gives a extra sweetness and crunch when eating.

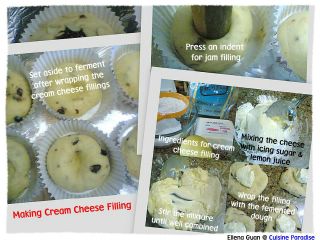
For The Cream Cheese Filling :
100g Soften Cream Cheese
20g Icing Sugar
1 Teaspoon Lemon Juice
1 Grated Lemon Rind

Methods:
1. Sift the icing sugar into a small mixing bowl, then add in the lemon juice and stir well.
2. Next add in the soften cream cheese and lemon rind and stir till well combined.
3. Set aside in the fridge for later use.

Theoriginall recipe actually coated the bread withdesiccatee coconut and top with some blueberries jam. But since I do not have any of those items at home. I replace it with some assorted nuts and jams that I found in my fridge. So this is my version of Cranberries Bread With Cream Cheese Filling.

For Decoration:
1 Extra Egg For Glazing
Some Almond Flake/Pumpkin Seeds
Some Assorted Jam

Methods:
1. Divide the fermented dough into 7 lumps of 60g each and leave the lumps to rise for another 20 minutes.
2. Wrap about 1/2 Tablespoon of the cream cheese paste with the lumps and shape into round balls.
3. Use a small rolling pin or your thumb to press an deep indent in the middle of the bun to place the jam filling later.
4. Leave the filled balls to ferment until they have double their original size(about another 20 minutes).
5. Brush the fermented bun evenly with some beaten egg wash and top with some jam fillings in the indent and sprinkle some almond flake or pumpkin seeds on the surrounding.
6. Bake in a preheated oven of 200 degree for 10 mins until well risen & golden brown.
7. Glaze buns with margarine while hot.

Notes: You can used any types of jam that you prefer for the top fillings. Posted by Picasa


Pork Chop La Mian-排骨拉面

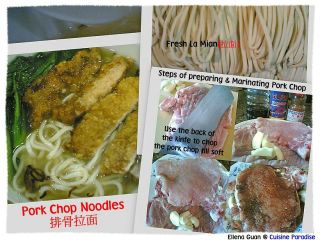
I always like to eat the 排骨拉面 from Crystal Jade Noodle House. So when I saw this similar recipe from one of the cookbook, I decide to give it a try. I bought the Fresh La Mian(拉面) from NTUC supermarket which can use to serve 3 - 4 person. This dish is very simple, just need to marinate the pork chop then deep-fry it and serve with soup noodle. It cost about $3.00 per bowl base on the ingredients used.


Ingredients: (serves 2)
2 Pieces of Big Pork Chop With Bone
1 Packet of La Mian(拉面)
A Few Stalks Of Xiao Bao Cai/Cai Xin(小白菜/菜薪)
600ml Of Soup Stock
Some Shallot/Sesame Oil
2 Tablespoon Sweet Potato Flour + 1 Tablespoon Cornstarch

Seasoning:
1 Tablespoon Cooking Wine
2 Tablespoon Light Soy Sauce
1 Teaspoon Sugar
3-4 Cloves Crush Garlic
1/2 Teaspoon Five-spice Powder

Methods:
1. Wash and chop the pork chop with the back of the knife to make it tenderize.
2. Marinate it with the seasoning for at least 30 minutes or more in the fridge.
3. Before deep-frying, coat it evenly with the flour mixture and set aside for 2 - 3 minutes.
4. Preheat the oil and deep-fry the pork chop in medium heat one at a time until golden brown and crisp.
5. Blanch the noodle in boiling water, then rinse with tap water to remove the starch on the noodles.
6. Then cook the noodles accordingly to the packet instructions.
7. Wash and blanch the vegetables in the boiling soup, remove and set side.
8. Place the cooked noodles in a serving bowl, top with blanch vegetables and deep-fry pork chop.
9. Pour over the soup stock and sprinkle some dried shallot, sesame oil and spring onion then serve.

Notes: You can use any types of noodle that you prefer. Or you can change the pork chop to pork ribs.Posted by Picasa

Thursday, 22 June 2006

Pumpkin & Assorted Bean Soup

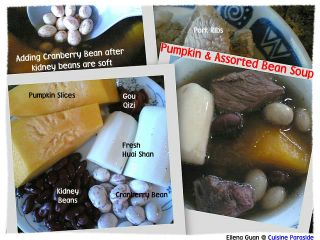
Remember the Cranberry Bean(click link for more details) that I had used for some of the soup recipes before. Today we are going to have another soup using these beautify peal bean together with some kidney beans and pumpkin to stew a wonderful soup of the day.

Kidney Beans-红腰豆
A dried kidney shape bean that is reddish brown in color, strong flavored and has a slight mealy (powdery) texture. The beans can be cooked as their own dish or can be added into other dishes, such as chili, casseroles, refried beans and salads. They are available dried or in cans, precooked. Kidney beans also provide large amounts of foliate and tryptophan. It also benefits the Spleen and invigorates the Stomach, expels Heat and Dampness. As with all dried beans, they should be sorted and washed before cooking. Soaking ahead of time reduces cooking time.


Ingredients:
1/4 Pumpkin(南瓜), about 300g
20 Pods Cranberry Bean(珍珠豆)
100g Kidney Beans(红腰豆)
300g - 350g Pork Ribs(排骨)
1 Medium Fresh Huai Shan(鲜淮山), about 200g
1/2 Tablespoon Gou Qizi(枸杞子)
1 Piece Of Dried Tangerine Peel, 陈皮

Methods:
1. Wash, trim and blanch the pork ribs in boiling water. Rinse and set aside for later use.
2. Wash, peel and cut the pumpkin into 4 large pieces.
3. Wash and soak the kidney bean for about 30 minutes, drain and set aside.
4. Soak dried tangerine peel till soft, then scrape off the pith.
5. Remove the cranberry bean from the pod, wash and set aside.
6. Bring a pot of 1.2 litre of water to boil, then add in all the ingredients except the cranberry bean, reduce the heat and let it simmer for about 1 hrs or until the kidney bean is tender then add in the cranberry bean and continue to simmer for another 20 minutes.
7. Or you can transfer the boiled soup to a slow-cooker and simmer on LOW heat for 2 hours then add in the cranberry beans and continue to simmer for another 30 minutes season with salt and serve. Posted by Picasa

Wednesday, 21 June 2006

Kapitan Chicken Curry

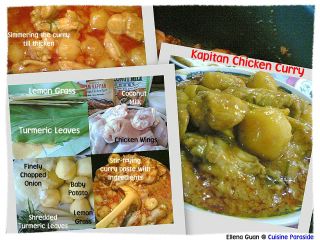
This Ayam Kapitan is a very special curry paste that I had not try before and it actually used Fresh Turmeric Leaves as one of the ingredients. It has a very refreshing and special aroma when the dish is done. When you taste the curry sauce, it has a lemon scent of the turmeric leave taste and it make the curry less greasy which I find is a new taste for those curry paste that I had tried before.


Ingredients:
1 Packet Ayam Kapitan Curry Paste
500g Chicken Wings
10 Baby Potato
1 Brown Onion, finely chopped
1/2 Cup Coconut Milk
1 1/2 Cup Water
1 Tablespoon Finely Shredded Fresh Turmeric Leave

Methods:
1. Wash and trim the chicken wings then set aside for later used.
2. Mix the coconut milk with 1/2 cup of water and stir well.
3. Preheat a pot with 1 tablespoon of oil and saute the brown onion until fragrant then add in the curry paste and stir till well mixture.
4. Next add the chicken wings and potato then stir till well coated with the curry paste and let it cook for a few minutes then add in the coconut milk mixture.
5. Stir well and when it boil, add in the water and let it simmer until the sauce is almost thicken then add in the shredded turmeric leaves and simmer for another 5 minutes and serve with bread or rice.

My mum got these instant Maggi Curry Paste from one of those shopping mall in Malaysia. So I think for those who usually visit the shopping mall over there, maybe you can try to take a look at these products and give it a try... it's very special and you don't find it in Singapore. Posted by Picasa

Tuesday, 20 June 2006

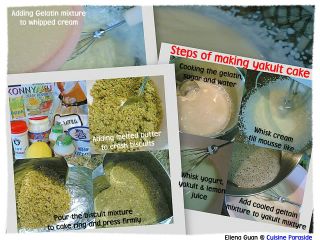
Apple Yakult Cake

Got this very interesting Chilled Yakult Yogurt Cake recipe from one of my new blogger's friend Tazz(click link for her original recipe). You might be wondering... Wow.. since when Yakult(it is a kind of fermented milk drink ) can used to make cake as well..... From her recipe, I change two of her ingredients which I had some left over from making a Cheesecake. So it's kind of adventure when you got something new in the original recipe because you might not know what can goes wrong.......

But luckily the cake turns out well and everyone enjoys it so much. The texture of the cake is sort of like Lily's(Hugbear) Peach Marshmallow Cake, but as usual some of the ingredients had being recipe for a different favour and texture. For my version of Apple Yakult Cake, I used the new Konnyaku Apple Favour Jelly for the topping instead...

Ingredients For The Base: (6"/7" cake pan)
7 Pieces Of digestive Biscuits
40g Melted Butter
Ingredients For The Filling:
100g Plain Natural Yogurt
150ml Yakult, apple flavour
1 Tablespoon Lemon Juice
150ml Thicken Cream
1 Tablespoon Gelatin
3 Tablespoons Sugar
150ml Water

Method:
1. Crush the digestive biscuit in a zip-lock bag until fine crumbs then mix with melted butter, and press firmly to the base of the cake pan, set aside in the fridge for later use.
2. Dissolve gelatin and sugar in 150ml of water in a saucepan over low heat, then set aside to cool.
3. Whisk plain yogurt, yakult and lemon juice until well blended then pour in the cooled gelatin mixture and mix well.
4. Whip the thicken cream till soft peak form.
5. Slowly fold in the yogurt mixture into the whipped cream and mix well.
6. Pour the combined mixture onto the chilled biscuit base and leave it in the fridge for about 2 hours or more to set.

Jelly Topping:
1 Teaspoon of Kiwi Seeds
1/2 Packet Of Konnyaku Jelly Powder, apple favour
250ml Water

Methods:
1. Soak kiwi seeds in 1 glass of water for 20 minutes and remove those that are floating on top. Drain and rinse on the sieve.
2. Fill a saucepan with 250ml of water, pour the jelly powder and soaked kiwi seeds in.
3. Switch on the heat and gradually stir the mixture until boil, upon boiling, remove from stove and stir till bubbles disappear.
4. When the cake is set, spoon the cooled jelly solution on the cake and refrigerate again.
5. Keep in the fridge for about 2 hours or overnight then remove from cake ring and cut into slices and serve.

Notes:
1. You can add some fruit slices on top if you prefer.....
2. You can used any favour of yakult and jelly powder that you prefer.
3. Even for the biscuit base, you can change to chocolate biscuit instead of digestive Biscuits.
Just try to explore and be creative with your end-products.


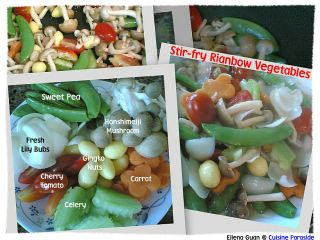
Stir-fry Rainbow Vegetables

RAINBOW vegetables...... For those who is a regular visitor of my blog, you will notice that I usually used a lot of colours in my dishes. That's because I love my food to be colour and presentable. For today's veggi dish, I used all common ingredients that is good and health for everyone in the family... I call it Stir-fry Rainbow vegetables because I used 7 different types of colourful vegetables for this. And it really gives different kind of texture when you chew in your mouth.


Ingredients:
10 Sweet Bean
2 Stalks Of Celery, cut into slices
1 Small Carrot, cut into slices
8 Gingko Nuts
5 Cherry Tomato, cut into halves
3 Fresh Lily Bubs, remove the petals
1 Packet of Honshimeiji Mushroom
2 Slices Of Ginger
1 Teaspoon Finely Chopped Garlic
100- 150ml Chicken/Vegetables Stock
1 Tablespoon Cornstarch + 1 Tablespoon Water

Methods:
1. Wash, trim and cut all the vegetables then set aside. (you can used cookie cutter to stamp shapes for the carrot and celery slices)
2. Remove the Honshimeiji mushroom from the packet, cut off the end stems and rinse with water, drain and set aside.
3. Preheat a non-stick pan with 1 tablespoon of oil then saute the ginger slices and garlic till fragrant then add in the sweet bean, carrot and celery to stir till combine for 1 minutes then add in the rest of the vegetables and pour in the stock.
4. Let it bring to boil and simmer for another minutes then thicken the sauce with cornstarch mixture and remove to plate.

Notes: Stir-fry vegetables on medium high heat and must be quick do not over cooked the vegetables or else the colour will turn dark and the texture will not be crunch.Posted by Picasa

Sunday, 18 June 2006

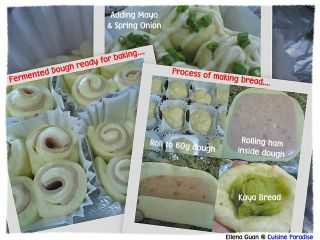
Homemade Assorted Bread

Saw this interesting and easy to make Bread recipe in one of my blogger friend Evan's blog. Her Ham Bread was very nicely done and it really give me an inspiration to try making this bread. I do a slight change on the sequence of adding certain ingredients based from another bakery book which will decrease the wetness and easier handling of the dough.

The most tedious part of making bread at home without bread machine is the kneading part. Because you had to knead at least 20 to 30 minutes until the dough is smooth, elastic and stick free from your fingers. So it's might not be a easy job if you thought of giving it up half way through.

But come to think about it..... When you can have homemade bread anytime with any fillings you prefer. It's really a wonderful things. Especially to fill the bread filling with the help of another family member or kids.... I am sure they will enjoy more of the bread which is done by them.

This recipe that Evan shares with us is really a very test-proof recipe. Since we can do it.... I am sure those who wants to try on this recipe will be able to do it as well... Just remember during the kneading process.. DO NOT GIVE UP.... Keep on kneading with your fingers without adding EXTRA FLOUR(which I used to do previously) or OIL..... I am SURE your dough will be ready within 30 minutes or less.... Do give it a try..... and I am sure you won't regards it....

Recipe taken from Evan's Kitchen Rantings.....
Ingredients: (make around 12 60g portions)
300g Bread Flour
100g Plain Flour
80g Sugar
1 Egg
1/2 Teaspoon Salt
2 Teaspoon Instant Dry Yeast
175ml Ice Water
50g Butter Or Margarine
For The Filling :
Picnic Ham
Spring Onions, Chopped
Mayonnaise(optional)
1 Beaten Egg, For Glazing

Methods:
1. Mix bread flour, plain flour, salt, sugar and dry yeast till well blended in a big mixing bowl.
2. Next add in Egg, and use finger to mix it well and slowly add in the cold water while you knead the mixture till combine then add in the butter and knead to form a pliable & elastic dough.
3. This process may take quite a while, about 30 mins or so.
4. The dough will be wet & sticky at first (and kinda messy as well), but keep on kneading (without adding oil or water) until dough no longer sticks to fingers & is glossy on surface.
5. And if you're about to give up just like I did, DON'T!
6. Place the dough in the mixing bowl, wrap it up and set aside in a warm place to allow dough to fermentate, approx. 45 minutes - 60 minutes,(depend on the weather, or you can place it in the oven with a bowl of hot water beside it) the dough must at least double in size after fermentation.
7. Use finger to press into the dough, it should show a clear finger tip mark but the dough should not sink and it's ready to use the dough.
8. Punch to release some air. Separate dough into individual 60g portions & refrigerate for about 10 mins.
9. Taking a portion of the dough out of the fridge, knead into a flat sheet just abit bigger than a slice of picnic ham.
10. Place ham on top of the dough and roll up.
11. Cut into 5 portions and place them onto a small round dish or flan tin.
12. Repeat steps 9-11 for the rest of the dough.
13. Leave on to fermentate for another further 35 mins.
14. Glaze with egg wash, drizzle with some mayonnaise & sprinkle with chopped spring onions.
15. Bake in a preheated oven of 200 degree for about 10 mins until golden brown. Brush top with margarine for a shiny glaze.

Notes: You can use the same dough for different kind of fillings: eg; red bean or green tea paste, curry chicken, hotdog or etc. Posted by Picasa


Bubor Terrigu - 椰浆大麦露

Bubor Terrigu(椰浆大麦露) is a local Singapore dessert that you can found in most of the dessert stalls in the hawker centre or foodcourts. It's actually wheat cook in sugar syrup then serve with some coconut cream.

Ingredients:
150g Terrigu(大麦)
90g Rock Sugar
100g Palm Sugar
100ml Thick Coconut Milk
Pandan Leaves
50ml Water
Pinch Of Salt

Methods:
1. Soak the terrigu for at least 3 - 4 hours with plently of water. Discard the water.
2. Boil the rock sugar, palm sugar in 50ml of water until sugar melts, sift and set aside.
3. Put coconut milk and salt in a saucepan, simmer over low heat and set aside to cool as topping.
4. Fill a large pot with 1.2 litres of water and add pandan leaves and bring to boil.
5. Add the terrigu, switch to low heat and cook the terrigu until tender and keep stirring to prevent mixture from sticking to the pot.(use non-stick pan is better)
6. Add water if mixture goes too dry, keep stirring and lastly add sugar syrup and cook for another 10 minutes.
7. For a thicker mixture, mix 1 tablespoon plain flour with 2 tablespoons water, stir in and bring to boil again over low heat and remove from heat.
8. Scoop terrigu into a bowl and add 2 tablespoons of coconut milk and serve. Posted by Picasa


Friday, 16 June 2006

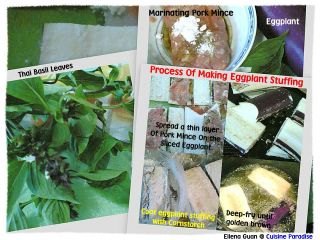
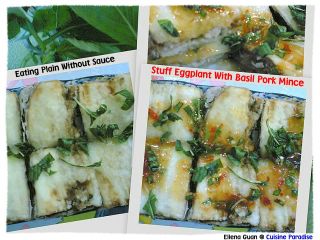
Stuff Eggplant With Basil Pork mince - 塔香茄子肉

Another dish of the week using Thai Basil Leave(click link for more details). It can be treated as finger food or appetizer because of it's light content. You can easily get hold of Thai Basil Leave(it with purple-red flowers and fresh green foliage which offers an intense licorice aroma) in those vegetables stall in the wet market. The one selling in the Cold Storage is Sweet Basil which had a bigger leave and it's fragrant and taste will be different from Thai Basil Leave.


Raw Eggplant has a somewhat disagreeable taste, but when cooked, becomes tender and develops a rich, complex flavour and firm texture. Salting and then rinsing the sliced eggplant can also remove much of its bitterness. This is a spongy, mild-tasting vegetable that's meaty yet low in calories. You can either sever it with or without sauce dressing. It's all depend on individual taste. As for the sauce dressing, you can click on the Thai-style Basil Salad for it's sweet chilli sauce dressing.

Ingredients:
1 Large Purple Eggplant(Brinjal) 茄子
50g Pork Mince
4-6 Leave Of Thai Basil Leave(九层塔), finely chopped
1/2 Teaspoon Sesame Oil
1 Teaspoon Soy Sauce
1/4 Teaspoon Pepper
2 Tablespoons Plain Flour
2 Tablespoons Cornstarch

Methods:
1. Wash and cut the eggplant into halve, then slice them length-wide thinly to about 0.5cm thick.
2. Soak it in some lightly salted water or else it will oxidize and darken in colour.
3. Marinate the pork mince with chopped basil leave, sesame oil, soy sauce, pepper and 1/2 teaspoon cornstarch and set aside.
4. Coat 2 slices of eggplant with some plain flour then sandwich it with a thin layer of basil pork mince.(do not put too much filling inside, otherwise it will not be cooked with deep-frying)
5. Continue to sandwich the pork mince with the rest of the eggplant slices then let them in the fridge to infuse the favour for about 30 minutes before deep-frying.
6. Evenly coat the eggplant stuffing with some cornstarch on both side of the eggplant slices(set it aside for a few minutes before deep-frying, so that the flour will stick to the eggplant) and deep-fry it in medium hot oil until golden colour.
7. Drain and set aside. Blanch some extra basil leaves in hot oil, drained and crash it on top of the eggplants and serve with or with sauce dressing. Posted by Picasa

Si Shen Dang Gui Chicken Soup - 四神当归鸡汤

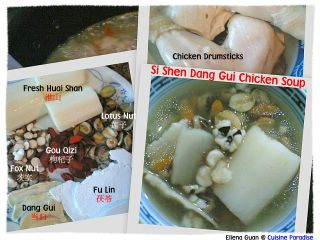
I think alot of people had heard or taken Si Shen Tang before. There are actually a few version of the ingredients. You can bought those pre-packed type from any supermarket or Chinese medical hall. The ingredients inside may vary and you can add in extra ingredients to suit your needs and taste.


For this Si Shen Tang of mine, I add in Fresh Huai Shan, Gou Qizi and Dang Gui(click link for more details) to make it more effective for the blood circulation. And the Lotus seed that I used is those type with skin. Lotus seeds are classified as astringents, being sweet and neutral, and benefiting the spleen, kidney, and heart. The sweet taste and nourishing qualities of the seed are responsible for the benefit to the spleen; this helps stop diarrhea associated with qi deficiency. The astringent quality helps prevent loss of kidney essence, so the seeds are used to treat weak sexual function in men and leukorrhea in women. The seed also has calming properties that alleviate restlessness, palpitations, and insomnia.

Ingredients:
2 - 3 Chicken Drumsticks
1 Piece Fresh Huai Shan(淮山), about 150g
40g Lotus Seed(莲子)
40g Chinese Barley(中国薏米),optional
20g Fox Nut(茨实)
20g Fu Lin(茯苓)
15g Slices Dang Gui(当归), about 5 pieces
1/2 Tablespoon Guo Qizi(枸杞子)

Seasoning:
1 Tablespoon Rice Wine
1/4 Teaspoon Salt

Methods:
1. Blanch chicken drumsticks in boiling water, rinse and set aside.
2. Rinse all the herbs, drain and add in the pot with about 1.5 litres of water and bring to bowl.
3. Peel the fresh huai shan, wash and cut into thick section then add into the water.
4. When it comes to boil, add in the chicken drumsticks and let it boil for 10 minutes on high heat.
5. Transfer to slow cooker and simmer on low heat for about 2 hours then season with salt and rice wine then serve hot.

Notes: If you just want normal plain si shen tang, then obmit the Dang Gui slices and Guo Qizi.Posted by Picasa

Thursday, 15 June 2006

Chocolate Cornflake Treats

Corn flake is a crisp, flaky, commercially prepared cold cereal made from coarse cornmeal. If you or your kids are going to eat sweets and treats sometimes, (sure you are!) try to make sure at least some are of nutritional value.

For this simple treats, you only required 2 main ingredients which is the corn flakes and dark chocolate. And you can decorate it with some almond flakes, or colourful sprinkler.

Eating more Dark Chocolate can help lower blood pressure -- if you've reached a certain age and have mild high blood pressure, say the researchers. But you have to balance the extra calories by eating less of other things. Dark chocolate may have better anti-oxidant properties than milk chocolate. So a little bits of this sinful treat once in a while is exceptional for all family members.

Ingredients:
100g Plain Corn Flakes
120g Dark Chocolate
10g Toasted Almond Flake/Colourful Chocolate Bits

Methods:
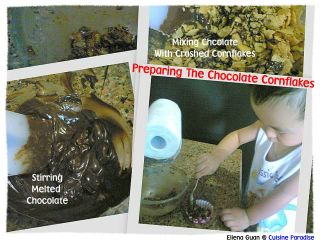
1. Put corn flake in a zip lock bag and use a rolling-pin to lightly crash it.(do not crush the corn flake till too mashy)
2. Double-boil the dark chocolate over a pot of simmering hot until melted or you can put in the microwave on high for 30 second stir and repeat the process until the chocolate is fully melted.
3. Add the corn flake into the melted chocolate and stir well using a spatula.
4. Spoon the coated corn flake into paper cups or ring mould then flatten the top with a spoon.
5. Decorate it with some almond fake or colourful chocolate bits, refridge for at last 20 minutes to harden before removing them from mould and serve. Posted by Picasa


Cottage Cheesecakelets

I believed most of us loves to eat Pancake, Waffle or Crepe. But had you heard Cheesecakelets before? I doubt you do....Right? Cheesecakelets is actually is a cake batter with cheese content that fried in a pan or on a griddle with oil or butter. It can be eaten hot or cold, and are generally filled or topped with a sweet or savoury sauce.

Cottage cheese is a cheese curd product with a mild flavor. It is drained, but not pressed so some whey remains. The curd is usually washed to remove acidity giving sweet curd cheese. It is not aged or colored. Different styles of cottage cheese are made from milks with different fat levels and in small curd or large curd preparations. Cottage cheese is low in fat and carbohydrates while high in protein.

Most types of pancakes are cooked one side at a time and flipped by the cook halfway through. The process of tossing or flipping them is part of the essence of the pancake, and one of the skills that separates the experienced cook from the beginner. Guess from the picture above you can see that I am a beginner for pancake......lolz.. because all the colour are so unevenly done......

Ingredients: (make about 8 -10)
3 Egg Yolks
3 Egg Whites
1 Cup Cottage Cheese(about 200g)
1/3 Cup Plain Flour(about 80g)
1 Teaspoon Vanilla Essence
2 Tablespoons Fine Sugar

Methods:
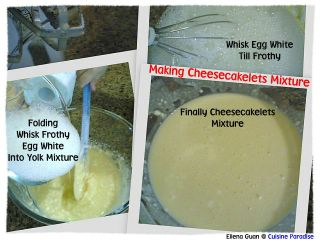
1. Mix egg yolks with fine sugar and beat till well combine.
2. Next beat in the cottage cheese and vanilla essence then fold in the sifted flour and stir till well combined.
3. Then in another bowl, whisk the egg whites until frothy(with a hand whisk) and fold it into the cottage cheese mixture.
4. Heat a smooth non-stick pan and drop a tablespoon or curd-thick batter on to it to make cakelets for about 3.5" in diameter.(you can use egg ring for different shapes)
5. When it firms up underneath, flip it and cook the other side.
6. Repeat until all the batter had being used up.
7. Serve with fresh fruit, whipped cream, lemon curd or jam. Posted by Picasa


ShareThis