Showing posts with label Japanese Cuisine. Show all posts

Friday 17 May 2013

Omurice and Pork Cutlet With Japanese Curry

Curry (カレー) is one of the most popular dishes in Japan and it is often make into Curry Rice (カレーライス), Curry Udon (thick noodles) and Curry Bun. The ingredients used for Japanese curry are vegetables like onions, carrots, potatoes and meat such as beef, pork, and chicken. Sometime you could also find Katsu-karē / Tonkatsu (カツカレー) which is a breaded deep-fried pork cutlet served with curry sauce too.

For this recipe I have combined 3 of our family favourite such as Omelette Rice, Japanese Curry and Deep-fried Pork Cutlet into one dish and we just simply love this dish even though we are having it second time for this week.


OMURICE AND PORK CUTLET WITH JAPANESE CURRY


Although we have a mad rushing week but finally the mid-year school examination has ended (on Thursday) and now we can start counting down for June school holidays. And also since I could not help my kid to sit for the exam, all I can do as a mum is to prepare his favourite food to shower my love and encouragement to him during this stressful week.

I know there are many mothers out there sharing the same thoughts as me during this stressful exam month but I believe we would get it through and enjoy the sweet moments with our kid(s) no matter how good or bad they scored for the exam.  After all family support and love are also one of the greatest secret to score well too. 


(Serves: 2-3 | Preparation: 10 minutes | Cooking: 25 - 30 minutes)

Ingredients:
  • 2 Servings Of Cooked Rice
  • 2 Pieces of Butterfly Pork Cutlets
  • 1/2 Cup of Breadcrumbs
  • Oil For Deep-frying

  • Japanese Curry
  • 3 Medium Potato, cut into 1" cubes
  • 1 Medium Carrot, cut into 1.5 cm chunks
  • 1 Medium Onion, diced
  • 100g Of Pumpkin, cut into 1.5 cm chunks
  • Half Chicken Breast Meat (optional), cut into chunks
  • 1/2 Tablespoon of Cooking Oil
  • 700ml Boiling Water
  • 3 - 4 Cubes of Japanese Curry Sauce Mix

  • Omelette Skin
  • 2 Eggs (55g each)
  • 2 Tablespoons of Fresh Milk

Method:-

For Japanese Curry:-
1. Saute diced onion with 1/2 tablespoon of cooking oil till soft and fragrance.

2. Stir in chicken breast (lightly marinated with 1/2 teaspoon each of light soya sauce, cooking wine, cornflour and dash of ground pepper) add cook for 30 seconds before adding in carrot and potato.

3. Give the mixture a quick toss, pour in 700ml of boiling water and bring it to boil. Lower the heat and simmer the mixture for about 7 minutes, add pumpkin and continue to cook for another 5 - 7 minutes until all the vegetables are cook to your preference.

4. Remove the pot from heat. Slowly stir in 3 - 4 cubes of Japanese Curry Sauce Mix till dissolved.

Tip:
~ I would advise you to taste the curry after adding the 3rd cubes and decide whether would you still like to add in either half/whole of the 4th curry cubes to suit your preference.

~ I use 2 curry cubes each from the above sauce mix so that the curry will taste better with the sweet and hot mixture, but you could also use just 1 type instead of two.

My boy loves this type of deep-fried pork cutlets which could be purchased from any of those Hainanese Scissor Cut Mixed Vegetables Rice Stalls in Singapore which cost around S$1.00 - S$2.00 each depending on it's size. For this quick recipe, I marinate the pork cutlet with egg and cornflour together with other seasonings and coat with a layer of dried bread crumbs before deep-frying it till golden brown.

You can find the recipe on how to make this deep-fried pork cutlet as well as how to use it to create dishes such as Hainanese Pork Chop Rice and Pork Katsudon at this post here.

For Omelette Skin:-
1. Lightly beat 1 egg with 1 tablespoon of milk till combined. Pour mixture into preheated grease pan and tilt the pan to coat the base. Cook until eggs are almost set but still a little runny in the middle (refer to the photo label no. 4 above).

2. Remove the pan from heat spoon about 1 serving of cooked rice (1/2 cup) on the omelette (refer to the photo label no. 5 above). With a spatula, flip one side of the egg omelette over the rice mixture

3. Slide the wrapped omelette rice to the edge of the pan and flip the pan against the plate for the omelette to land upside down on the plate.

4. Shape the omelette rice using kitchen paper towel and repeat steps with remaining portion of the rice and egg.

Depending on your preference, you could served the curry together with the omurice rice and pork cutlets or serve them in separate plates. For me, I love everything to be on the same plate and with decent amount of curry sauce to go with it. What about you?


Other than Omelette rice, you could also served the Japanese Curry with some cooked spaghetti or penne for quick meal idea. And if you have any interesting ways of pairing Japanese Curry, please do share with us by leaving your comments/suggestions in this post. Thanks.

Lastly, have a great weekend and hope you enjoy making this quick and easy Omurice with Japanese Curry for your family and loved ones too.


Monday 1 April 2013

Okinawan Cuisine By Chef Tadashi Takahashi at La Galerie De Dietrich

About two weeks ago, ShiTing (@ lobsterpaints.com) and I were invited by FoodNews to a cooking demo class together with a few food bloggers plus customers who purchased De Dietrich product(s). This cooking demo was conducted by Chef Tadashi Takashi, owner of Hashi Japanese Restaurant on 3 different cuisines using ingredients from Okinawa which were available at Four Seasons Gourmet Market.

The demo kitchen at La Galerie De Dietrich, Cendex Centre


OKINAWA MOZUKU WITH TUNA


Blanched and Marinate Tuna

Okinawa Mozuku with Tuna
The first demo dish was Okinawa Mozuku with Tuna whereby Chef Tadashi shared with us his tips on handling tuna. He suggested in order for the tuna to absorb the marinade evenly, it would be good if we could blanched the tuna in boiling water then cover it with a layer of kitchen paper towel before putting it into the marinade for better result..

Between Mozuku is a type of "seaweed algae" grown on other seaweed which is a healthy ingredient that contains fiber, mineral, iron, and 18 kinds of Amino acid. So if you are a seaweed lovely, do drop-by Four Seasons Gourmet Market to grab some if you are near Marina Bay Financial Centre Tower 1.


OKINAWA VEGETABLE TEMPURA


Okinawa Vegetable Tempura
Second dish was something with homely taste which you would fall in love immediately. Chef Tadashi prepared 3 different types of vegetables tempura such as Beni Imo (purple sweet potato), Nigauri (bitter gourd) and Shima Ninjin (carrot) to pair with the Okinawa Sea Salt and Yellow Noodles.

Although the blanched yellow noodles might look plain due to it's soy sauce broth. But after adding in some generous amount of grated ginger, the end result was amazing. It taste so refreshing and had a  rather similar flavour like our Asian "Sweet Potato Soup" that infused with lot of ginger in it.


Recipe Adapted from Chef Tadashi Takahashi

(Serves: 4 | Preparation: 10 minutes | Cooking: 30 minutes)

The Okinawa Nigauri (bitter gourd) has an unique bitter taste and high level of heat-resistant vitamin C which makes it a popular vegetable that is perfect for stir-fry. As a bitter gourd lover, I find eating the fried nigauri with hint of sea salt gives it a better aftertaste, leaving it a sweet scent instead of bitterness.

Ingredients:
170g Beni Imo (紅いも, Purple Sweet Potato)
60g Nigauri ( ゴーヤー, Japanese Bitter gourd)
85g Shima Ninjin (Okinawa Carrot)

Tempura Batter
85g Tempura Flour
125ml Cold Water
1/2 Egg (cold)

Method:-
1. Wrap Beni Imo in Aluminum foil and bake in De Dietrich oven at 180°C (Degree Celsius) for 25 minutes. (depending on size, adjust the timing accordingly)

2. Cut Nigauri and remove the seeds. Cut into small slices.

3. Peel Shima Ninjin's skin and cut into long sticks.

4. To make tempura batter:- First, make sure all the tempura batter ingredients are cold (this will enable a fluffy and crispy batter) before mixing the egg and water. Then slowly stir in the flour and you could add in more flour / water and mix until the batter is able to coat onto the vegetables.

5. Dip the vegetables in the prepared Tempura batter and fry till golden brown. (remember to test the oil with some batter to make sure that it is hot enough to fry the tempura)

6. To go with the vegetable tempura, Chef Tadashi specially prepared some soup broth (using soy sauce, dashi and water) to serve with the springy yellow noodles which was imported from Okinawa too.


OKINAWA PINEAPPLE WITH ICE CREAM


Sweet and Juicy Okinawa Pineapple serve with Koorimo’s Chestnut Ice Cream

The last dish was a quick simple dessert which used Okinawa's famous Pineapple. These pineapples have been cultivated on Okinawa as an agricultural product for around a century and if you do visit Okinawan, don't miss out the opportunity to drop by it's famous pineapple plantation at Nago Pineapple Park.

I am always fascinated by Japanese cuisines but yet I find them very difficult to prepare at home perhaps due to the lack of ingredients and etc. Now after Chef Tadashi's demo class, I think preparing simple Japanese cuisines at home is actually not that difficult too.
Lastly I would like to thanks La Galerie De Dietrich, Four Seasons Gourmet Market and Foodnews for the Okinawan Cooking Demo invite.

Wednesday 20 July 2011

Chicken Karaage

Sorry for the lack of post(s) these few weeks because I was pretty busy with a few projects on hand. I would try to get all the draft post(s) published as soon as possible but to compensate, I have invited a few well-known bloggers to guest post(s) some of their home-style dishes and bakes.

Today's let put our hands together and welcome Nami from "Just One Cookbook". I know Nami through her comments on my blog a few months back. From her blog link I also get to know her better as well as exploring her wonderful recipes collection on her home-style Japanese Cuisines. She is also the one who help me to look up recipes on Japanese website regarding the Japanese Steamed Cake which I wish to learn more about it. Today I am so happy to invite Nami to Cuisine Paradise to share her classic “Chicken Karaage” recipe with us and I sure you would like it as much as we do. Enjoy!

Hello readers of Cuisine Paradise! Usually, I’m just the same as you, a fan enjoying Ellena’s delicious creations. She was generous to invite me to contribute a recipe on her site so today I will share one of my family’s favorite Japanese dish, Chicken Karaage (鶏の唐揚げ) recipe. I am a dedicated visitor to Ellena’s site and her mouth watering photos always make me hungry. With her extensive library of recipes from around the world, I learned so much from Ellena and especially Chinese and Southeast Asian cooking techniques. Personally I’ve used multiple recipes from her site to feed my family lunch and dinner and her website has been a great inspirational resource.

Chicken Karaage is a classic Japanese fried chicken dish. It’s a very common Japanese home cooking recipe and many Japanese restaurants including Izakaya (Japanese tapas) offer it in many countries all over the world. You might also find them as a main dish in lunch teishoku (meal set) at restaurants or bento box (lunch box) you buy from Japanese supermarkets. Usually the chicken is marinated in a mix of soy sauce, garlic, ginger, and lightly coated with potato/corn starch mix, then finally deep fried. However, each family has different way of preparing it, and here is mine that my family loves.

I hope you enjoy my Chicken Karaage recipe and thank you so much Ellena for having me!


Chicken Karaage


Difficulty: Modearate
Cooking Time: 60 minutes (excluding marinade time)
Makes: 5-8 servings

Ingredients:
5-10 Chicken thigh fillets, cut into 2 inch pieces (make sure each piece is about the same size so it takes about the same amount of time to deep fry.)

Seasonings
¼ onion, grated
½ Tbsp. ginger (1.5 inch ginger), grated
2 cloves garlic, minced
1 egg yolk
2 Tbsp. cooking sake
1 Tbsp. soy sauce
1 Tbsp. sesame oil
1 tsp. salt
Freshly ground black pepper

¼ cup corn starch (Please adjust if necessary. If you use 10 chicken thighs, probably about ½ cup)

Oil for deep frying

A couple of lemon wedges
Ichimi Togarashi (Japanese red chili pepper flakes) (optional)
Green onion for garnish (optional)


Directions:
1. Put chicken in a Ziploc bag and combine all the ingredients for Seasonings in a bowl and mix all together.

2. Pour the Seasonings into the Ziploc bag and rub the chicken well with hands. Keep it in the fridge for at least 1 hour, preferably 3-4 hours.

3. In a wok, add oil to about half way full and heat it on medium high heat. When you put a chopstick in the oil and bubbles start to appear around the tip, the oil temperature is now around 180C (356F) and ready for deep frying.

4. When oil is ready, take out the Ziploc bag from the fridge and transfer the chicken into a bowl and discard the marinade (liquid). Then add corn starch and mix quickly. You don’t need to mix it evenly (as you see in the picture below). The uneven coating gives each piece its unique texture.

5. Place each piece of chicken separately into the oil. Do not overcrowd the wok, fry maximum 5 pieces at a time. If you put a lot of chicken in the oil, the temperature will drop quickly and chicken end up absorbing too much oil. Make sure the oil temperature stays around 180C (356F) at all time.

  1. Deep fry for 90 seconds.
  2. Transfer the chicken onto a wire rack (if not, paper towel) to drain the oil for 4 minutes,
  3. Deep fry again for 45 seconds, or until golden brown.

Transfer the chicken onto a wire rack to drain the oil. Before you start the next batch, skim/remove leftover crumbs from the oil in order to keep it clean.

6. Serve the chicken with lemon wedges. Squeeze the lemon right before you eat. You can dip in Ichimi Togarashi if you enjoy spicy chicken.


For more Japanese home-sytle recipes, you can refer to Nami website at Just One Cookbook for more recipe ideas.


Saturday 20 December 2008

Hidden Treasure

This is the adult version of the Cod Onigiri which I made for Reyon. His onigiri is slightly different from mine because I didn't wrapped it with any filling, I just mixed the cooked sushi rice with mashed cod fillet then coat it with fish floss.

As you can see from the picture, my version of the Cod Onigiri is more colourful with different assorted design. I wrapped it with some cod fillet, cucumber and tomato cubes for that extra crunch. Posted by Picasa

Assemble the Cod Onigiri
1. Cook the sushi rice according to same method as Cod Fish Rice in my previous post.
2. When it is done, slowly removed the fish from the top of the rice and set aside.
3. Use the rectangle Onigiri mould, spread a layer of cooked rice, add a piece of the cod fillet, some tomato and cucumber cubes then top with rice, shape it into triangle shape.
4. You can assemble it with seedweed strips, sesame seeds or even coat with fish floss.

Notes:
a) You can season the cooked rice with some sushi seasoning to enhance the flavour of the rice.

Sunday 24 August 2008

Salmon Onigiri

Onigiri also known as Omusubi, is a snack of Japanese rice formed into triangle or oval shapes and often wrapped in nori (edible seaweed). Traditionally, the onigiri is filled with pickled ume fruit (umeboshi), salted salmon, katsuobushi, or any other salty or sour ingredient. But now most of the Onigiri can be wrapped with other special ingredients like salmon, ebi or etc.


For our Quick & Easy menu tonight, we will be having Salmon Onigiri. I use the pan-fry salmon flake to make three different version of Salmon Onigiri, 1st type is salmon flakes with black sesame seeds, 2nd is salmon flakes with seaweed flakes and 3rd type is salmon & cheese wrapped with rice. And making of Onigiri is so much easier with the help of the assorted Onigiri Moulds sold in the supermarket. Posted by Picasa

Ingredients: (make 6 Onigiri, 6cm by 5cm)
1 Cup of Short Grain/Calrose Rice
1 Piece of Salmon Fillet, about 250g
3-4 Slices of Ginger
1 Teaspoon Black Sesame Seeds, toasted
1 Teaspoon White Sesame Seeds, toasted
1 Slice of Sandwich Cheese, folded into quarter lengthwise
1 Small Sheet of seaweed, cut into 8cm by 1cm

Methods for Salmon & Black Sesame Onigiri:
1. Wash and rinse the rice with a few rounds of water until the water is clear, then soak it with about 20ml more of water for about 2 - 3 hrs then cook it in the rice cooker as per normal.
2. While cooking the rice, heat up a small non-stick saucepan and add in about 1/2 tablespoon of olive oil and saute the ginger slices till fragrant then add in the salmon skin side down.
3. Pan-fry it for about 2 minutes or till golden brown then flip it over and cook on the surface until it is cooked through, but do not overcooked it.
4. Add about 1/4 of the cooked salmon flakes in a big bowl, use the fork to flake it then add in 1 scoop of the cooked rice and about 1/2 teaspoon of the black sesame seeds.
5. Mixed them well then fill the rice in the Onigiri Mould and pressed the cover hard to get it moulded into shape.
6. Remove it from the mould and sprinkle some extra black sesame seeds on top. (You can make about two of this using the 6cm by 5cm mould)

Methods for Salmon & Seaweed Flakes Onigiri:
1. You can follow the same steps as the Salmon & Black Sesame Onigiri but do some changes on method 4.
2. Instead of adding 1/2 teaspoon of black sesame seeds to mixture with the salmon flakes, you can add in 1 teaspoons of the seaweeds flakes to make it green and pink.

Methods for Salmon & Cheese Onigiri:
1. You can follow the same steps as the Salmon & Black Sesame Onigiri from method 1 to 3.
2. Next instead of mixing the salmon with the rice, you filled almost 1/2 the Onigiri mould with cooked rice, then place 1 piece of cooked salmon(about 1.5cm cube) in the middle and top with 1 piece of the cheese cube.
3. Next cover the filling with another 1/2 of the cooked rice on top to fill the mould.
4. Put on the cover and pressed tie to get the shape, remove the Onigiri from the mould and wrap it with seaweed strip and sprinkle with some white sesame seeds on one side.
5. Heat the the same saucepan use to pan-fry the salmon with 1 teaspoon of olive and pan-fry both side of the Onigiri for about 1 minute each side so that the heat will melt the cheese inside.

Ingredients & Onigiri Moulds


Notes:
a) You can toast the sesame seeds in advance and keep it in an air-tight container for future use.
b) You can either serve the Onigiri cold or warm.
c) You can use whatever ingredients you have in your pantry, if you do not have black or white sesame seeds or even seaweed sheet, you can either omit or replace it with other ingredients.

Saturday 23 February 2008

Sushi Tale

It's had being a few months since my last Salad post in December. Due to the hectic working schedule, I don't really have time to whip up any meals on the weekdays night as well as weekends. What I do most is to spend time with my little darling and doing all the household chores. But this weekend, upon Reyon's request we decided to turn out kitchen into little Sushi Bar.........(click here to see our Little Sushi Chef)


These are what we had made for our dinner and all these are Reyon's favourite sushi like Kanikama, Tamago and Kani Salad. I also made a few Gunkan Sushi(round sushi which is wrapped with seaweed and topped with ingredients) topped with Fish Floss for him.

Ingredients For Sushi Rice:
125g Short Grain Rice
Seasonings
10g Fine Salt
35g Fine Sugar
50ml Japanese Rice Vinegar

Methods:
1. Mix salt, sugar and vinegar in the pot and simmer over heat till mixture is dissolved. Set aside.(or you can do it in Microwave oven on 30 sec High)
2. Using both hands, wash rice gently for a few times till rice water becomes perfectly clear then drain.
3. Add some water and soak the rice for 30 minutes. Drain and add 250ml water and cook in the rice cookers.
4. When the rice is cooked, let it stand in rice cookers with covered lid for 15 minutes before removing the lid.
5. Transfer cooked rice into a wooden rice tub, pour prepared seasoning mixture evenly over sushi rice and stir well with wooden ladle. Use a fan to cool the rice for 5 minutes.

Tamago is the Japanese omelette commonly used in maki, nigiri and tamaki sushi. Unlike a regular omelette, the tamago is made with sugar, soy sauce, and mirin added. And this is always the MUST have items when Reyon visit any Sushi restaurants, he can have about 4 in a meal. This is my very first time trying to make this at home for him. Even though I didn't managed to achieve those professional Tamago look but at least it still taste good and presentable...... For those who are interested to try out, here is the recipe that I used and also a very good youtube video that is recommended by one of my friend Pamy on how to fry the omelette @ Tamago Making (I did not use the recipe given in the video). Posted by Picasa

Ingredients:
2 Eggs
2 Tablespoons of Dashi Stock
1/2 Tablespoon Sugar
1/2 Teaspoon Mirin
1/4 Teaspoon Soy Sauce

Methods:
1. Add the eggs and the rest of the ingredients in a big bowl then beat well to make sure that it is smooth and well combined.
2. Heat up a well-oiled tamgo pan and pour about 1/4 of the mixture to the pan and swirl it as if you making crepe.
3. Cook the mixture over medium heat till almost done, fold it up to the side with a chopstick to the back of the pan.
4. Add more oil to the pan and pour in another 1/4 of the mixture, making sure to get some of it under the roll.
5. As it cook, roll the sheet and fold it up again and set it on top of the previous omelette.
6. Repeat the steps until all omelette mixture is used up.
7. Square omelette with a wooden block and remove, leave to cool.
8. Cut omelette into 7 or 8 slices then mould the sushi rice and place each slice of omelette on top and wrap it with a roasted seaweed strip and serve.


Notes:
a) I replace the Dashi Stock with Chicken Stock.
b) The 1/4 of the egg mixture that you pour in will depend on the size of the pan as in it might be more or less.
c) If you don't have the special rectage pan for making tamago, you can use any normal round pan but then trim the side when it is done. Or you can get a affordable rectangle pan at any Daiso branch for $2.

Wednesday 26 October 2005

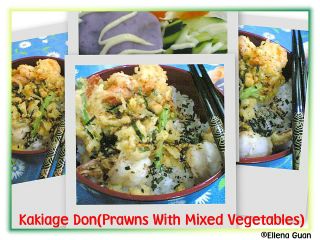
Kakiage Don

This is another quick Japanese rice dish which featured deep-fried prawns and assorted veggie. It takes less than 30 minutes to prepare and get everything together before serving. The main ingredients for this dish are prawns and mixed vegetables such as carrot, asparagus, mushroom and etc.

Wednesday 19 October 2005

Omelette Donburi

Japanese Food is usually the most time consuming to prepare because they often have many steps and sides dishes such as rice to the salad and main course where a lot of preparations and ingredients are needed. Today since my best friend and mum are coming over for dinner, I would like to give them a surprised by making this most simple Japanese dish that I modify from a cookbook which I borrow from library.  Omettle Donburi and Mini Potatoes Salad.

ShareThis