Showing posts with label Blog Event. Show all posts

Tuesday 26 April 2011

[Cupcake Pop Mold Giveaway] Assorted Cream Cheese Cake Pops

Ever since I saw and bought these cute cupcake pop molds, I have always wanted to try making some Cake Pops which is one of the latest trend among online bakers other than cupcakes and macarons. And recently I also saw Starbucks having some cute Cake Pops featuring in their food menu too.

What is Cake Pops? Cake Pops can be defined as little/mini cakes on a stick that is coated with chocolate/icing and decorated with all sort of sprinkles or toppings which made famous by Bakerella( read more on the link HERE).

There are a few ways of making these cake pops from either using crashed Oreo or graham biscuits to vanilla or chocolate cake crumbs. But no matter which method(s) you prefer I am sure both Adults and Kids will enjoy the fun process of rolling, molding and decorating these cute Cake Pops.

Ingredients: (make 10 mini cake pops)
200g Butter/Marble Cake, break into pieces
150g Cream Cheese, soften
*1/2 Tablespoon of Grand Marnier/RUM/Kahlua, optional

Decorations:
Assorted Chocolate of Your Choice, melted
Assorted Toppings

*Note:
~ You can either add more cream cheese or a bit cold milk to bind the crumbs if it is too dry.

Method:-
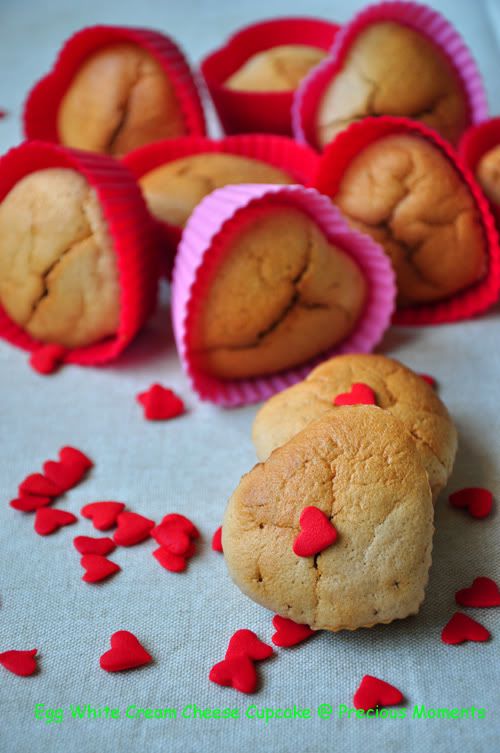
1. Break the ready bought marble cake into smaller pieces and place it in a large mixing bowl.

2. Beat the cake pieces at low speed until it resemble find crumbled (refer to the photo above), drizzle Grand Marnier evenly over the cake and beat for another few second till combined.

3. Next using a spatula or hand mix and knead the soft cream cheese mixture with the crumbs till it forms a smooth dough.

4. Roll the mixture into a 1” round balls and place on a tray lined with foil/baking paper.

5. When done, place them in the freezer for about 5 minutes before molding them using the cupcake mold.


To Assemble:
1. Place one of the chilled dough in the cupcake mold, gently press down to fix the mould and closed it tight to remove any excess dough that are being cut off.

2. You have to work fast and mold all the prepared dough into cupcake shape then freeze them for another 5 minutes to firm it up before dipping with melted chocolate.

3. Melt your choice of chocolate in a microwave safe bowl at 30 seconds intervals on high heat, stirring in between until chocolate melts and become smooth.

4. Slowly lower the cake into the melted chocolate to coat the bottom half portion by holding the tip of the cake. When done carefully insert a lolliop stick from the bottom base of the cake to secure it. (after coating the base, I leave it on the baking paper and freeze for another 3 minutes before doing the top)

5. After the chocolate coating, rest the sticks of cake pop on styrofoam block(can get from daiso) or in a tall cup to dry while decorating the pops with sprinkles or toppings.

6. You can refer to the related VIDEO(click HERE) on making these cake pops by using this cupcake mold.


Remeber the monthly Aspiring Bakers(founder, small small baker) events that I always participate, for this month of April, the key ingredients will be cheese. Jean suggest that it should be something cheese related on either bakes/frozen desserts. So I will be submitting this to Aspiring Bakers #6: Say Cheese! (April 2011) hosted by Jean from Noms I Must.

Secondly I would like to thanks those of you who had participated in the "Gyoza Mold Giveaway" and "Sandwich Sealer plus Heart Shaped Food Picks" events which ended last week. Here is the 3rd “Giveaway” for the month of April to celebrate Cuisine Paradise's 6th Anniversary which falls on 30th April 2011. And I hope with this handy "Cupcake Pop Mold" you can make use of it to shape into different design of Cake Pops where you can refer to their official website HERE.

If you are interested to win this set of "Cupcake Pop Mold", just leave your Name and your favourite Cake Pop and topping (strawberries, Oreo, dark chocolate, mint), example "I Love Chocolate Cake  Pop With Oreo Toppings" in the comment box and I will pick ONE Lucky winner on Sunday, 01 May 2011. Result will be announce on 02 May 2011.


[Updated on 02 May 2011 09 May 20111]

GIVEAWAY RESULTS!!!!!


GIVEAWAY RESULTS ARE OUT! Are you the Lucky One!!!!!

Sunday 17 April 2011

[Sandwich Sealer Giveaway] Bread Pockets Bento Set

Thanks to those of you who participated in the "Gyoza Mold Giveaway" event which is ending on coming Monday, 18 April 2011. Here I am having another “Giveaway” which consists of a “Sandwich Sealer plus Heart Shaped Food Picks”. With this sandwich sealer you can make your favourite sandwich with all kind of fillings from sweet to savory without worrying that the fillings will drop-off from the sides and etc.

If you are interested to win a set of this "Sandwich Sealer plus Heart Shaped Food Picks", just leave your Name and with a type of your favourite sandwich filling (tuna, egg mayonnaise, jam) "I love xxxxx" in the comment box and I will pick ONE Lucky winner on Wednesday, 20 April 2011. Do check the result after Noon, 21 April 2011.

I have a few different types of Sandwich Sealer/Cutter at home which we usually use to rotate around when making sealed/opened sandwich for our breakfast or picnic. Here I use the sandwich sealer shown below to make some ham and egg sandwich serve with chocolate chips cookies, chocolate, apple and drink for a quick lunch before my boy goes to his Sunday class.

Method:-
1. Warm the bread in the microwave oven according to the instruction menu (shown at the back of the sandwich sealer packaging). Place the bread onto the center of the frame, then place your desire filling onto the bread. (refer to the step by step photos above)

2. Warm another slice of bread in the microwave oven, cover the first bread and filling with this bread by aligning its placement with the first bread.

3. Place the bread cutter onto the bread.

4. Carefully press the bread cutter downwards.

5. Hold up the bread crust while holding down the bread cutter to see if the crust has been thoroughly cut.

6. Remove the bread cutter and the entire crust from the mold and the sandwich should be completely sealed.

Ok, that's all for this simple post. Have a great weekend everyone and if you are interested to win a set of this Sandwich Sealer plus Heart Shaped Food Picks, do start leaving your comments now :) Have Fun everyone!


[Updated on 21 April 2011]

GIVEAWAY RESULTS!!!!!


GIVEAWAY RESULTS ARE OUT! Are you the Lucky One!!!!!

Tuesday 12 April 2011

[Gyoza Mold Giveaway!!!] 3 Ways of Eating Dumpling or Wonton

Continue from the previous post on the "Steamed Dumplings with Assorted Vegetables". Here I will be giving away a set of "Gyoza Mold" which you can use it to wrap either Japanese Gyoza or Chinese Dumpling/Wonton. This is a handy and easy to use mold by just placing a gyoza or wonton wrapper on top of the press (mold), add in fillings, close and press tight to form a perfect sealed gyoza or dumpling.

If you are interested to win a set of this "Gyoza Mold", just leave your Name and which type of dumpling you prefer (steamed, pan-fried, boiled  or deep-fried) "I love xxxxx" in the comment box and I will pick one TWO Lucky winners on Tuesday, 19 April 2011. Do check the result after Noon, 19 April.


For this Dumpling/Wonton post, I will be sharing another two different ways of cooking dumpling/wonton dish which you could try it out anytime at home. First let's take a look at this "Chicken Dumplings with Chili Oil - 紅油抽手". This is one of the common dumplings dish that you can easily order from most Chinese Ramen and Steamed Bun Restaurants. Usually the ingredients are shrimp and pork mince that are wrapped in thin layer of handmade dumpling skin and serve with the unique spicy chili oil sauce.


CHICKEN DUMPLINGS WITH CHILI OIL - 紅油抽手

Ingredients: (makes 10 Dumplings and 15 Wonton)
150g Mince Chicken Meat
20g Carrot, finely chopped/grated
2 Shallots, finely chopped
3 Fresh Water Chestnut, skin remove and finely chopped
1/2 Tablespoon Chopped Spring Onion

Seasonings:
1/2 Tablespoon Light Soy Sauce
1 Teaspoon Sesame Oil
1 Teaspoon Cooking Wine
Dash of Fish Sauce, optional
Dash of Pepper
1/2 Teaspoon Cornflour


Method:-
1. Put all the ingredients in a medium bowl, mix well with seasonings and marinate in the refrigerate for at least 20 minutes or more.

2. Refer to the photo above, place 1 piece of round dumpling wrapper on the gyoza mold, top with meat fillings, close and press tight to form a perfect sealed dumpling.

3. Repeat the same process and makes about 10 dumplings using the gyoza mold.

4. Next bring a pot of 1.5 litres of water to boil with 1/2 teaspoon of oil. Slowly drop in the wrapped dumplings and cook over medium heat.

5. Once the dumplings float on the surface, lower the heat and continue to simmer for another minute. Remove the cooked dumplings and place it in a bowl of water to stand for another 1 minute.

6. Drain well and place the cooked dumpling in a serving plate. Drizzle some sesame oil then pour over the prepared spicy chili oil and top with some extra chopped spring onion and serve.


I use the Lao Gan Ma(老干妈) Chili Flavoured Oil(油辣椒) which you could purchased from either Sheng Siong(昇菘超市) or any provision shop in the wet market to create this Spicy Sauce for my dumplings.(Price:- range from S$1.95 - S$2.50)

Spicy Chili Oil Ingredients:-
2 Tablespoon of Lao Gan Man Chili Flavoured Oil
80ml Hot Water
1/2 Teaspoon Sugar
1/2 Teaspoon of Vinegar, optional

Method:-
1. Using a microwave safe bowl, reheat the chili flavoured oil on medium heat for about 1 minute or until warm through.

2. Dissolve 1/2 teaspoon of sugar in 80ml of hot water then add it into the prepared chili oil (add vinegar if using) and stir till well combine. Set aside.


Chicken Dumplings With Chili Oil - 紅油抽手


These fried Wontons will definitely be a great finger food or snacks during party or gathering and it goes well with cool icy beer too. You can prepared these ahead by wrapping the dumplings and keep them in the fridge for a few hours or a day before cooking. And these can be a very addictive finger food too... so beware!


DEEP-DRIED WONTONS

Method:-
1. Prepare the same fillings using the above ingredients shown for the dumplings.

2. Refer to the photo above, place about 1 teaspoon of meat filling in the middle of the square wonton wrapper.

3. Brush some water on the top 2 corner of the wrapper, fold it into half to form a triangle.  Pull the 2 edge below to form a diamond shape by sticking the two edge together.

4. Repeat the process to make about 7 Triangles and Diamond shape wontons.

5. Preheat a pot of oil and deep-fried the prepared wonton on medium heat till golden brown, remove and drain well.

6. Serve with desire dipping sauce.


With a little effort done, you can whipped out two homecook dishes by just using one prepared meat fillings. Isn't this wonderful! I am sure your family will loves these quick and simple dish. If spicy food is not your choice, you can always replace it with just light soy sauce.

Non-Spicy Sauce Ingredients:
3/4 Tablespoon of Light Soy Sauce
80ml Hot Water
1/2 Teaspoon Sesame Oil

Method:-
1. Mix all the ingredients together and pour over to the cooked dumplings.


Total cost for these two dishes is about S$4.00 with breakdown shown below:-
Cost of Ingredients:
~ 150g Mince Chicken Meat = S$1.50
~ 3 Water Chestnut = S$0.50
Wonton Wrapper = S$1.00
~ Carrot, Spring Onion, Shallot = S$0.50
~ Chili Flavour Oil = S$0.50


Updates: I am so happy that many of you are interested in this "Gyoza Mold". So in order to increase the chance of winning, I will be giving away "2 Sets" instead of 1 to "2 Lucky" winners. Good Luck, everyone!


GIVEAWAY RESULTS!!!!!


GIVEAWAY RESULTS ARE OUT!
Are you the Lucky One!!!!!

Wednesday 16 March 2011

[Blog Event] 2 Dishes plus 1 Soup

Recently we have come out a blog event on $20.00 Budget Meal with aim to encourage those who loves to prepare simple homecooked meal to share with us their meal planning and budget tips. We hope to take this opportunity to learn from each other on how to plan and prepare some quick and easy nutritious dishes even with minimum sum of budget given.

So far I have a few responds and enquires from readers but I do hope to see more supporter(s) for this event if you/your helper do prepared a budget meal smilar to this post. For example below shows the 2  Dishes plus 1 Soup menu which I spent a total of S$19.20 to prepare and serves 4.


STIR-FRY BITTER GOURD WITH EGG

Ingredients: (serves 4)
1 Small Bitter Gourd(苦瓜), about 150g
1/2 Tablespoon Dried Shrimps, soaked till soften
2 Eggs
3-4 Garlic Cloves, minced
50ml Hot Water

Seasonings
1 Teaspoon Chicken Stock Powder
Dash of Light Soy Sauce


Methods:-
1. Remove seeds from the bitter gourd and slice it thinly before rubbing it with with 1 teaspoon of salt. Rinse well with water and set side to drain.

2. Preheat a frying pan with 1 tablespoon of oil, saute dried shrimp(pound lightly before use) until fragrant, add in garlic and continue to fry for another 10 seconds before adding in the drained bitter gourd.

3. Fry for a another 10 seconds, add in powder chicken stock, water and let it simmer for 2 minutes.

4. Lastly crack in eggs, give it a quick stir and simmer till the mixture became thicken.

5. Add in dash of light soy sauce, stir, dish up and serve.


Bitter Gourd (苦瓜) being rich in all the essential vitamins and minerals, especially vitamin A, B1, B2, C and Iron. It can also be use to treat complications such as hypertension, eye complications if consume regularly. For this quick and nutritious dish it cost around S$2.10 with breakdown shown below:-

Cost of Ingredients:
~ Bitter Gourd = S$1.00
~ Egg = S$0.40
~ Dried Shrimp and Garlic  = S$0.70


STEAM KURAU FISH WITH SALTED VEGETABLES

Ingredients: (serves 4)
400g of Kurau Fish(马友鱼), tail portion
150g of Preserved Salted Vegetable, cut into slices
2 Fresh Shittake Mushroom, thinly slice
1 - 2 Stalks of Spring Onion, cut into sections
3 Slices of Ginger, cut into thin strips
1 Chili, seed removed and cut into slices

Seasonings:
1 Teaspoon Sesame Oil
1 Teaspoon Cooking Wine


Method:-
1. Clean and remove any scales from the fish, rinse and pat dry using kitchen paper towel. Set aside.

2. Rinse salted vegetables under tap water, drain well and cut into slices. Put 1/3 portion of it on steaming plate together with some ginger and spring onion before placing the fish on top.

3. Top fish with the rest of the ingredients and drizzle with seasonings.

4. When the pot of water comes to boil, steamed fish over medium high heat for about 12 - 15 minute till the fish is cooked through.(you can test using a fork to flake the fish meat after 12 minutes to check)

5. To serve, drizzle some extra sesame oil and dash of pepper on it and spoon some sauce at the bottom of the fish to moist the fillet and enhance the taste.


  Out of the 3 dishes, this steamed fish is consider to be the most expensive as the Kurau Fish cost around S$3.00per 100g. Total cost for this dish is about S$14.40 with breakdown shown below:-

Cost of Ingredients:
~ Kurau Fish Tail = S$12.90
~ Salted Vegetable = S$0.60
~ Mushroom = S$0.40
~ Chili and Spring onion = S$0.50


BLACK MOSS TOFU SOUP


Ingredients: (serves 4)
1 Box of Silken Tofu, cut into small cubes
50g Minced Pork
1 Tablespoon of Black Moss, soaked in water till soft
1 Shallot, finely chopped
2 Slices of Ginger, optional
1.2 Litres Hot Water
1/2 Chicken Stock Cube
1 Tablespoon Cornflour Solution
Some chopped Spring Onion


Method:-
1. Rinse the beancurd and cut into small cubes. Rinse the soften black moss and cut into shorter lengths.

2. Marinate mince pork with 1.5 teaspoon light soy sauce, 1/2 teaspoon sesame oil, 1.5 teaspoon cornflour and dash of pepper. Stir well and set aside.

3. Heat up 1/2 tablespoon of oil in soup pot, add in chopped shallot, ginger and saute it till fragrant.

4. Add in minced pork, press and stir with a spatula to break the pork into bits.

5. Pour in water and let it simmer for about 5 minutes before adding the stock cube, beancurd and black moss.

6. When the mixture comes to boil again, stir in some cornflour solution(mix 1 tablespoon cornflour with 1/2 tablespoon water) to thicken the soup.

7. To serve, top with ground pepper and chopping spring onion or coriander.


This quick and easy soup is done in less than 15 minutes of cooking time which you can prepared while steaming the fish so that you do not need to reheat it before serving. Total cost for this dish is about S$2.70 with breakdown shown below:-

Cost of Ingredients:
~ Silken Tofu = S$0.90
~ Minced Meat = S$1.00
~ Black Moss = S$0.50
~ Shallot and Spring onion = S$0.30


For more read up or ideas on how to submit your homecooked dish for this event, you can also refer to these 2 submission below:- or follow the link HERE. Hope to see your entry soon, closing date EXTEND to next Sunday, 27 March 2011, 2359 Hours.


SINGAPORE: with total costs of S$19.50


2 Dishes, 1 Soup (两菜一汤 ) by WaiFong of Fong's Kitchen Journal

BANGKOK: with total cost of THB 340 or S$14.30

2 Dishes plus 1 Soup by Amy of  Mothering Corner


Closing Date: Sunday, 27 March 2011, 2359 Hours.

Thursday 10 March 2011

[Blog Event] $20 Budget Meal ~ (Closing date: 27 March 11)

Recently while chatting with some facebook and twitter friends about the TV program known as "3 Plus 1 Sr 3(三菜一汤)" showing on every Wednesday, 8.00pm on Channel 8. I realise that the few of us usually have the habit of preparing homecooked dishes either by our own self, parents or helper at home. Especially now when the food pricing is rather high compare to a few years back, I am sure most of the family would rather prepared some simple homecooked food than eat out most of the days.

So here I would like to urge those who loves to prepare simple homecooked meal to join us in this small event in order to accumulated more cooking ideas as well as sharing with each other on how to purchase ingredients with a minimum sum of budget given.


WHO CAN JOIN:
~ Anyone who is interested to help and share more ideas in preparing homecooked meal.


CRITERIA:
~ Prepare any "2 Dishes plus 1 Soup" or "1 Pot Dish" using a Maximum budget of S$20.00. If you are from overseas, you can also particpiate by converting to the appropriate currency value, (ie. US$15.00, RM$50.00, Rp $138,000 and etc)

~ Send in either your blog link with a post of all the prepared dishes plus soup together with at least 1 recipe on the prepared meal.

Or

~ If you do not have a blog, just send in the photos and recipe of your dishes and I will publish on your behalf in my blog, credited to you. (photos can be taken in any form using digital camera or handphone)

~ Please do mention in your blog that you are sharing this post to “$20 Budget Meal” event and link it to this page so as to encourage more readers to contribute.


SUBMISSION:
~ E-mail your "blog link" or "photos with recipe" to ellenaguan@hotmail.com with a subject "$20 Budget Meal" in the following format:

Your Name:
URL of your post:
Name of your dishes + soup:
Estimate amount spent for each dish:
Attachment of your photo in your email (each photo, preferably 500kb or less).


CLOSING DATE:

~ 20 March 2011, 2359hours 27 March 2011, 2359 hours and all entries will be compiled and posted on 30th March 2011.

~ If the respond is good we will held a readers voting event for the best "$20 Budget Meal" family over at Cuisine Paradise Facebook Page for more giveaways.


For example if you wish to cook some delicious and nutritious herbal soup but you do not have those necessary Chinese Herbs in your pantry. Here is what you can do with any purchase of pre-packed herbal soup ingredients from any local supermarket. I bought this FairPrice(Pasar) herbs for S$4.50 + 2 Chicken drumstick for S$3.20 so total I spent S$7.70 for this pot of Chicken Herbal Soup. In this case I will have S$12.30 balance to get ingredients for another 2 dishes.

  With this pre-packed herbs, follow the instructions at the back of the packet and you will have a pot of delicious soup in a few hours time. Before this, perhaps you would like to take notes on a few items when preparing the soup.


SOME PREPARATION NOTES


~ Always rinse the herbs with either running water or warm water in a bowl to watch away any dirt in it.

~ Depend on your preference, get ready either chicken bones, chicken drumsticks, pork ribs or pork fillet. Trim, rinse and blanched them in boiling water for about 5 minutes, rinse well before use.

~ You can use a auto-timer and cook the soup in slower cooker even if you are out of your house so that the soup will be ready during meal time.


Lastly I hope that everyone can help to contribute some of your homecooked dishes so that we can get the opportunities to learn from each other and add on more cooking ideas to our "2 Dishes, 1 Soup(两菜一汤)" recipes bank.


Tuesday 1 March 2011

Aspiring Bakers #4 Love In The Air (Feb 2011) - Round Up

Thanks everyone for supporting February Aspiring Bakers #4 event and also Small Small Baker(SSB) for giving me the opportunity to be the host for this month theme. From this hosting, I got to know more talented blogger friends through their submissions with all the fantastic posts that support this month "heart shaped" theme. In total I have received 82 mouth drooling entries and each entry has its unique creation that makes you crave for more of their upcoming posts.

Here are all the entries for Aspiring Bakers #4 Love In The Air, listed in the order of the date submitted.


Meringue Hearts by Spear of My Baking Milestone


Pineapple Tarts by Ching of Little Corner of Mine


Hearty buns by Cathy of Cathy's Joy


Pancake Hearts by Qi Ting of
Misadventures of Fat-Free Baking


Salted-financier by Zoe of Bake for Happy Kids


Mandarin Orange Cranberry Scones
by Veronica of Pengs' Kitchen


My Sweetheart(Orange Scented Rice)
by Ellena of Cuisine Paradise


Spice Up Your Love(Stir-fried Chicken With Mandarin Orange)
by Ellena of Cuisine Paradise


Love binds us together by Cathy of Cathy's Joy


Mississippi Mud Cake by Ann of Anncoo Journal


Baked Egg and Cheese Toast
by Jasline of Food Is My Life


Strawberry yogurt cake, with fresh strawberries and strawberry whipped cream
by Janine of Not the Kitchen Sink!


Osmanthus Jelly by Ah Tze of Awayofmind


Melt Your Heart (strawberries yoghurt pops)
by Ellena of Cuisine Paradise


Heart Poppers (assorted mini donuts)
by Ellena of Cuisine Paradise


Vanilla Cookies by Nancy of Bake for a Queen


Chocolate Pudding With Fruits Cocktail Sauce
by Alice of I Love. I Cook. I Bake


A Love-ly mini Red Velvet Cake
  by Lisa of From My Lemony Kitchen


Lavender Butter Cookies
by Veronica of Pengs Kitchen


Dulce De Leche Pound Cake by Jess of j3ss kitch3n


Red Velvet Cupcakes with Mascarpone Cheese Frosting
by Gertrude of My Kitchen Snippets


Heart-shaped Cheesy Bread
by Kym Kym of Kym Kym's Adventure


Heart-shaped Raspberry Napoleon by Alan of Travellingfoodies


Heart-shaped Raspberry Napoleon by 茄子 of 袅袅烘焙香


Love You Beary Much - Valentine's Treats 
  by Loh Wai Fong of Fong's Kitchen Journal


Stained Glass Cookies by DG of Tested and Tasted


Egg White Cream Cheese Cupcake
by Edith of pReCiouS MoMentS


豆浆乳酪蛋糕 (Soya Milk Cheesecake)
by Esther of 我的厨房乐园


Lovely Whales Bento by Rachel Hei of ~温馨小厨~


Shaped Jelly for Valentine's Day by Ann of Anncoo Journal


Strawberry Macarons by Quizzine of Baking on Cloud 9


Valentine Sandwiches by Lena of Frozen Wings


Mini Genoise Cakes with Dark Chocolate Ganache 
by HoneyBeeSweets of Honey Bee Sweets


Mango Cheesecake by Jasmine of The Sweetylicious


Osmanthus Butter Cookies
by Peihwa of Love Melody, Love Baking


Chocolate Shortbread
by Peihwa of Love Melody, Love Baking


Pistachio and Almond Cookies
by Peihwa of Love Melody, Love Baking


Chocolate sponge cake with caramel cream
by SCP of Love to cook and cook to be loved


Matcha Mochi Cake by Jess of j3ss kitch3n


Sweetheart Torte by Kristy of My Little Space


Nutella Cupcakes with Nutella Cream Cheese Frosting
by Loh Wai Fong of Fong's Kitchen Journal


Tortilla by Vivian of Vivian Pang Kitchen


Pink Vanilla Bean Macarons
by Janine of Not the Kitchen Sink!


爱心Pizza by Myme of 最爱的。。。


Green Bean Soup with Rue
by Edith of pReCiouS MoMentS


Green Tea Tiramisu by Ann of Anncoo Journal


Heart Shaped Ricotta Cream Cheese Cheesecake
by Ah Tze of Awayofmind


French Apple Cake by Agnes of Agnes Bakes


Chocolate Caramel Brownie Hearts
by Daphne of More Than Words


Strawberry Chiffon Cake by Myme of 最爱的。。。


Tangzhong Heart-Shaped Buns
by Jen of Tastes of Home


Heart Shape Plait
by Vivian of Vivian Pang Kitchen


Jelly Heart by Jasmine of The Sweetylicious


Mandarin Orange Chiffon Cake
by winterpoohbear of Winterpoohbear


Valentine Chocolate Cake by Tricia of Experimental Cook


Fudgy Brownies Pop
by Alice of I Love. I Cook. I Bake


A Valentine's Rainbow Chiffon by Joyce of Chunky Cooky


Macarons (with heart pattern) 
  by Nancy of Bake for a Queen


Strawberry and Pistachio Financiers
by Janine of Not the Kitchen Sink!


2-layer agar agar with heart-shaped strawberries
by Ivy (Beary)of Beary's Passion


Passion fruit Ice Cream
by kk of My Food Affair


Non bake blueberry cheesecake
by Jess of Bakericious


Matcha Macarons by Cathy of Cathy's Joy


Heart Shaped Butter Rolls
by Treat and Trick of Treat and Trick


Wholemeal Yogurt Buns
by Janine of Not the Kitchen Sink!


heart shaped mont blanc cake
by Jasmine of The Sweetylicious


Mini Donuts by Gertrude of My Kitchen Snippets


Apple Pocket Pie
by Honey Boy of Cosy Bake


Paris-Brest with a Twist!
by Alan of Travellingfoodies


Heart shaped chestnut tiramisu
by Jasmine of The Sweetylicious


I love hello Kitty (Ice cream cake)
  by Nancy of Bake for a Queen


A Valentine Chocolate Cake for My Love
by Olivia Stephens of Food.Love.Passion


玉米糕 (Corn Pudding)
by Esther of 我的厨房乐园


Jelly Hearts
by Jean of Need More Noms


Strawberry temptation
by Yvonne of Muimui25


Sweethearts
by Stephanie (Musketnuss) of I really take the cake


Love pocket bread
by Wendy(Wen)of Wen's Delight


Rainbow Chiffon
by Peihwa of Love Melody, Love Baking


Lemon Hearts
by Jasmine of The Sweetylicious


Romeo and Juliet Cake by Lena of Frozen Wings


Revision on Making Macarons by Alan of Travellingfoodies


Strawberry Tart
by Alice of I Love. I Cook. I Bake


Thank you everyone!!!! 
Thanks for making this February theme full of LOVES!!!!!


And now the theme for this month's:
Aspiring Bakers #5: Fruity March(Mar 2011) will be hosted by Jess of Bakericious

The closing date is: 31 March 2011.
All entries will be complied and posted by 1st Apr 2011.

For more details please go over to her blog HERE.


p/s: If you have submitted your entry(s) but it is not shown here, do leave me a comment so that I could check it out. Thanks.

ShareThis