Tuesday 20 June 2006

Apple Yakult Cake

Got this very interesting Chilled Yakult Yogurt Cake recipe from one of my new blogger's friend Tazz(click link for her original recipe). You might be wondering... Wow.. since when Yakult(it is a kind of fermented milk drink ) can used to make cake as well..... From her recipe, I change two of her ingredients which I had some left over from making a Cheesecake. So it's kind of adventure when you got something new in the original recipe because you might not know what can goes wrong.......

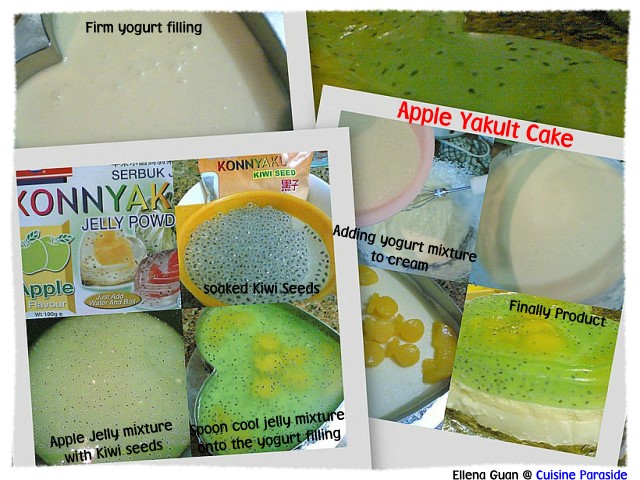
But luckily the cake turns out well and everyone enjoys it so much. The texture of the cake is sort of like Lily's(Hugbear) Peach Marshmallow Cake, but as usual some of the ingredients had being recipe for a different favour and texture. For my version of Apple Yakult Cake, I used the new Konnyaku Apple Favour Jelly for the topping instead...

Ingredients For The Base: (6"/7" cake pan)
7 Pieces Of digestive Biscuits
40g Melted Butter
Ingredients For The Filling:
100g Plain Natural Yogurt
150ml Yakult, apple flavour
1 Tablespoon Lemon Juice
150ml Thicken Cream
1 Tablespoon Gelatin
3 Tablespoons Sugar
150ml Water

Method:
1. Crush the digestive biscuit in a zip-lock bag until fine crumbs then mix with melted butter, and press firmly to the base of the cake pan, set aside in the fridge for later use.
2. Dissolve gelatin and sugar in 150ml of water in a saucepan over low heat, then set aside to cool.
3. Whisk plain yogurt, yakult and lemon juice until well blended then pour in the cooled gelatin mixture and mix well.
4. Whip the thicken cream till soft peak form.
5. Slowly fold in the yogurt mixture into the whipped cream and mix well.
6. Pour the combined mixture onto the chilled biscuit base and leave it in the fridge for about 2 hours or more to set.

Jelly Topping:
1 Teaspoon of Kiwi Seeds
1/2 Packet Of Konnyaku Jelly Powder, apple favour
250ml Water

Methods:
1. Soak kiwi seeds in 1 glass of water for 20 minutes and remove those that are floating on top. Drain and rinse on the sieve.
2. Fill a saucepan with 250ml of water, pour the jelly powder and soaked kiwi seeds in.
3. Switch on the heat and gradually stir the mixture until boil, upon boiling, remove from stove and stir till bubbles disappear.
4. When the cake is set, spoon the cooled jelly solution on the cake and refrigerate again.
5. Keep in the fridge for about 2 hours or overnight then remove from cake ring and cut into slices and serve.

Notes:
1. You can add some fruit slices on top if you prefer.....
2. You can used any favour of yakult and jelly powder that you prefer.
3. Even for the biscuit base, you can change to chocolate biscuit instead of digestive Biscuits.
Just try to explore and be creative with your end-products.


Stir-fry Rainbow Vegetables

RAINBOW vegetables...... For those who is a regular visitor of my blog, you will notice that I usually used a lot of colours in my dishes. That's because I love my food to be colour and presentable. For today's veggi dish, I used all common ingredients that is good and health for everyone in the family... I call it Stir-fry Rainbow vegetables because I used 7 different types of colourful vegetables for this. And it really gives different kind of texture when you chew in your mouth.


Ingredients:
10 Sweet Bean
2 Stalks Of Celery, cut into slices
1 Small Carrot, cut into slices
8 Gingko Nuts
5 Cherry Tomato, cut into halves
3 Fresh Lily Bubs, remove the petals
1 Packet of Honshimeiji Mushroom
2 Slices Of Ginger
1 Teaspoon Finely Chopped Garlic
100- 150ml Chicken/Vegetables Stock
1 Tablespoon Cornstarch + 1 Tablespoon Water

Methods:
1. Wash, trim and cut all the vegetables then set aside. (you can used cookie cutter to stamp shapes for the carrot and celery slices)
2. Remove the Honshimeiji mushroom from the packet, cut off the end stems and rinse with water, drain and set aside.
3. Preheat a non-stick pan with 1 tablespoon of oil then saute the ginger slices and garlic till fragrant then add in the sweet bean, carrot and celery to stir till combine for 1 minutes then add in the rest of the vegetables and pour in the stock.
4. Let it bring to boil and simmer for another minutes then thicken the sauce with cornstarch mixture and remove to plate.

Notes: Stir-fry vegetables on medium high heat and must be quick do not over cooked the vegetables or else the colour will turn dark and the texture will not be crunch.Posted by Picasa

Sunday 18 June 2006

Homemade Assorted Bread

Saw this interesting and easy to make Bread recipe in one of my blogger friend Evan's blog. Her Ham Bread was very nicely done and it really give me an inspiration to try making this bread. I do a slight change on the sequence of adding certain ingredients based from another bakery book which will decrease the wetness and easier handling of the dough.

The most tedious part of making bread at home without bread machine is the kneading part. Because you had to knead at least 20 to 30 minutes until the dough is smooth, elastic and stick free from your fingers. So it's might not be a easy job if you thought of giving it up half way through.

But come to think about it..... When you can have homemade bread anytime with any fillings you prefer. It's really a wonderful things. Especially to fill the bread filling with the help of another family member or kids.... I am sure they will enjoy more of the bread which is done by them.

This recipe that Evan shares with us is really a very test-proof recipe. Since we can do it.... I am sure those who wants to try on this recipe will be able to do it as well... Just remember during the kneading process.. DO NOT GIVE UP.... Keep on kneading with your fingers without adding EXTRA FLOUR(which I used to do previously) or OIL..... I am SURE your dough will be ready within 30 minutes or less.... Do give it a try..... and I am sure you won't regards it....

Recipe taken from Evan's Kitchen Rantings.....
Ingredients: (make around 12 60g portions)
300g Bread Flour
100g Plain Flour
80g Sugar
1 Egg
1/2 Teaspoon Salt
2 Teaspoon Instant Dry Yeast
175ml Ice Water
50g Butter Or Margarine
For The Filling :
Picnic Ham
Spring Onions, Chopped
Mayonnaise(optional)
1 Beaten Egg, For Glazing

Methods:
1. Mix bread flour, plain flour, salt, sugar and dry yeast till well blended in a big mixing bowl.
2. Next add in Egg, and use finger to mix it well and slowly add in the cold water while you knead the mixture till combine then add in the butter and knead to form a pliable & elastic dough.
3. This process may take quite a while, about 30 mins or so.
4. The dough will be wet & sticky at first (and kinda messy as well), but keep on kneading (without adding oil or water) until dough no longer sticks to fingers & is glossy on surface.
5. And if you're about to give up just like I did, DON'T!
6. Place the dough in the mixing bowl, wrap it up and set aside in a warm place to allow dough to fermentate, approx. 45 minutes - 60 minutes,(depend on the weather, or you can place it in the oven with a bowl of hot water beside it) the dough must at least double in size after fermentation.
7. Use finger to press into the dough, it should show a clear finger tip mark but the dough should not sink and it's ready to use the dough.
8. Punch to release some air. Separate dough into individual 60g portions & refrigerate for about 10 mins.
9. Taking a portion of the dough out of the fridge, knead into a flat sheet just abit bigger than a slice of picnic ham.
10. Place ham on top of the dough and roll up.
11. Cut into 5 portions and place them onto a small round dish or flan tin.
12. Repeat steps 9-11 for the rest of the dough.
13. Leave on to fermentate for another further 35 mins.
14. Glaze with egg wash, drizzle with some mayonnaise & sprinkle with chopped spring onions.
15. Bake in a preheated oven of 200 degree for about 10 mins until golden brown. Brush top with margarine for a shiny glaze.

Notes: You can use the same dough for different kind of fillings: eg; red bean or green tea paste, curry chicken, hotdog or etc. Posted by Picasa


Bubor Terrigu - 椰浆大麦露

Bubor Terrigu(椰浆大麦露) is a local Singapore dessert that you can found in most of the dessert stalls in the hawker centre or foodcourts. It's actually wheat cook in sugar syrup then serve with some coconut cream.

Ingredients:
150g Terrigu(大麦)
90g Rock Sugar
100g Palm Sugar
100ml Thick Coconut Milk
Pandan Leaves
50ml Water
Pinch Of Salt

Methods:
1. Soak the terrigu for at least 3 - 4 hours with plently of water. Discard the water.
2. Boil the rock sugar, palm sugar in 50ml of water until sugar melts, sift and set aside.
3. Put coconut milk and salt in a saucepan, simmer over low heat and set aside to cool as topping.
4. Fill a large pot with 1.2 litres of water and add pandan leaves and bring to boil.
5. Add the terrigu, switch to low heat and cook the terrigu until tender and keep stirring to prevent mixture from sticking to the pot.(use non-stick pan is better)
6. Add water if mixture goes too dry, keep stirring and lastly add sugar syrup and cook for another 10 minutes.
7. For a thicker mixture, mix 1 tablespoon plain flour with 2 tablespoons water, stir in and bring to boil again over low heat and remove from heat.
8. Scoop terrigu into a bowl and add 2 tablespoons of coconut milk and serve. Posted by Picasa


ShareThis