Thursday, 22 June 2006

Pumpkin & Assorted Bean Soup

Remember the Cranberry Bean(click link for more details) that I had used for some of the soup recipes before. Today we are going to have another soup using these beautify peal bean together with some kidney beans and pumpkin to stew a wonderful soup of the day.

Kidney Beans-红腰豆
A dried kidney shape bean that is reddish brown in color, strong flavored and has a slight mealy (powdery) texture. The beans can be cooked as their own dish or can be added into other dishes, such as chili, casseroles, refried beans and salads. They are available dried or in cans, precooked. Kidney beans also provide large amounts of foliate and tryptophan. It also benefits the Spleen and invigorates the Stomach, expels Heat and Dampness. As with all dried beans, they should be sorted and washed before cooking. Soaking ahead of time reduces cooking time.


Ingredients:
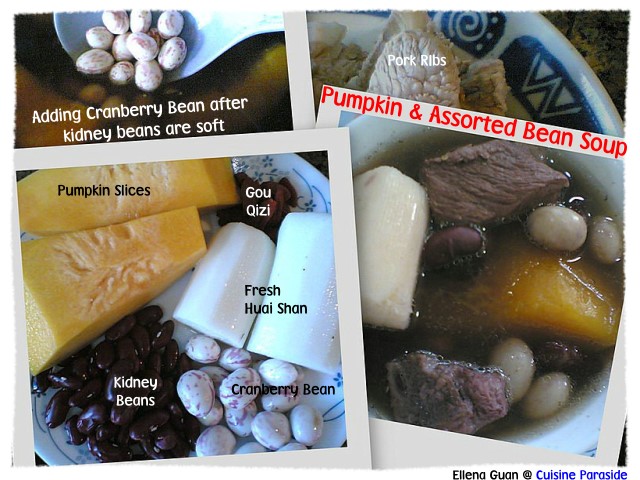
1/4 Pumpkin(南瓜), about 300g
20 Pods Cranberry Bean(珍珠豆)
100g Kidney Beans(红腰豆)
300g - 350g Pork Ribs(排骨)
1 Medium Fresh Huai Shan(鲜淮山), about 200g
1/2 Tablespoon Gou Qizi(枸杞子)
1 Piece Of Dried Tangerine Peel, 陈皮

Methods:
1. Wash, trim and blanch the pork ribs in boiling water. Rinse and set aside for later use.
2. Wash, peel and cut the pumpkin into 4 large pieces.
3. Wash and soak the kidney bean for about 30 minutes, drain and set aside.
4. Soak dried tangerine peel till soft, then scrape off the pith.
5. Remove the cranberry bean from the pod, wash and set aside.
6. Bring a pot of 1.2 litre of water to boil, then add in all the ingredients except the cranberry bean, reduce the heat and let it simmer for about 1 hrs or until the kidney bean is tender then add in the cranberry bean and continue to simmer for another 20 minutes.
7. Or you can transfer the boiled soup to a slow-cooker and simmer on LOW heat for 2 hours then add in the cranberry beans and continue to simmer for another 30 minutes season with salt and serve. Posted by Picasa

Wednesday, 21 June 2006

Kapitan Chicken Curry

This Ayam Kapitan is a very special curry paste that I had not try before and it actually used Fresh Turmeric Leaves as one of the ingredients. It has a very refreshing and special aroma when the dish is done. When you taste the curry sauce, it has a lemon scent of the turmeric leave taste and it make the curry less greasy which I find is a new taste for those curry paste that I had tried before.


Ingredients:
1 Packet Ayam Kapitan Curry Paste
500g Chicken Wings
10 Baby Potato
1 Brown Onion, finely chopped
1/2 Cup Coconut Milk
1 1/2 Cup Water
1 Tablespoon Finely Shredded Fresh Turmeric Leave

Methods:
1. Wash and trim the chicken wings then set aside for later used.
2. Mix the coconut milk with 1/2 cup of water and stir well.
3. Preheat a pot with 1 tablespoon of oil and saute the brown onion until fragrant then add in the curry paste and stir till well mixture.
4. Next add the chicken wings and potato then stir till well coated with the curry paste and let it cook for a few minutes then add in the coconut milk mixture.
5. Stir well and when it boil, add in the water and let it simmer until the sauce is almost thicken then add in the shredded turmeric leaves and simmer for another 5 minutes and serve with bread or rice.

My mum got these instant Maggi Curry Paste from one of those shopping mall in Malaysia. So I think for those who usually visit the shopping mall over there, maybe you can try to take a look at these products and give it a try... it's very special and you don't find it in Singapore. Posted by Picasa

Tuesday, 20 June 2006

Apple Yakult Cake

Got this very interesting Chilled Yakult Yogurt Cake recipe from one of my new blogger's friend Tazz(click link for her original recipe). You might be wondering... Wow.. since when Yakult(it is a kind of fermented milk drink ) can used to make cake as well..... From her recipe, I change two of her ingredients which I had some left over from making a Cheesecake. So it's kind of adventure when you got something new in the original recipe because you might not know what can goes wrong.......

But luckily the cake turns out well and everyone enjoys it so much. The texture of the cake is sort of like Lily's(Hugbear) Peach Marshmallow Cake, but as usual some of the ingredients had being recipe for a different favour and texture. For my version of Apple Yakult Cake, I used the new Konnyaku Apple Favour Jelly for the topping instead...

Ingredients For The Base: (6"/7" cake pan)
7 Pieces Of digestive Biscuits
40g Melted Butter
Ingredients For The Filling:
100g Plain Natural Yogurt
150ml Yakult, apple flavour
1 Tablespoon Lemon Juice
150ml Thicken Cream
1 Tablespoon Gelatin
3 Tablespoons Sugar
150ml Water

Method:
1. Crush the digestive biscuit in a zip-lock bag until fine crumbs then mix with melted butter, and press firmly to the base of the cake pan, set aside in the fridge for later use.
2. Dissolve gelatin and sugar in 150ml of water in a saucepan over low heat, then set aside to cool.
3. Whisk plain yogurt, yakult and lemon juice until well blended then pour in the cooled gelatin mixture and mix well.
4. Whip the thicken cream till soft peak form.
5. Slowly fold in the yogurt mixture into the whipped cream and mix well.
6. Pour the combined mixture onto the chilled biscuit base and leave it in the fridge for about 2 hours or more to set.

Jelly Topping:
1 Teaspoon of Kiwi Seeds
1/2 Packet Of Konnyaku Jelly Powder, apple favour
250ml Water

Methods:
1. Soak kiwi seeds in 1 glass of water for 20 minutes and remove those that are floating on top. Drain and rinse on the sieve.
2. Fill a saucepan with 250ml of water, pour the jelly powder and soaked kiwi seeds in.
3. Switch on the heat and gradually stir the mixture until boil, upon boiling, remove from stove and stir till bubbles disappear.
4. When the cake is set, spoon the cooled jelly solution on the cake and refrigerate again.
5. Keep in the fridge for about 2 hours or overnight then remove from cake ring and cut into slices and serve.

Notes:
1. You can add some fruit slices on top if you prefer.....
2. You can used any favour of yakult and jelly powder that you prefer.
3. Even for the biscuit base, you can change to chocolate biscuit instead of digestive Biscuits.
Just try to explore and be creative with your end-products.


Stir-fry Rainbow Vegetables

RAINBOW vegetables...... For those who is a regular visitor of my blog, you will notice that I usually used a lot of colours in my dishes. That's because I love my food to be colour and presentable. For today's veggi dish, I used all common ingredients that is good and health for everyone in the family... I call it Stir-fry Rainbow vegetables because I used 7 different types of colourful vegetables for this. And it really gives different kind of texture when you chew in your mouth.


Ingredients:
10 Sweet Bean
2 Stalks Of Celery, cut into slices
1 Small Carrot, cut into slices
8 Gingko Nuts
5 Cherry Tomato, cut into halves
3 Fresh Lily Bubs, remove the petals
1 Packet of Honshimeiji Mushroom
2 Slices Of Ginger
1 Teaspoon Finely Chopped Garlic
100- 150ml Chicken/Vegetables Stock
1 Tablespoon Cornstarch + 1 Tablespoon Water

Methods:
1. Wash, trim and cut all the vegetables then set aside. (you can used cookie cutter to stamp shapes for the carrot and celery slices)
2. Remove the Honshimeiji mushroom from the packet, cut off the end stems and rinse with water, drain and set aside.
3. Preheat a non-stick pan with 1 tablespoon of oil then saute the ginger slices and garlic till fragrant then add in the sweet bean, carrot and celery to stir till combine for 1 minutes then add in the rest of the vegetables and pour in the stock.
4. Let it bring to boil and simmer for another minutes then thicken the sauce with cornstarch mixture and remove to plate.

Notes: Stir-fry vegetables on medium high heat and must be quick do not over cooked the vegetables or else the colour will turn dark and the texture will not be crunch.Posted by Picasa

ShareThis