Showing posts with label Homemade Bread. Show all posts

Monday 1 August 2011

Cheese And Mayo Bun

I have being following "Maameemoomoo, a 1/2 food blog" since 2010 because I was attracted to Sherie's mouthwatering dishes and bakes. I still remembered vividly it was her Grilled Saba Fish and Black Sticky Rice, 3 ways which makes me among one of her die-heart readers. And furthermore, she had again captured our hearts earlier this year with our all-time favourite "Orh Nee" that she fusion into a wonderful "Orh Nee Cheesecake " which was featured in The Straits Times.

Today I am so happy to invite Sherie to guest post one of her family's all-time favourite "Cheese And Mayo Bun" recipe for us. I am sure with this quick and easy recipe we can all enjoy learning baking homemade bread in no time. Although this recipe is made using bread machine to knead and proof the dough, but no worries you can still make this bread by reading the tips shared by Sherie HERE on "How to make bread without bread machine".


CHEESE AND MAYO BUN


Bread is a daily staple in my household.

These days, i don't do 3 loaves anymore. Apart from experimenting with multigrain breads, one of my weekly must-bake would be Cheese & Mayo Bun. Everyone loves it to bits and pieces. From baby to old man (u-know-who), from me to the helper, we simply cannot resist this irresistible bun, especially now with the water roux method... Darcy is so ditching his favourite bakery. Heee!

When i was approached by the talented Ellena of Cuisine Paradise to guest post for her, i knew she would request a post on bread from me. Grin. Why? Because Ellena loves bread and buns! According to the ever so creative lady, it seems that bread doesn't like her all that much. Hence, she has never quite succeeded in making them. But you know what? Methinks that isn't at all true, because if you know Ellena, you will know that it's rather difficult not to like this oh so sweet lady! *wink*


To be honest, i didn't just thought of the toppings for this bun myself. I made this purely because of Darcy who fancies certain bakery's cheese and mayo bun. If not for Darcy, i wouldn't have thought of marrying the cheese with mayonnaise myself due to its not-so-ideal-for-the-waistline-ingredients.

But whaddaya know.... we are all now addicted to it.

Screw the not-so-idea-for-the-waistline-ingredients! HAHA!

Ingredients: (makes 8 buns)
125ml milk
56g egg
50g caster sugar
5g salt
30g butter
120g tangzhong
350g bread flour
7g milk powder
6g instant yeast

For the topping
grated cheddar cheese
mayonnaise

Method:
1. Place all ingredients in the pan of the bread machine (according to the sequence as stated in the instruction manual of your bread machine). Select the Dough function of the bread machine and press start.

2. Once the machine beeps (after 1 and half hour + 1 proofing), remove dough and give a few light kneading on a lightly floured work surface. Press out the trapped air as your knead before proceeding to chaffing and letting the dough rest for 5mins.

3. Divide dough into 8 pieces.

4. From the 8 pieces, further divide each dough into 3 pieces. Then roll each pieces to 15 cm long rope.

5. Place the rope side by side and start plaiting.

6. Continue to plait until you reach the end. Place the ends together and tuck them neatly under the bottom of the plait. Repeat for the remaining 7 pieces.

7. Place the completed plaits onto baking sheet that has been floured. Let doughs proof for 45 minutes or until double in size.

8. Squeeze or spread ample mayonnaise on the each of the bread doughs before topping them generously with grated cheddar cheese.


9. Bake at the preheated oven at 175c for 10 minutes until the bread is browned. Remove immediately.

----------------------------

Warning : Never bake this when you have little children or adults or .. wait, hmm.. actually, the word anyone would be more befitting *grin*, so yeah, never bake this when there's anyone around because the buns will fly off the cooling rack in a blink of an eye, unless that is your intention in the first place! :D


Once again, thanks Sherie for her wonderful post. And I think after this I shall not have any excuse on not trying to start my bread baking session :p Cross fingers and hope I could bake something decent from her recipe. For more bread recipes on Sherie's blog, you can refer to the list HERE.


Monday 15 November 2010

Cream Of Mushroom Soup

Out of all the western soups available, “Cream of Mushroom” is always my priority choice when making orders. To be honest, this is my first time making mushroom soup from raw ingredients rather than the all time favourite Campbell can soup.

Since I cannot find any decent button mushroom or suitable replacement from the supermarkets, I decided to replace it with Swiss browns that have a deeper and earthier flavour than white mushrooms. These mushrooms have a firm flesh that hold their shape well when cooked and they are great to be used for risotto, casseroles or even pasta sauce.

These are the ingredients and steps for making the mushroom soup:-

Ingredients: (serves 2)
1 Tablespoon Olive Oil
10g Unsalted Butter
1/2 Stalk of Leek, thinly sliced
1 Cloves Garlic, roughly minced
200g Swiss Brown Mushroom, cut into quarters
1 Cup Chicken Stock + 1/2 Cup Water
50ml Thickened Cream
Dash of freshly ground pepper
Garlic Toast, to serve


Note:
~ You can replace Leek with 1 medium Brown onion, thinly sliced.

~ You can experiment with different type of mushroom like a mixture of white button mushroom with Swiss brown, shittake mushroom or etc to achieve different flavour.


Method:
1. Give the mushrooms a quick rinse, remove the stalks and cut each mushroom each quarters then set aside.
2. Heat oil and butter in a large saucepan over medium low heat, add leek and garlic and saute for about 3 - 5 minutes till the leek is tender.
3. Add mushrooms to the leek mixture and continue to stir and cook for about 5 - 8 minutes till they are soften.
4. Next add in chicken stock and water to the mushroom mixture and simmer for another 15 minutes.
5. Remove from heat and set aside to cool before processing the soup till well combined.
6. Return the soup mixture back into the saucepan, add in 50ml of cream and stir without boiling over low heat until warmed through.
7. Ladle soup into serving bowls, swirl with some extra cream and season with pepper.
8. Serve with some homemade garlic bread.


Garlic Bread is a very tasty sides for soups or pasta dishes especially for those garlic lovers. For me I would always look forward to it to go with my favourite cream of mushroom soup. There are a lot of methods and ways for making garlic bread and below is one of my simplest way of spreading butter garlic mixture on the bread and toast it till golden brown.

Homemade garlic bread is one of the quick and easy snacks to prepare at home without much hassle. All you required is minimum amount of ingredients such as baguette, butter, garlic and some herbs.

Ingredients: (serves 2)
1 Small Baguette, cut into thick slices
50g Butter, soften
4 Cloves Garlic, minced
Dried Parsley/Italian Herbs, optional

Methods:
1. Mix the minced garlic together with soft butter and some dried herbs till well combined.
2. Cut the baguette into thick slices(about 5 equal slices), put them into the oven toaster(this is what i use, photo) and toast about 1 minute on each side.
3. Remove and let it cool off a bit before spreading it with a layer of garlic butter.
4. Return the bread back to the toaster and toast for another 3 - 5 minutes till it turns golden brown and crispy.
5. Serve it with your desire soup or even as a breakfast treat with coffee/tea.


Note:
~ The reason why I pre-toast the bread is to prevent the surface from being soggy after toasting it with the garlic butter spread. But if you are in a hurry you can omit this extra step.
~ You can prepared them ahead, stored in the freezer and toast it as when you like for breakfast treat or tea snacks too.

It is always a good way to take comfort with some piping hot homecook soup during year-end cold and rainy weather. And I am sure anyone or even your guests would be delighted for being served with a bowl of this homemade cream of mushroom soup together with a few slices of garlic bread to accompany it.


Tuesday 30 March 2010

Chocolate Hot Cross Buns

Often Easter isn't complete without eating some warm hot cross buns straight from the oven. So for this coming Easter, perhaps you would like to give this recipe a try and bake a batch of your own. I saw this recipe from one of the Australia best selling Food Magazine known as "Super Food Idea". I am a big fan of this magazine during my stay in Australia a few years back and today all thanks to my dear friend, Quinn who stays in Adelaide. With her help on getting this magazine for us, we are able to try out this wonderful Chocolate Chip Hot Cross Bun. She is so sweet and helpful that she even take photo of the recipes and email to me in case we don't received the book before Easter.

Thursday 29 June 2006

Cranberries Cinnamon Roll

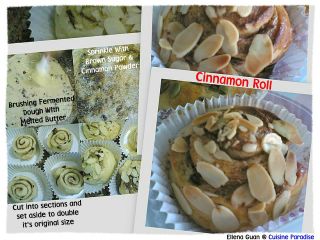
Opps! Another bread collection for Today's Breakfast. As I was making a batch of the Cranberries Cream Cheese Bread for my aunty, I decided to use half of the dough to make this Cranberries Cinnamon Roll. It's indeed very easy to prepare, just need to sprinkle some brown sugar and cinnamon powder to it.... so simple and yet so delicious........Sometime I think bread making is very simple and full of creative ideas, just as long as you get hold of the kneading process of the dough. Then with the dough, you can creative different kinds of bread according to your creation.

Ingredients: (make about 7 buns)
150g Bread Flour
50g Plain Flour
10g Milk Powder
30g Sugar
1 Medium Egg
½ Teaspoon Salt
1 Teaspoon Instant Dry Yeast
85ml Ice Water
25g Butter/Margarine
40g Dried Cranberries, finely chopped

Methods:
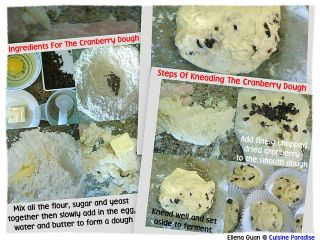
1. Mix bread flour, plain flour, milk powder, salt, sugar and dry yeast till well blended in a big mixing bowl.
2. Next add in Egg, and use finger to mix it well and slowly add in the cold water while you knead the mixture till combine then add in the butter and knead to form a pliable & elastic dough.(you might not need all the ice water, just add slowly while kneading so that it will come to a rough dough consistency then add in the butter)
3. This process may take quite a while, about 30 mins or so.
4. The dough will be wet & sticky at first (and kinda messy as well), but keep on kneading (without adding oil or water) until dough no longer sticks to fingers & is glossy on surface.
5. And if you're about to give up just like I did, DON'T!
6. When the dough is done, add in the chopped cranberries slowly and mix till well combine.
7. Place the dough in the mixing bowl, wrap it up and set aside in a warm place to allow dough to fermentate, approx. 45 minutes - 60minutess,(depend on the weather, or you can place it in the oven with a bowl of hot water beside it) the dough must at least double in size after fermentation.

For The Cinnamon Fillings:
1/2 Tablespoon Or more Cinnamon Powder
1 Tablespoon Brown Sugar
1 Tablespoon Soft Butter
1 Egg, lightly beaten
Some Almond Flakes

Methods:
1. Roll the fermented dough roughly into a 30cm by 25cm rectangle shape.
2. Spread a thin layer of butter on the dough surface and sprinkle some cinnamon powder and brown sugar evenly around the surface.(Adjust the amount by personal preference.)
3. Roll up the dough on the wider side downwards evenly, cut the rolled up dough into 6 or 7 equal parts.
4. Place the cut dough into paper mould with the cut surface facing upwards.
5. Leave it to continue ferment until it fill 80% of the mould.
6. Brush the dough with egg wash and sprinkle some almond flakes on the surface, you can spinkle some extra cinnamon powder if you prefer.
7. Bake in a preheat 180 degree oven for about 15 minutes or till golden brown, remove and set aside to cool. Posted by Picasa


Friday 23 June 2006

Cranberries & Cream Cheese Bread

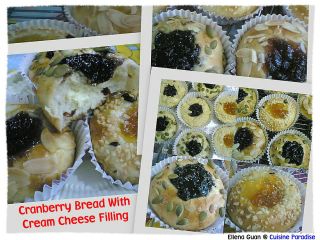
Since today is Friday and I am preparing a very simple dish for today's dinner. I took so time on and off during my son's afternoon naptime to prepare this Cranberries & Cream Cheese Bread. I used half of the previous dough ingredients that Evan suggested and add some dried cranberry in it. This bread is wonder with the cream cheese filling and some assorted jam spread on top. Although it might look complicated but it is indeed very easy to prepare.


Ingredients: (make 7 buns)
150g Bread Flour
50g Plain Flour
10g Milk Powder
30g Sugar
1 Medium Egg
½ Teaspoon Salt
1 Teaspoon Instant Dry Yeast
85ml Ice Water
25g Butter/Margarine
40g Dried Cranberries, finely chopped

Methods:
1. Mix bread flour, plain flour, milk powder, salt, sugar and dry yeast till well blended in a big mixing bowl.
2. Next add in Egg, and use finger to mix it well and slowly add in the cold water while you knead the mixture till combine then add in the butter and knead to form a pliable & elastic dough.
3. This process may take quite a while, about 30 mins or so.
4. The dough will be wet & sticky at first (and kinda messy as well), but keep on kneading (without adding oil or water) until dough no longer sticks to fingers & is glossy on surface.
5. And if you're about to give up just like I did, DON'T!
6. When the dough is done, add in the chopped cranberries slowly and mix till well combine.
7. Place the dough in the mixing bowl, wrap it up and set aside in a warm place to allow dough to fermentate, approx. 45 minutes - 60 minutes,(depend on the weather, or you can place it in the oven with a bowl of hot water beside it) the dough must at least double in size after fermentation.

Nowsday, you can find alot of bread with cranberry as one of the mixture from most bakery. Cranberries are a source of polyphenol antioxidants, chemicals which are known to provide certain health benefits to the cardiovascular system and immune system. By adding these chopped dried cranberries to the bread, it really gives a extra sweetness and crunch when eating.

For The Cream Cheese Filling :
100g Soften Cream Cheese
20g Icing Sugar
1 Teaspoon Lemon Juice
1 Grated Lemon Rind

Methods:
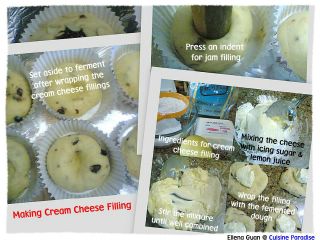
1. Sift the icing sugar into a small mixing bowl, then add in the lemon juice and stir well.
2. Next add in the soften cream cheese and lemon rind and stir till well combined.
3. Set aside in the fridge for later use.

Theoriginall recipe actually coated the bread withdesiccatee coconut and top with some blueberries jam. But since I do not have any of those items at home. I replace it with some assorted nuts and jams that I found in my fridge. So this is my version of Cranberries Bread With Cream Cheese Filling.

For Decoration:
1 Extra Egg For Glazing
Some Almond Flake/Pumpkin Seeds
Some Assorted Jam

Methods:
1. Divide the fermented dough into 7 lumps of 60g each and leave the lumps to rise for another 20 minutes.
2. Wrap about 1/2 Tablespoon of the cream cheese paste with the lumps and shape into round balls.
3. Use a small rolling pin or your thumb to press an deep indent in the middle of the bun to place the jam filling later.
4. Leave the filled balls to ferment until they have double their original size(about another 20 minutes).
5. Brush the fermented bun evenly with some beaten egg wash and top with some jam fillings in the indent and sprinkle some almond flake or pumpkin seeds on the surrounding.
6. Bake in a preheated oven of 200 degree for 10 mins until well risen & golden brown.
7. Glaze buns with margarine while hot.

Notes: You can used any types of jam that you prefer for the top fillings. Posted by Picasa


Sunday 18 June 2006

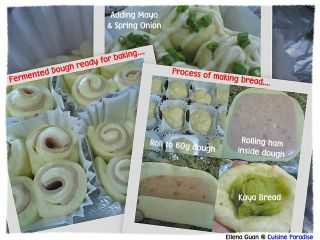
Homemade Assorted Bread

Saw this interesting and easy to make Bread recipe in one of my blogger friend Evan's blog. Her Ham Bread was very nicely done and it really give me an inspiration to try making this bread. I do a slight change on the sequence of adding certain ingredients based from another bakery book which will decrease the wetness and easier handling of the dough.

The most tedious part of making bread at home without bread machine is the kneading part. Because you had to knead at least 20 to 30 minutes until the dough is smooth, elastic and stick free from your fingers. So it's might not be a easy job if you thought of giving it up half way through.

But come to think about it..... When you can have homemade bread anytime with any fillings you prefer. It's really a wonderful things. Especially to fill the bread filling with the help of another family member or kids.... I am sure they will enjoy more of the bread which is done by them.

This recipe that Evan shares with us is really a very test-proof recipe. Since we can do it.... I am sure those who wants to try on this recipe will be able to do it as well... Just remember during the kneading process.. DO NOT GIVE UP.... Keep on kneading with your fingers without adding EXTRA FLOUR(which I used to do previously) or OIL..... I am SURE your dough will be ready within 30 minutes or less.... Do give it a try..... and I am sure you won't regards it....

Recipe taken from Evan's Kitchen Rantings.....
Ingredients: (make around 12 60g portions)
300g Bread Flour
100g Plain Flour
80g Sugar
1 Egg
1/2 Teaspoon Salt
2 Teaspoon Instant Dry Yeast
175ml Ice Water
50g Butter Or Margarine
For The Filling :
Picnic Ham
Spring Onions, Chopped
Mayonnaise(optional)
1 Beaten Egg, For Glazing

Methods:
1. Mix bread flour, plain flour, salt, sugar and dry yeast till well blended in a big mixing bowl.
2. Next add in Egg, and use finger to mix it well and slowly add in the cold water while you knead the mixture till combine then add in the butter and knead to form a pliable & elastic dough.
3. This process may take quite a while, about 30 mins or so.
4. The dough will be wet & sticky at first (and kinda messy as well), but keep on kneading (without adding oil or water) until dough no longer sticks to fingers & is glossy on surface.
5. And if you're about to give up just like I did, DON'T!
6. Place the dough in the mixing bowl, wrap it up and set aside in a warm place to allow dough to fermentate, approx. 45 minutes - 60 minutes,(depend on the weather, or you can place it in the oven with a bowl of hot water beside it) the dough must at least double in size after fermentation.
7. Use finger to press into the dough, it should show a clear finger tip mark but the dough should not sink and it's ready to use the dough.
8. Punch to release some air. Separate dough into individual 60g portions & refrigerate for about 10 mins.
9. Taking a portion of the dough out of the fridge, knead into a flat sheet just abit bigger than a slice of picnic ham.
10. Place ham on top of the dough and roll up.
11. Cut into 5 portions and place them onto a small round dish or flan tin.
12. Repeat steps 9-11 for the rest of the dough.
13. Leave on to fermentate for another further 35 mins.
14. Glaze with egg wash, drizzle with some mayonnaise & sprinkle with chopped spring onions.
15. Bake in a preheated oven of 200 degree for about 10 mins until golden brown. Brush top with margarine for a shiny glaze.

Notes: You can use the same dough for different kind of fillings: eg; red bean or green tea paste, curry chicken, hotdog or etc. Posted by Picasa


ShareThis