Showing posts with label Peanut. Show all posts

Tuesday 26 June 2012

Kueh Tutu aka 嘟嘟糕


Kueh Tutu (嘟嘟糕) is a traditional Singaporean delicacy which is made using roasted rice flour and fillings such as grated coconut or peanut powder. Nowadays it is not easy to find some authentic ones which taste as good as it used to be.

Recently I have posted a Kueh Tutu photo on facebook (HERE) which draws over "300+ likes" from readers and some even suggested a few places where we can still find some yummy Kueh Tutu.


KUEH TUTU
嘟嘟糕


3rd Trial of my Kueh Tutu with Coconut Filling
My love for Kueh Tutu starts when I was in primary school as I remembered vividly that my father used to get them for me at least twice a week from one of the shop near our area. And I always love those with coconut filling compared to the rest.

So when readers ask about Kueh Tutu recipe, I thought perhaps I could try to Google. With lucky, I managed to find some posts online using a similar recipe they adapted from the Food And Travel Magazine (Singapore version). You can read more about Kueh Tutu and where to get it's mould HERE.


Recipe adapted from Food And Travel Magazine, August 2010 issue.

(Make: 12 |          Preparation: 15 minutes |         Cooking: 8 minutes per batch)

Ingredients:
1 Kueh Tutu Mould
2 Cups Rice Flour
3/4 Teaspoon Salt
1 Teaspoon Caster Sugar
170ml Hot Water
Pandan Leaves, cut into squares

Coconut Filling:
1/2 Cup Fresh Grated and Skinless Coconut
1/4 Cup Brown Sugar/Gula Melaka

Steps On Coconut Filling:-
1. Prepare the coconut filling. Heat a pan over medium heat and melt the brown sugar together with some pandan leaves.

2. Stir in the grated coconut and cook until the mixture is well coated with the melted sugar and fairly dry. Set aside.

(You can use either frying pan or microwave method to roast the rice flour)

Steps On Cooked Rice Flour:-
3. Next dry roast rice flour in a non-stick pan with some pandan leaves for 2 minutes on medium heat or alternatively you can microwave it on medium high heat (1 minute) with some pandan leaves.

4. When done, remove it from heat and leave it to cool.

5. Mix salt and sugar in the hot water and sprinkle over the roasted rice flour.

6. Using a fork combine the liquid and flour until the mixture is cool enough to touch. this this an important step, the flour mixture should not be too dry nor too wet or else it would affect the end result when shaping the kueh tutu as well as its texture)

7. Sieve the grainy mixture to get a fine and sandy texture. (the texture resemble grated coconut with that bit of moisture)
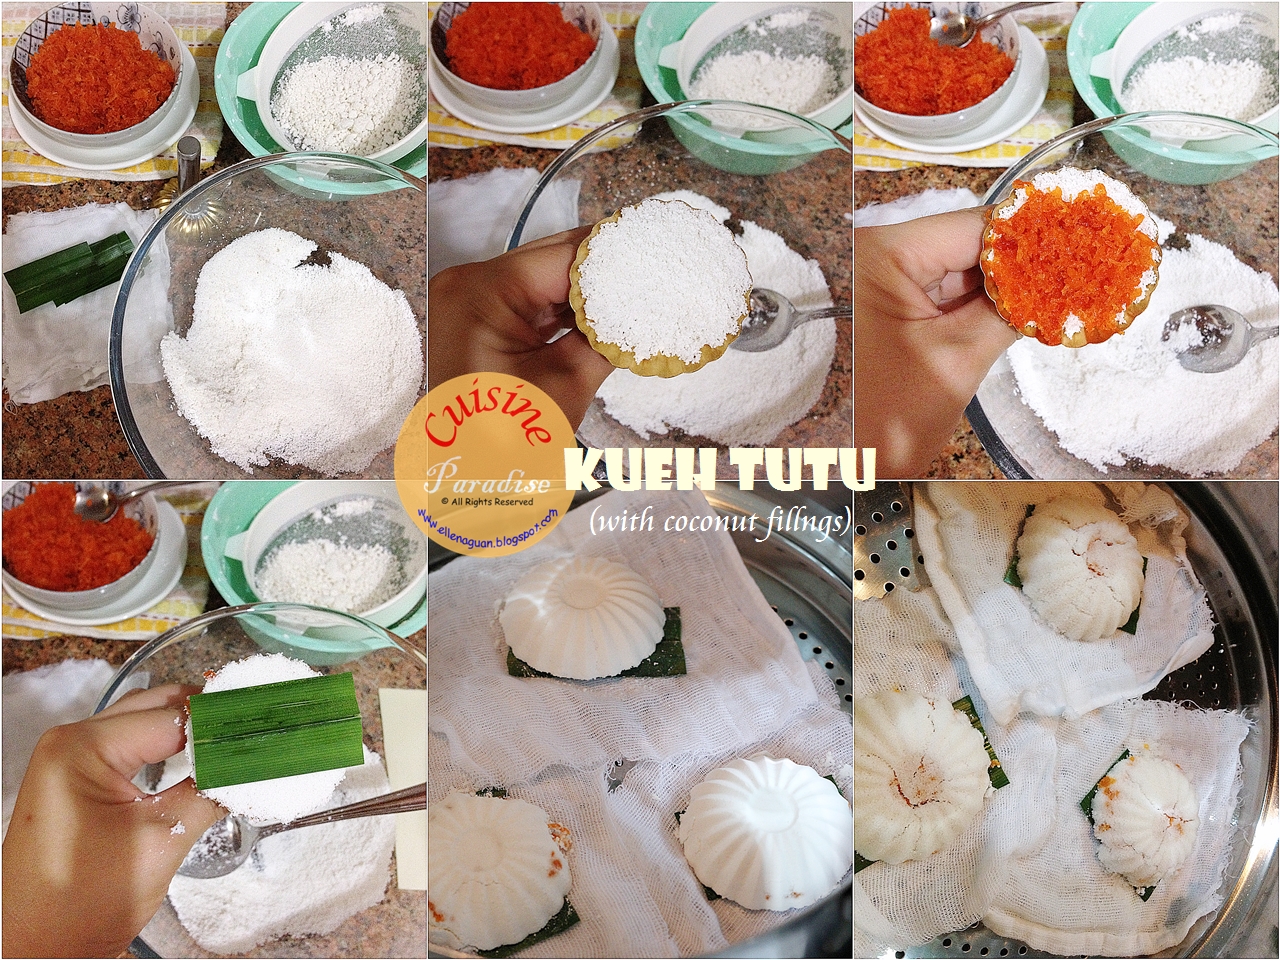

Steps On Shaping the Kueh Tutu:-
8. Fill half the kueh tutu mould with prepared flour, top with 1 teaspoon of the coconut filling and cover with more flour.

9. Place a small piece of pandan leaf over it and press with a square muslin cloth.

10. Turn it over (lightly give it a knock) on the steamer rack with the muslin cloth below.

11. Repeat the above steps until the remaining flour and coconut filling(or peanut filling) have been used up.

12. Steamed the kueh tutu for about 7 minutes on medium heat. Remove from the steamer and serve immediately.


2nd Trial of my Kueh Tutu. Photo taken using iPhone
Although making Kueh Tutu at home is not an easy task and some of you might not be able to get hold of the mould because of the country that you are in. But as long as you could get hold of the rice flour(any brand), pandan leave(can be omit), grated coconut/peanut you could apply this recipe by using similar size plastic or aluminum foil cases to act as the mould.

Just for your information, a reader(Janetan) wrote me a note to me that she found a useful tips online:-
"to let the kueh stay soft, the secret is roast the rice flour then steamed using steam bath and cover with a wet cloth".
Perhaps you would like to consider this point when preparing the rice flour which is the key success of the Kueh Tutu.

Don't worry if you don't get the texture right on the 1st trial, always starts with 1 cup of the flour to test out the recipe if you prefer. Happy trying and I hope to hear from your feedback too.

Tuesday 15 May 2012

Taiyaki (たい焼き)


Taiyaki (たい焼き) is a Japanese fish shaped pancake which is commonly filled with red bean paste that is made from sweetened azuki beans. But in these day, there are many other fillings such as custard, chocolate, cream cheese or even sausage in it.

As usual the creative and wonder members in Munch Ministry facebook group always bring up interesting kitchen gadgets to share with the rest of the members and just recently, there is a rave in making these cute Taiyaki in the group due to some promotion on the Taiyaki Pan shown above.


TAIYAKI
(たい焼き)


All related Photos and Recipes of Taiyaki are ©Copyright by Ellena Guan of Cuisine Paradise. All rights reserved.

These yummy little treat is actually very easy to make at home if you have a Taiyaki Pan. What you required is to get hold a pack of Pancake Premix plus some Instant Fillings such as Cream Cheese, Nutella, Peanut Butter, Kaya and etc.


(Make: 6 |            Preparation: 3 minutes |             Cooking: 20 minutes)

Ingredients:
150g (1 sachet) Morinaga Pancake Premix
1 Large Egg, 60g
100ml Fresh Milk
1/2 Tablespoon Cornflour
Some Nutella, Peanut Butter, Cream Cheese or etc
1 Taiyaki Pan


Method:-
1. Whisk egg and milk together in a mixing bowl or jug till combined. Add in 1 sachet of Morinaga pancake premix and stir till the mixture resemble cake batter.

2. Lightly brush oil on both inner sides of the Taiyaki pan. Preheat it 30 seconds before ladle a small amount of batter(refer to the step-by-step photo above) to the preheated pan (on one deeper print side).

3. Add your desire fillings such as 1 tablespoon of nutella/peanut. Next pour a little more batter just enough to cover the paste. Close the pan and cook for 1 minute 20 seconds on medium low heat.

4. Flip the pan over, cook for another 1 minute or more, open the pan slight and check the colour of the fish. Careful not to overcook and burn it as they should be golden brown on each side.

~~~~~~~~~~~~~~~~~~~~~~~~~~
NOTE:-
~ To get a nice evenly golden brown colour for your Taiyaki, the "secret" lies on the heat and timing for cooking the Taiyaki.


All related Photos and Recipes of Taiyaki are ©Copyright by Ellena Guan of Cuisine Paradise. All rights reserved.

Above is my first batch of assorted Taiyaki (たい焼き) made using Morinaga Pancake Premix filled with some of our favourite spread such as Cream Cheese and Nutella . And all these are made in less than 30 minutes where you can prepared a delicious and healthy breakfast or snack for your kids. I am sure nobody will be able to resists a piping hot Taiyaki with crispy outsider layer and soft inner texture with oozing filling in their mouth.

ShareThis