Showing posts with label Jam And Spread. Show all posts

Thursday 13 September 2012

Pandan Kaya Using Joyoung Soymilk Maker

My impulse on making this Pandan Kaya comes from Celes (Celestial Delish) who recently shared with us some of her delicious homemade kaya as we were both inspired by Chef Ann's mentioned on making kaya using Joyoung soymilk maker during the media preview (read more here).

Making kaya is quiet similar to the western style of making lime/lemon curd or custard where egg, sugar and in this case, coconut milk and pandan leaves are needed for it's uniquer fragrant, colour and taste. Here with either soymilk maker or bread machine that comes with "Jam" function, it actually cuts down cooking time a lot more and delicious homemade kaya will ready ready in breeze without you standing at the stove for hours stirring and keep an eye for it.


HOMEMADE PANDAN KAYA
(using Joyoung Soymilk Maker)


I love the natural jade green colour and taste of this Homemade Pandan Kaya. The natural green and unique aroma comes from using fresh Pandan Leaves blended with coconut milk which both can be found in either major supermarkets or wet markets.


(Make: 1 Cup  | Preparation: 10 minutes  | Cooking: 30 minutes)

Ingredients:
250ml Coconut Milk
4 (55g) Whole Egg
120g - 150g Caster Sugar
15 Pieces of Pandan Leaves


Method:-
1. Blend Pandan leaves (cut into 1cm wide pieces) together with coconut milk and strained through muslin cloth or soup bag. Set aside.

2. Whisk egg and sugar together till sugar dissolve (about 2 minutes or less). Stir in pandan coconut milk mixture and mix well.

3. Pour the mixture into Joyoung soymilk maker. Select "Jam" function. (I repeat the process twice in the soymilk maker to get a thicker texture)

4. Once done, let it stand in the machine for about 5 minutes. Transfer mixture to a double-boiler (I pour it into a glass mixing bowl and simmer over a pot of boiling water till the kaya is thicker, it takes about 8 - 10 minutes)

5. Store kaya in sterilized glass jar (boil glass jar in boiling water for about 5 minutes) and keep in the fridge after completely cool down.


Wednesday 15 August 2012

Kiwifruit Compote

If you still remember, last month I have shared a post on Blueberry Vs Raspberry Compote (recipes here) where you could used it as topping for yoghurt, pancake, crepe, cheesecake and etc. Here since I have some extra kiwifruit from my #14daysofZespri goodie bag, I decided to make some Kiwifruit Compote to go with toast or crackers for a healthier snack.


KIWIFRUIT COMPOTE


For your information, I used this Kiwifruit Compote for my "Kiwifruit Yoghurt Parfait" which featured in the other post HERE.


(Makes: 1/3 Cup       | Preparation: 2 minutes      | Cooking: 3 - 5 minutes)

Ingredients:

Method:-
1. Peel the outer skin of the kiwifruits and cut it into 1.5 cm cubes.

2. Put all the ingredients into a heavy duty saucepan, simmer over medium low heat until the sugar melt and kiwifruit soften. (Do not overcook the berries else the compote will end up to be with too much juice)

3. Remove from heat and serve warm with pancakes or crepes. Or alternatively you can stored cool compote in sealed container in the fridge for up to a week.

Indeed this can also be a very addictive quick snacks due to it's sweet and sour refreshing taste plus a hint of citric aroma from the lemon rind. To bring the taste, you can also pair it with some smoke or cheddar cheese.

This is our all time favourite cheese cubes and best is they comes in different flavour each box!

For more interesting recipes using Kiwifruit, you can visit Zespri website @ http://www.zespri.com.sg/

Friday 18 May 2012

{EVENT ENDED} Gold Kili Coffee plus Frezfruta Jam Giveaway!


Hi! It's Friday again and it's time to slow down your pace and get ready for the weekend break if you have being work too hard for the week. Here I have some new products review plus giveaways to brighten up your day as well as boost up your energy with a cup of fragrant coffee from Gold Kili.

I am sure most of you who stays in Singapore have either tried or heard of "Gold Kili" products before. Since 1985, Gold Kili has being a local coffee manufacturer and distributor with great selection of Instant Beverages such as their ever popular Instant Honey Ginger and Instant Honey Chrysanthemum. And just recently Lion City Distribution, a joint venture between Gold Kili and Frezfruta has launched a total of 7 products on their improved coffee, tea, cereal and jam which some are shown on the post below.


GOLD KILI
Double Shot Instant White Coffee And Kopi O


Double Shot Instant White Coffee features the strong full-bodied taste of the finest Arabica Beans blended with a rich creamer and as well first instant coffee in the market which has "Inulin(寡糖)" added. Inulin is known to promote the growth of good Bifidus bacteria to help maintain a good digestive systems which worth giving it a Shot!
Retail Price: S$6.50/packet of 15 sachets


Kopi-O 35% Less Sugar is a new and improved from Gold Kili's 2-in-1 Kopi-O (35% Less Sugar) using 100% ground coffee that’s traditionally roasted in Singapore but this new packaging comes with less sugar for the health-conscious. So for those who prefer non-milk coffee this will be a great choice to start your day with.
Retail Price: S$4.30/packet of 20 sachets


FREZFRUTA KAYA AND JAMS


For regular consumer, you will notice they orange-coloured Frezfruta Kaya has actually being replace from "tin-can" to a classy glass bottle like what other competitor brands used. Although this traditional kaya might not be of liking to those who fancy thick, creamy and fragrant kaya such as from Yakun toast but in another view this might be someone else favourite too. So for a chance no harm giving this a try on your toast or baguette.
Retail Price: S$2.25/bottle


Frezefruta Peach as well as Frezefruta Apple Blueberry Jam are new fruits jam in the  market made from IQF(Individually Quick Frozen) fresh fruits, with a high fruit content of 50%  that is natural goodness at its best. Although I do make my own jam from time to time(read more on homemade jam recipes here) but it has never come across my mind to combine apple with blueberry into jam. So upon trying their Apple Blueberry Jam it indeed gives me a light and refreshing berries taste which goes well with a few cream crackers and a cup of tea.
Retail Price: S$3.00/bottle


For more product updates and recipes using Gold Kili and Frezfruta Jam, you can follow Lion City Distribution(the official distributor of Gold Kili Coffee & Beverages products, Frezfruta Jam and Kaya as well as other food items in Singapore)at their facebook page HERE.

EVENT ENDED AS ON 20 May 2012

GIVEAWAYS! - SINGAPORE ONLY


Thanks to the sponsors Frezfruta and Gold Kili. Here we are giving away a set each of the above items(Peach, Apple blueberry Jams and Kaya, Double Shot White Coffee and Kopi-O Less 35% sugar) to 3 Lucky Readers of Cuisine Paradise. To participate, please please refer to our facebook page HERE.

NOTE:-
~ For those who has no facebook account but wish to join in this Giveaway. Please leave a comment on which is your favourite old Kili Beverage or Frezfruta Jam.
Example:- I love Gold Kili Kopi-O 35% Less Sugar

Saturday 21 August 2010

Homemade Kiwifruit and Apple Jam

Recently I have posted a "Blueberry & Banana Jam - 蓝莓香蕉果酱" (click HERE) over at my "Omy blog" which is written in Chinese. And since I have some extra Kiwifruit in the pantry which mum bought it from the recent kiwifruit promotion at the supermarket, I decided to use it to make this jam.

Spreading some lovely homemade jam on warm toasted bread is definitely a wonderful things to start off the day for morning breakfast. My mum loves to have jam on either toast or plain cracker for her morning breakfast so whenever there is extra fruits in the fridge I will make some lovely jam for her.

To start with we will need some fresh kiwifruit, apple and lemon together with caster sugar. There are a few types of kiwifruit available from the fruit stalls or supermarket depending of which countries they are from. I am sure you have tried the green kiwifruit and golden kiwifruit which is yellowish after removing the outer skin.

You might like to take this photo as reference to shows the steps and changes that took place while cooking the jam.

Ingredients: (make about 1 cup)
2 Medium Size Green Kiwifruit, about 150g
1 Apple, about 150g
220g Sugar
Rind of 1 Lemon
Juice of Half Lemon

Method:
1. Bring a pot of water with jam bottle in it to a boil and boil them for 5 - 8 minutes or so to sterilize them, removed and invert for them to dry.
2. Peel off the skin from the kiwifruit and apple and chopped them into fine cubes.
3. Place all the above ingredients in a heavy-duty saucepan(choose a slightly higher saucepan as the mixture will rise as it boils) and bring to boil over medium high heat and stirring occasionally.
4. Reduce heat to medium and cook, stirring constantly and skimming foam as necessary.
5. Cook about 10 minutes, until mixture begins to look syrupy and thickens slightly.
6. Once the mixture is stiff enough with a glossy outlook remove the pot from the heat and start filling the jam bottle.
7. Fill the jam near to the rim, screw the cap on and leave it to cool.
8. The jam needs to be refrigerated to prevent mold from forming and it can be kept in the fridge for 2 - 3 weeks.


Note:
1. The jam will look rather watery when done, but don't worry it will thicken up when it cools down to room temperature.


Kiwifruit consists of twice as much vitamin C as there are in oranges so in fact you need one kiwifruit each day to get that amount to replenish your daily intake. But if you or your kids don't prefer to eat the fruit as it's own, perhaps you can consider to some kiwifuits to make some smoothie or jam like what I have shared above. Posted by Picasa

Saturday 20 June 2009

Banana & Orange Cinnamon Jam

Remember the Banana and Passion fruit Jam that I posted in April? My mum really love the taste and fragrant of that jam so since she gave me some banana on Friday I decided to try out another type of Banana Jam. This round I use the combination of Banana and Orange together with a touch of Cinnamon Powder. So you can imagine the sweetness of banana, tangerine fragrant from the orange and a touch of Cinnamon spice................


As usual, you don't really need any fancy ingredients. All you required is about 2 medium size banana, 1 big orange and some cinnamon powder. And don't forget to get two glass jar for your jam. (you can use re-cycle jam bottle for this)Posted by Picasa

Ingredients:
2 Ripe Medium Banana, about 200g
1 Large Orange, without peel about 100g
Grated Rind of 1 Orange
Juice of Half Orange, 50ml
1/4 Teaspoon Cinnamon Powder
200g Caster Sugar
2 Small Jam Bottles

Method:
1. Weight and pour the sugar into a small heavy duty saucepan, then add in the grated orange rind. (Washed, clean dry the orange and grate the rind)
2. Cut the orange into half, juice half of it to get about 50ml of juice then cut off the outer peel of the other half of the orange, remove the pith and membrane.
3. For each section, cut between the fruit and membrane on each side. Lift out each segment and drop it into the saucepan together with the sugar.
4. Next weight and mash the banana with a fork then add it into the saucepan together with the orange juice and cinnamon powder.
5. Stir all the mixture over medium low heat for about 10 - 15 minutes.
6. When the mixture begin to boil a lot of forms will form, do skim away those form and continue to cook until the mixture is clear and thicken.(refer to the above picture for details, the jam will continue to thicken further after it is cool to room temperature)
7. Pour the cooked jam into the sterilize glass bottle, covered and let it cool to room temperature before storing it in the fridge.

Note:
a) Bring a pot of water with jam bottle in it to a boil and boil them for 10 minutes or so to sterilize them, removed and invert for them to dry. (you can do this while cooking the jam)

Related Post:
1) Homemade Banana & Passion Fruit Jam
2) Homemade Mango Jam
3) Homemade Plum Jam
4) Homemade Strawberry Jam


Thursday 16 April 2009

Homemade Banana & Passion Fruit Jam

This is definitely a simple and easy to attempt keeper recipe. I got to know this special Homemade Banana & Passion Fruit Jam from Happy Home Baking website(click here). You should take a look at her recipe if you are interested in making your own jam at home. It's very simple and straight forward. All you required is only 3 Ingredients which are:- Ripe Banana, Passion fruit Pulp and Sugar.

Put all these ingredients into a small heavy-duty saucepan and simmer on medium heat for about less than 10 minutes and you will have your very own Homemade jam in no time...... So do hope by to her blog shown on the above link for more detail :) I promise you will be in love with the texture and fragrant of this jam. Posted by Picasa

Saturday 18 October 2008

Homemade Mango Jam

The name Mango is from the Malayalam word 'Manga' which was introduced to Europe from Calicut by the Portuguese in late fifteenth century during the spice trade. The ripe fruit is variable in size and color, and may be yellow, orange, red or green when ripe, depending on the cultivate. Mangoes are used in chutney; Western recipes are often sweet and so use ripe mangoes, but in the Indian subcontinent is usually made with sour, unripe mangoes and hot chilis or limes.

Mango is rich in a variety of phytochemicals and nutrients that qualify it as a model "superfruit", a term used to highlight potential health value of certain edible fruits. The fruit is high in prebiotic dietary fiber, vitamin C, polyphenols and carotenoids

After the Strawberry and Plum Jam, Tracy and I are kind of into jam making craze so on the 3rd batch of trial. We decided to test it on Mango which is commonly found in the local fruit stall. But I guess you won't be able to find mango jam or mango chutney in Singapore. So if you are a mango lover why not test out this lovely mango jam and you can use it for cakes or tarts filling too..... Like eg. I used this Mango Jam to make Mango Jam Cake.Posted by Picasa

Ingredients: (make about 250g jam)
3 Medium Size Ripe Mango, about 2 cups of cut fruits
1/4 Cup of Sugar
1 Tablespoon of Lime Juice
1 Lime Rind

Methods:
1. Peel and cut the mango into small cubes and combine all the ingredients in a heavy duty saucepan and cook on medium heat, stirring in between.
2. The sugar will melt and the fruit will break down within 5 - 7 minutes (refer to the picture above).
3. At first, the mixture will be soggy and watery but after another 5 minutes or so, it will bind together into solid and smooth texture.(the whole process takes about 15 - 20 minutes, remember to stir in between to prevent it getting burnt)
4. Turn off the heat and let it cool completely and store in a clean jar and store in the fridge.

Notes:
a) The taste and fragrant of this mango jam will varies from the type of mango that you use.

Thursday 9 October 2008

Homemade Plum Jam

Nothing beat the Freshly Homemade Jam using fresh fruits as you can control the amount of sugars as well as no preservative is added during the making process. After the Strawberry Jam making, Tracy and I continue to experience with different kind of fruits to make jam for our kids. Do you believed that I made these Plum Jam in just less than 30 minutes late in the night after hearing Tracy great comments on her Plum Jam :)

As you can see from the picture, the process of making Plum Jam is actually more or else the same as making Strawberry Jam. The Plum Jam actually thicken faster and the texture is more gel like compare to strawberry jam due to the pectin in it. If you like those a bit sweet and sour taste jam, do give this a try......Posted by Picasa

Ingredients:
5 - 6 Sweet Red Plum
1/2 Cup Sugar
1 Tablespoon of Lime Juice

Methods:
1. Wash and stone the plum then cut it into small cubes and place together with the rest of the ingredients in a heavy based saucepan and cook over medium heat till it boil.
2. Place a saucer into the freezer to chill as you'll need this when you come to test the setting point of the jam.
3. Reduce heat to medium and cook, stirring constantly and skimming foam as necessary.
4. Cook about 10 minutes, until mixture begins to look syrupy and thickens slightly. 7
5. Spoon ½ teaspoon of the hot mixture onto the cold saucer and let it rest for 30 seconds. Tip the saucer to one side; jam should be a soft gel that moves slightly.
6. If mixture is thin and runs down side of plate, the gel is too soft. Cook jam 1 to 2 minutes longer, stirring constantly and repeat the test again.
7. Once the mixture is stiff enough remove from the heat and start filling the jam bottle.

Notes:
a) Don't be panic if you happen to see some water or juice form when cooking the fruits. It will evaporate and thicken when continue to cook.


Wednesday 1 October 2008

Homemade Strawberry Jam

Since Strawberries are in season now and the supermarkets are also having sale on it. I decided to grab a few boxes of fresh strawberries to try making some Strawberry Jam. To my surprised they really turn out well and it taste fruit and fragrant and you can also control the sweetness of the jam. The different between these two is Jam is made from chunk or slices of fruit pieces. Preserves are made from whole fruit, or at least larger pieces.

Monday 7 August 2006

Homemade Ricotta Cheese

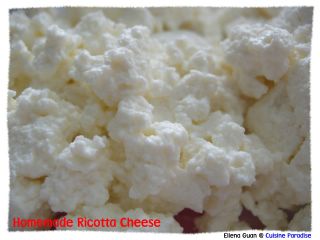
Can you "Guess What Is This Cloud Like" thing in the picture? I bet you can't right, you might think that is the cooked egg white or some over whipped cream. Actually this is my 1st Homemade Ricotta Cheese which is introduce by Tracy base of her research on some blog sites.

Ricotta is an Italian cheese made from the whey which results when making cheeses such as mozzarella or provolone. The name "ricotta" means "cooked again" in Italian, referring to the second processing of the liquid to produce the cheese. Ricotta is similar in texture to cottage cheese though considerably lighter and is a key ingredient in cheesecake, lasagna and many cannolis. It is often served mixed with sugar, cinnamon and occasionally chocolate shavings as a dessert in Italian household

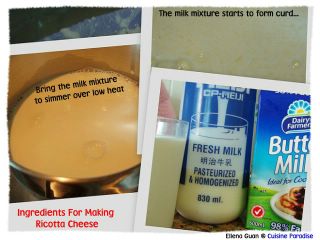
For those who is interested in trying out, you might take some reference from these blogs Lex Culinaria blog, Fias Co Farm, Ricotta Making. For my case, after some simple conversion and calculation, I starts trying on using small amount of milk and I made two different batches of ricotta cheese by using buttermilk and lemon juice separately. The finally result from using lemon juice is much finer and smooth compare to the buttermilk.


Ingredients: (make about 125g ricotta cheese)
120ml Buttermilk/55ml Fresh Lemon Juice
480ml Fresh Whole Milk

Methods:
1. In a small milk saucepan, simmer the fresh whole milk over low heat until around 90 - 95 degree.(you need to have a themometer that reads up to 100 degrees or more, if not you have to estimate the timing when you saw a lot of steam rising and it's almost going to boil)
2. Slowly add in the buttermilk or lemon juice and give it a gentle stir.(do not over stir it or you will break up the large ricotta pieces)
3. You will see very tiny white particles floating in the whey.
4. Remove the pot from the heat and set it aside, covered to rest undisturbed for about 15 minutes.
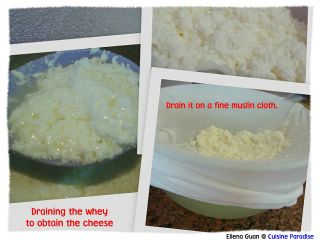
5. Line a big container or mixing bowl with muslin/cheese cloth.
6. Slowly pour the whole whey mixture into the prepared bowl and drained until the no liquid left on the cloth.(the more milk you used, the longer it will take to drain)
7. When it has drained, place the ricotta in a clean contain and you can keep it in the fridge for up to one week.

Notes:
You can season the ricotta with either salt or salt depending what you wanted to used it as.

You can use it for pizza filling, crepes or making ricotta cheese cake or muffin. Posted by Picasa


Friday 9 June 2006

Lemon Curd

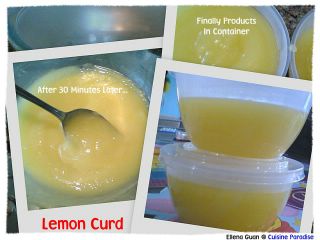
Lemon curd is a delicious tart, soft, thick, spreadable cooked cream that contains eggs, sugar, lemon juice and lemon zest. It has more lemon juice and zest and a more buttery taste than lemon filling. Lemon curd can be served as a spread for scones or toast, and goes well with tea at any time of day. It is also wonderful as a filling in trifles, tarts, sponge and cakes.

In this recipe the lemon curd is cooked over a saucepan of simmering water to help prevent the eggs from curdling and curd getting burnt. Problems can arise (eg: curd not thickening) if the temperature of the 'simmering' water is too low. Unfortunately, on the stove we do not use exact temperatures like we do with ovens. In this recipe "simmer" is defined as the point just short of a boil which is when bubbles begin to appear.

The lemon curd will continue to thicken as it cools. Remember to cover immediately (so a skin doesn't form) and it can be kept refrigerate for up to 1 month. Thanks Tracy for introducing me this wonder and fragrant Lemon Curd.

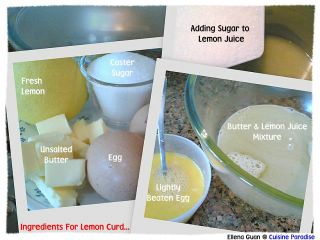
Ingredients:
1/2 Cup(125ml) Lemon Juice
150g Caster Sugar
65g Butter, cubes
2 Eggs, lightly beaten
1 1/2 Grated Lemon Rinds

Methods:
1. Place lemon juice, lemon rinds and sugar into a small saucepan. Heat gently, stirring until the sugar has dissolved.
2. Add butter, stir until melted then remove from the stove.
3. Slowly whisk in the beaten egg and stir the mixture together at the same time until well combined.
4. Next pour the egg mixture through a fine strainer into a big glass/stainless steel mixing bowl to remove any lumps.
5. Place the bowl over a saucepan of gently simmering water and simmer and stir often for about 25 minutes or more until the mixture thicken(like custard) and coats the back of a metal spoon.
6. Make sure that the mixture does not boil or it will curdle.
7. When the lemon curd is ready, pour it into prepared warm, sterilised jars. Seal tightly, allow it to cool then store in the refridgerator.

Notes: If you prefer a thicker curd, make a paste of 1 teaspoon cornflour and 2 teaspoons water. Blend into prepared hot curd. Transfer to a saucepan, bring to the boil and simmer for 1 minute then pour into jars. Posted by Picasa


ShareThis