Thursday 6 October 2011

New Dishes From Golden Village Gold Class Lounges


It has being ages since I last step into cinema to enjoy a good movie as well as pamper myself  at their Gold Class Lounges. Recently Golden Village (GV) has introduce a new Gold Class menu with a mix of hearty Western delights as well as contemporary local favourites to bring an exclusive and luxurious movie experience within the Golden Village Multiplex. (Gold Class is available at GV VivoCity and GV Grand)

These GV's Gold Class signature dishes are prepared by Executive Chef Chris Foo and Chef de Cuisine Ronnie Ng, backed with almost 50 years of combined culinary experience in French, Continental, Chinese and Singapore cuisines.


Golden Abalone Soup Noodles @ S$18.00
(*New / Exclusive to GV VivoCity) 


If you are looking for something to pamper yourself after a hectic work week while enjoying the movie, perhaps you might want to consider a bowl of this Golden Abalone Soup Noodles. It consists of homemade rich abalone broth served with noodles and accompanied by seafood dumplings, tiger prawn and abalone. And this dish is food for the soul, presenting a hearty yet comfortable option especially for rainy day.


Trio of Desserts @ S$14.00
(*New / Available at both GV VivoCity and GV Grand)


For those who craving for dessert and cannot decide on which to choose; a sugary combination of Cinnamon Praline Mousse, Wild Cherry Almond Tart and Blueberry Pannacotta will be a great choice to delight any sweet tooth.


Diners may also choose to indulge in the 3-course Gold Class Set Menu at S$30.00 / S$33.00 which includes a choice of one appetizer, one main course, and dessert, served with coffee or TWG Tea, or soft drinks of their choice. And all GV Movie Club members also gets to enjoy a 10% off menu prices at Golden Village Gold Class by presenting their card before payment. For more details, you can visit www.gv.com.sg

Pork Schnitzel And Apple Salad

Pin It

Salad isn't just some mixture of vegetables, mixed fruits, pasta and etc with dressings. Sometime it can be consider as a Main Meal with additions of meat and seafood to make it more nutritious and family meal. Here we have Pork Schnitzel to go with some salad green and crunchy apples for combination of textures and flavour. And for me I find this is also a good way to get kids to eat vegetables and fruits with that extra slices of yummy pork schnitzel that goes with it.


PORK SCHNITZEL AND APPLE SALAD 


(serves: 4 | Preparation: 20 minutes | Cooking: 5 minutes)

Ingredients: 
4 Pork Sirloin Steaks, fat trimmed
1/2 Tablespoon Cornflour
1/2 Tablespoon Cooking Wine 
1 Egg, lightly beaten
1 Cup breadcrumbs or Panko
1/3 Cup Olive Oil
2 Green Apple, cored, halved and thinly sliced
1 Packet Ready-to-serve Salad Green with dressing

Mustard Dressing:
Some Mayonnaise
Some Wholegrain/Creamy Mustard Sauce

Method:-
1. Using a meat mallet, pound pork slices evenly to 5mm thick. Marinate it with cornflour, cooking wine and lightly beaten egg for about 3 - 5 minutes.

2. Coat marinated pork slices evenly with breadcrumbs by pressing the meat down against the crumbs.

3. Heat oil in a frying pan on medium heat, cook pork schnitzel for 3 minutes on each side or until golden and cooked through. Drain well on paper towels.

4. Meanwhile, toss the pre-packed salad with accompany dressing before transferring them to a serving plate and top with apple slices. (you can soak apple slices with some lightly salted water to prevent it from oxidized and turns brown)

5. Next thickly slice pork and arrange on salad and drizzle mustard dressing over pork and serve.


Overall this can be a very flexible dish as you can use different types of salad green as well as changing the Pork Schnitzel to Chicken or Fish fillet depending on what is available in your pantry. And if you find it is a trouble to prepare Pork Schnitzel you can also purchase those ready-made(frozen type) and oven baked them according to the packet instructions.


Wednesday 5 October 2011

{Guest Post} Gulai Cancang (Beef Curry) by Lia, Bentolicious

Today I have invited Lia from  Bentolicious whom is a very talented mummy of 2. She has never failed to excite her readers with her beautiful and creative bento(s)(read more HERE) which reflects her love and passion for her kids. Each time whenever I visit her blog I will be amazed with her ideas and skills in assembling those gorgeous bento.


I get to know Lia since a few years back while leaving comments in some of our favourite bento sites. And recently Lia has started "Bloglicious" where she shared her homecook dishes, bakes as well as some food reviews. For this Guest Post, I am so happy that Lia is here to share with us one of her Indonesia curry dish known as "Gulai Cancang". Without delay, let's take a look at this delicious dish and it's recipe.


GULAI CANCANG


I am a reader of Cuisine Paradise for quite sometimes now. I always admire Ellena’s cooking and baking skills, showed on her delicious blog. She is one of the passionate foodie bloggers from Singapore. She also prepares bento for her son, perhaps that the reason we knew each other in the blogging world. Last week, she asked me whether I could make a guest post for her blog. I was excited and nervous at the same time. After reviewing some choices about Indonesian foods that I wanted to post, I chose ‘Gulai Cancang’ or Beef Curry from West Sumatra. I believe that some of you from the South East Asia region, especially from Singapore and Malaysia are familiar with Padangnese foods. Indonesia is very rich with its culinary heritage, each region has its different culinary that sometimes I don’t know or never taste it before.

Padangnese foods are one of my favorite because they are so tasty that surely will make you eat more than 1 portion of rice. Gulai Cancang usually uses beef or lamb. But since I don’t eat lamb, I choose beef to cook this curry.

Ingredients:-
1kg Beef Brisket
1.5 Litres – 2 Litres water
400ml Thick Coconut Milk / 150ml Coconut Cream
2 Star Anise
1 Teaspoon White Peppercorn
1 Tablespoon Curry Powder
2 Asam Kandis
2 Stalks Lemongrass, bruised
4 Indonesian Bay Leaves
3 Kaffir Lime Leaves
1 Turmeric Leave, knotted
2 Teaspoon Salt or to taste
3 Tablespoons Cooking Oil

Spices Paste:
75 gr Shallot
40 gr Garlic
40 gr Ginger
40 gr Galangal
120 gr Big Red Chilli

Directions:-
1. Boil the water in a pot and cook the beef brisket until tender. I use electric press cooker to speed up the process.

2. Meanwhile, grind shallot, garlic, ginger, galangal and chilli to fine paste with mortar & pestle or electric blender.

3. When the meat is already tender, remove it from the pot, but leave the beef stock inside the pot.

4. Diced the beef brisket about 2 x 2cm.

5. Heat cooking oil in a large pan.

6. Stir fry the spices paste, star anise, white peppercorn, curry powder, asam kandis, lemongrass, Indonesian bay leave, kaffir lime leave, and turmeric leave until aromatic over medium heat.

7. Add 1.5L beef stock. Add salt.

8. Stir well together for few minutes.

9. Add the diced beef brisket. Add coconut milk / coconut cream, keep stiring.

10. Cook until the liquid become slightly thicken. Serve it warm with rice.

~~~~~~~~~~~

Once again, thanks Lia for this wonderful Guest Post and if you wish to find out more about Lia's  Bento creations/tips or her homecooked dishes. Do head over to her blog at Bentolicious. (p/s: photos and recipe shown here all copyright and credited to Bentolicious)


Monday 3 October 2011

{Guest Post} Fruity Jelly by Anncoo Journal


For the month of October I am so excited to line-up a few wonder Guest Posts from different culinary aspect to share with you people. First let's us welcome Ann from "Anncoo Journal" with her gorgeous "Fruity Jelly" which would come in perfectly as a after meal dessert to delight your family or guests.


I get to know more about Ann's blog through Aspiring Bakers since 2010 where everyone of us get together to share (blog about) what we made through a monthly assigned theme. To me, Ann possess a great passion in both her culinary and photographing skill which reflect through her posts. Example:- just recently, she has created some lovely baked "piglets"(read more HERE) for this Mid-Autumn festival which you would definitely be amazed by her crafty fingers.

Now let's us take a look at her new creation for this guest post.


FRUITY JELLY


I've been a silent reader of Cuisine Paradise by Ellena before I started my own blog and I was thrilled when she approached me to do a dessert guest post on her blog. Thank you very much Ellena for giving me an opportunity to be a guest over at Cuisine Paradise.

Fruits have many benefits to our health and Singaporeans are very fortunate to get to taste various types of fresh fruits imported from all over the world at an affordable price. So today, I'm using blueberry from USA, golden kiwi from New Zealand and strawberry from Australia to make a simple Fruity Jelly with agar agar powder as dessert.

Here is the recipe....


Ingredients (A):
1 packet (13g) Agar agar powder
600ml Water
400ml Fresh milk
170g Sugar
2-3 pcs Pandan leaves, rinse and clean well, tie leaves into knots

Ingredients (B):
1 packet (13g) Agar agar powder
1000ml water 170g Sugar
2-3 pcs Pandan leaves, rinse and clean well,tie leaves into knots
Cut some fresh fruits(blueberries, golden kiwi and strawberries)

Method:-
Ingredients (A) 
1. Boil water, sugar and pandan leaves together for 5 minutes, keep stirring constantly at medium heat.

2.Off heat and pour in fresh milk and continue to stir the liquid for another 2 minutes.

3. Discard pandan leaves and pour liquid into serving glass until half full. Leave to set in fridge for about 10 minutes.

Ingredients (B) 
4. Rinse and set aside the cut fruits. (blueberries, diced golden kiwi and strawberries)

5. Boil water, sugar and pandan leaves together for 5 minutes, keep stirring constantly at medium heat.

6. Off heat and continue to stir the liquid for another 2 minutes. Discard pandan leaves.

7. Place fresh fruits into prepared glasses and pour (B) liquid into it.

8. Chill fruity jelly in fridge for few hours before serve.

~~~~~~~~~~~~

Thanks Ann for this wonderful Fruity Jelly post. If you want to read more about Ann's other recipes on making Jelly. You can refer to the link HERE.

Friday 30 September 2011

Chicken And Vegetable Pho


Phở is a Vietnamese noodle soup that usually served with flat long rice noodles, fresh herbs and thin slices of meat(beef or chicken) cook quickly in hot broth. In Vietnam most of their dishes are typically served with lots of greens, herbs, vegetables, and various other accompaniments such as dipping sauces, hot and spicy pastes and a squeeze of lime or lemon juice to enhance the taste.

Last week while watching the Junior Master Chef series, I was attracted to one of their quick and easy demo dish is is "Chicken and Vegetable Pho". So without hesitate I search through my pantry for some necessary ingredients to try out this dish.


For my version, I omitted the Bay Leaf, Thyme and Parsley from the original recipe for the soup broth as I do not have those available in my pantry. But in a while it also make the soup for oriental flavour without those herbs.

Recipe adapted from Australia Master Chef website, HERE.
Ingredients for Quick Chicken Stock: (serves 4)
2 Chicken Breast plus 4 Chicken Wings
2.5 Liters Water
1 Small Brown Onion, cut into half
2 Stalk Celery, cut into 1" chunks
1 Medium Carrot, cut into thick slices
2 Cloves Garlic
1 Teaspoon Black Peppercorns, lightly pound

Method:-
1. Trim and blanched the chicken in boiling water, rinse and set aside.

2. For the chicken stock, place all ingredients in a large stock pot, bring to boil.

3. Reduce heat and simmer for about 45 minutes, skim the fat from the top as required.

4. Strain stock through a fine sieve and set aside.


Ingredients For Broth Infusion:
1.8 Litres Chicken Stock
1 Cinnamon Quill
2 Star Anise
4cm Ginger, halved
1 Big Red Chili, sliced
3 Pieces Coriander Root, light pound

Seasoning:
2 - 3 Tablespoons of Fish Sauce
3 Tablespoons Light Soya Sauce
Juice of half a Lime, about 1 tablespoon

Method:-
1. Place all the Broth Infusion ingredients in a medium saucepan and bring to boil.

2. Reduce heat to simmer and cook for 10 minutes.

3. Season to taste with fish sauce, light soya sauce and lime juice.


Ingredients For Pho Vegetables: (serves 4)
4 Serving of Fresh Thin Rice Noodles, about 400g
1 Medium Carrot, julienned
1 Packet of Enoki Mushrooms
100g Bean Sprouts, blanched in hot water
4 Fresh Shitake Mushrooms, thinly sliced
Some Spring Onion, thinly sliced
1 Cup of shredded Chicken Meat, optional 

Garnish:
Some Vietnamese Mint and Coriander
1 Big Red Chili, thinly sliced
1/2 Lime, cut into quarter

Tips:-
~ I used the chicken breast meat from the soup stock, shred it and serve together with the noodles.

Method:-
1. To serve, layer pho ingredients into separate serving bowls starting with noodles, carrot and etc from the sequence above.

2. Gently divide the broth infusion into serving bowls top with garnish, lime juice and serve immediately.


Although my version might not be the authentic Vietnamese Pho but we definitely love it's fragrant clear soup base which is loaded without lot of fresh vegetables and herbs. Overall the soup tasty and refreshing with hint of cinnamon fragrant and a bit of spicy and sourish taste from the chili and lime juice.

Monday 26 September 2011

Orange-Scented Flourless Chocolate Cake

Flourless Chocolate Cake has being queuing in my "must-try" lists for at least more than 2 years. Whenever I saw beautiful photos and recipes from fellow bloggers who lay their hand on this delicious looking cake I will be fascinated to give it a try. But the "fate" between me and this cake only begins to spark last week while I was planning to bake something for my neighour and my boy's school teacher.

From the name "Flourless" you can more or less figure out that this recipe does not require any Flour, but somehow or rather it did call for a minimum amount of cocoa powder to enhance the taste. So in order to have better texture and taste for this cake, I would suggest you get some decent brand of cocoa powder which would give it that dark and luxury outlook.

I love this recipe because it is so easy to prepare and you can even let your kid(s) handle most of the beating and folding job with maybe a bit of help from the Adult. Furthermore those of us who tried this cake were surprised of it's taste and texture which is moist, fluffy and tasty even without any use of "BUTTER or MILK".

Ingredients: (make 4, 9cm x 9cm square disposal baking case)
4 Egg Yolks
4 Egg Whites
110g Caster Sugar
12g Valrhona Cocoa Powder
100g Valrhona(Guanaja - 70%)Dark Chocolate, melted
1 Teaspoon Grand Marine/Vanilla Essence
Zest of 1 or 2 Oranges

Method:-
1. Preheat oven to 180 degree.

2. Separate egg yolks and whites in two different mixing bowl. (i use a bigger bowl for my yolks mixture in order to mix in the whites later on)

3. Whisk egg whites in a bowl with a mixer until soft peaks form. (do not over beat till stiff peak)

4. Next whisk egg yolks and sugar in another mixing bowl until pale and airy before folding in cocoa powder, orange zest and grand marine.

5. Stir in melted chocolate till well combined. Fold in 1/3 of the egg whites at a time and mix well. (since chocolate mixture will be heavier than egg whites, try to scrap and stir from the bottom when mixing to get an even texture)

6. Pour mixture into prepared cake pan or disposal baking cases. Bake in preheated oven for 18 minutes(9cm square paper case), 25 minutes(7"/15cm round cake pan) or when skewer insert and comes out clean.

7. Cool the cake completely on baking rack before sprinkle it with icing sugar and decorate with whipped cream, ice-cream or assorted fresh berries of your choice and serve.

Tips:-
1. You can either melt the chocolate over a double-boiler or place them in microwave safe bowl and cook on HIGH heat for about 90 seconds, stirring at an interval of 30 seconds to prevent burnt.

2. Eggs use in the recipe is 60g each in weighs.

As you can see from the photos, the top of the cake has a delicate crispy crust which gives this cake a few layers of texture such as crisp top, moist and fluffy cake with orange-scented flavour on each bites. And since this is my 1st trial, I hope I would be able to achieve a bit slightly fudgy texture perhaps with a 3 minutes under bake on the timing.

For more recipes on different type of Flourless Chocolate Cake, you can refer to the follow site which I bookmark too.
1. Flourless Chocolate Gateau from Happy Home Baking
2. Flourless Chocolate and Almond Cake from Little Teochew

Monday 19 September 2011

Yang Sheng Le(养生乐) - Cordyceps Concentrated Herbal Soup

Last monthly, I have bought a few bottles of these Yang Sheng Le(养生乐), concentrated herbal soup from Fairprice during one of it's promotion. And for your information this concentrated soup is a collaboration by two trusted brand names Eu Yan Sang and MAGGI. Although for most of us this might be just another "instant" soup base which enables you to prepare quick and easy soup within minutes but with some extra bits of ingredients you could also turn this into a once pot dish too.

To enjoy and prepare these delicious herbal soup, what you need to do is to dilute the mixture with water and simmer it for about 20 minutes before serving. Yan Sheng Le Concentrated Herbal Soup is also endorsed as the "Healthier Choice" by the Singapore Health Promotion Board and as well with the following :-.

~ All Natural
~ No Preservatives
~ No Added MSG
~ No Added Artificial Colouring/Flavoring

Retail Price: From S$7.50 per bottle onwards

Ingredients: (serve 3 - 4)
1 Bottle of Cordyceps Concentrated Herbal Soup
1 Black Chicken (乌鸡) or 600g Chicken Pieces
1 Litre Boiling Water
Some Wolfberries and Red Dates

Method:-
1. Trim and cut the black chicken into quarters, rinse and blanched in a pot of boiling water for a about 3 minutes. Remove, rinse and set aside.

2. Empty contents of herbal concentrate from bottle into 1 litre of boiling water and mix well.


3. Add chicken pieces, bring to boil.


4. Lower the heat and simmer for 20 minutes and serve hot.


These concentrated Herbal Soup comes in a few different types of flavour but we loves the American Ginseng Concentrated And Cordyceps Concentrated most. The photo shown above is Black Chicken with Cordyceps Herbal Soup in 20 minutes. The Cordyceps Concentrated Herbal Soup consist of 5 herbs such as :-  Cordyceps, Bei Shan Shen, Bei Qi, Yu Zhu and Chi Pi which provides nourishing goodness for the body.


Wednesday 14 September 2011

Sweet and Sour Pork plus Cookbook Giveaway by Rasa Malaysia

Today I am so happy to share with you one of our family's favourite recipe from Bee's new cookbook, Easy Chinese Recipes (recipe and photos credited to Rasa Malaysia). If you still remember I did mentioned in facebook(HERE) sometime back regarding the launch of her new cookbook in Singapore. And here my friend Bee kindly offer to share with us this recipe (origin from Easy Chinese Recipes) as well as a complimentary copy of her new cookbook to one of the lucky SINGAPORE readers from this blog.

Sweet-and-Sour Pork, the ubiquitous and arguably one of the most well known Chinese pork dishes, is Cantonese in origin. The secret of an authentic Sweet-and-Sour Pork dish is in the perfect balance of the sweet versus sour flavor of the sauce. Now you can master this flavorsome dish with Bee's (Rasa Malaysia) tested recipe below and more tips on her cookbook.

Serves 4 as part of a multicourse meal 
Ingredients:
8 oz (250 g) pork tenderloin, pork butt, or pork neck
Oil, for deep-frying
2 tablespoons oil, for stir-frying
1 clove garlic, minced
½ small red bell pepper, deseeded and cut into pieces
½ small green bell pepper, deseeded and cut into pieces
½ small onion, quartered
1 slice canned pineapple ring, cut into pieces
2 green onions (scallions), white parts only, cut into 2 in (5 cm) lengths
½ cup (125 ml) Sweet-and-Sour Sauce (page 30)

Marinade:
1 teaspoon soy sauce
1 teaspoon cornstarch
½ teaspoon Chinese rice wine or sherry

Frying Batter:
½ cup (65 g) all-purpose flour, sifted
¼ cup (35 g) cornstarch
½ teaspoon baking soda
1 egg white
¹/³ cup (80 ml) water
1 tablespoon oil Pinch of salt

Method:- 
1. Cut the pork into bite-sized pieces and marinate with the Marinade ingredients for 15 minutes.

2. Mix all the ingredients in the Frying Batter until well combined. Add the marinated pork into the Frying Batter, stir to evenly coat with the batter.

3. Heat 2 to 3 inches (5 to 7.5 cm) of the oil in a wok or stockpot to 350°F (175°C) for deep-frying.

4. Gently drop the pork into the oil and loosen them up immediately with the spatula to prevent the pork from clumping together.

5. Deep-fry them to a light golden brown or until the batter becomes crispy.

6. Dish out with a strainer or slotted spoon, draining the excess oil by laying the pork on a dish lined with paper towels. Discard or reserve the oil for use in another recipe.

7. To stir-fry, heat 2 tablespoons of the oil in a wok or skillet over high heat.

8. Add the garlic and stir-fry to a light brown before adding the peppers, onion, pineapple, and green onion.

9. Stir the ingredients a few times and then add the Sweet-and-Sour Sauce. As soon as the Sweet-and-Sour Sauce thickens, add the fried pork into the wok or skillet.

10. Stir continuously until all the ingredients are well coated with the sauce. Dish out and serve immediately with steamed rice.

Cook’s Note:
If you feel that the frying batter is too thick, add a little more water to it. To make the pork extra crispy, increase the temperature of the oil and deep-fry a second time. If you like more sauce, double the portion of the Sweet-and-Sour Sauce.

As mentioned I am so happy that Bee from Rasa Malaysia agreed to offer 1 Lucky reader from SINGAPORE a "Complimentary Copy" of her NEW cookbook Easy Chinese Recipes published by Tuttle Publishing at a retail price of S$32.00 (before GST). If you are keen in learning more about these easy Chinese Recipes, do grab a copy of this cookbook at any of the major bookstores in Singapore or order online HERE.

To enter the draw, leave a comment on why you would like to win this cookbook together with a valid email address on the comment form and the lucky winner will be randomly chosen. And in order to increase your extra chances on winning you can also choose either 1 or ALL of the bonus below:-

~ Like Rasa Malaysia on Facebook. Leave 1 extra comment for this.

~ Share this post on Tweeter. Leave 1 extra comment for this.

~ Share this post on your Facebook. Leave 1 extra comment for this.

~ Like Cuisine Paradise on Facebook. Leave 1 extra comment for this.


Closing Date for the above Giveaway will be on Sunday, 18 September 2011(2359 Hours). Result will be announce on 19 September 2011, Noon. Good luck everyone!!!! Have fun!


Note:- 
For OVERSEAS readers, you can join a similar giveaway of this cookbook at Rasa Malaysia and My Cooking Hut website respectively.


~~~~~~~~~
{Updated on 19th September 2011}

GIVEAWAY RESULT!!!!!


Giveaway Result Updated!!!

Tuesday 13 September 2011

Chocolate Lemon Yogurt Cake

Pin It
About two weeks back I have an entry on Lemon Yougurt Butter Cake which was quite well-received by most of my friends. So during my Kids' Pizza and Bento Workshop last week I decided to twist the recipe a bit in order to suit the kids with this Chocolate Lemon Yogurt Cake.

Each bites on this chocolate cake leaves you with a light and refreshing lemon fragrant mixing together with that rich chocolate taste that stays in your mouth for quite sometime which I am sure it would makes a perfect tea cake for the kids.

In order to make it more chocolatey, I added extra 100g of mini chocolate chips so that i will make the cake more moist and full of chocolate flavour.

Recipe adapted from Lemon Yogurt Butter Cake HERE.

Ingredients: (makes 2 small loaf tins, 17cm x 8cm x 6cm) 
175g Unsalted Butter, room temperature
200g Caster Sugar
3 Eggs, 60g each
200g Self Raising Flour
45g Valrhona Cocoa Powder
100g Mini Chocolate Chips
Juice of 1/2 Lemon
Zest of 1 Lemon
4 Tablespoons Plain Yogurt


Method:-
1. Cream butter and sugar with mixer till creamy and pale (about 3 - 4 minutes on medium speed).

2. Add in eggs, one at a time and beat well after each addition. If necessary scrap mixture off the side of the mixing bowl and make sure everything is well beaten.

3. Fold in the mixture of sifted self-raising flour plus cocoa powder in 3 batches.

4. Next add in lemon zest, juice, yogurt, mini chocolate chips and fold thoroughly till combined.

5. Divide batter equal into 2 mini loaf tins that are lined with greaseproof paper.

6. Bake in preheat 180 degree oven for about 35 - 40 minutes or when skewer insert and come out clean.

7. When cake is done, remove it from the oven and allow to cool in the pan for 10 minutes.

8. Transfer cake to cooling rack and cool completely before cutting it into serving slices.


Monday 12 September 2011

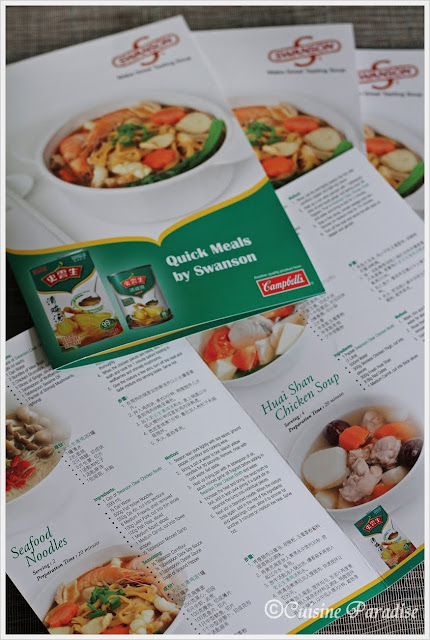
Celebrate Mid-Autumn Reunion with Swanson

Finally after about 2 months of preparation such as drafting, cooking, tasting and photoshoot on the dishes, my 1st set of Recipes booklet with "Swanson Clear Chicken Broth" is available at major supermarkets island wide. The launch of this Quick Meals by Swanson recipes is to enable consumers to cook up something fast and yet nutritious for the family during Mid-Autumn Reunionor anytime of the day.

In this recipes booklet it consists of 2 soup and 2 noodle dishes whereby I would share with you two of the related recipes that are available in the booklet such are:-

Friday 9 September 2011

[My 1st Kids' Workshop] Pizza Toast plus Red Angry Bird Bento

Yesterday we have a fun-filled day with all the wonderful kids and their parents who attended our very 1st Kids' Pizza and Bento Workshop. This workshop has being in my wishing list for so long because I always hope to be able to conduct a hands-on workshop for kids and their parents. For me I think hands-on workshop are a great way to show bonding between parents and their kids as most of the kids enjoy the time where mummy or daddy will be able to hold their hands and work together to complete an assigned task. And during the workshop I am so happy to see some heart-warming bonding time between parents and their kids.

Sunday 4 September 2011

Once Upon A Milkshake

Once Upon A Milkshake (OUAM, pronounced “ohm”) derived from fairytale phrase "Once upon a time....." and it's owner Mr Alvin Ng is someone who loves ice-creams and milkshakes. He wanted his products to be “premium but without the premium prices” so he figured the best way was to use quality ice creams to achieve the desire products and sell them at affordable prices.


Their ordering menu is very cartoon like and innovative menu. And to make your order of milkshake or ice-cream you just have to follow these 3 simple steps:-

1. Decide on whether you want a milkshake (mini or regular) or an ice cream (scoops or pint).

2. Choose from ten flavours, each one represented by a cute character such as Agent Strawberry and Spooky Mocha.

3. Optional: You can to add extra toppings such as chocolate pearls, peanuts, crushed chocolate chip cookies and etc.

Chocolate Truffle Castle Milkshake (back) wins the heart of all chocolate lovers with it's rich and mouth watering chocolate milkshake together with some extra chocolate bits for bite. Mangonista Milkshake(front) which is a fragrant Mango flavour ice-cream milkshake that suits those who prefer something more refreshing and light.

Regular Agent Strawberry Milkshake that serves with generous amount of tangy real strawberries. According to some read up, they used 100% fresh strawberries to make their ice cream that customers who order this will get to taste the real strawberries in it.

Regular Grumbling Raisin Milkshake served with alcoholic rum ice cream and rum-soaked raisin.


Once Upon A Milkshake
Maxwell Chambers (flagship outlet)
32 Maxwell Road
#01-08 Maxwell Chambers
Singapore 069115
Telephone: 9823 3779
Website: http://www.onceuponamilkshake.com/
Facebook: http://www.facebook.com/onceuponamilkshake

Opening Hours:
Sunday - Thursday: 1200 - 2200 hours
Friday and Saturday: 1200 - 2300 hours


Our Mission of the Day!
CHARLES propose and CHARLENE say YES!


On June 25th 2011, our important mission was to help Charles proposed to Charlene at Once Upon A Milkshake where you could read more about this touching and heartwarming mission at Charlene's Blog HERE.The reason of why I kept this post for so long is because this coming Friday, 09 September 2011 they are going to have their solemnization and we are all so excited and happy for this lovely couples. Let's put our hands and hearts together and give both of them our sincere blessing......... Congratulation Charles and Charlene!!!!!

ShareThis