Showing posts sorted by relevance for query happy call pan. Sort by date Show all posts

Tuesday 28 January 2014

[With Recipes] Our Chinese Lunar New Year Goodies

Three more days to go before the Chinese Lunar New Year celebration begins and most of the households are busying with new year bakes such as pineapple tarts, almond cookies, love letters and etc. Whereas for savory dishes most of us will be making the ngoh hiang (minced meat roll), braised soy duck, braised sea cucumber, chicken curry and etc.

In this post, I am sharing some of the goodies (with recipes) that we had made till date such as Kueh Bangkit, Orr Nee, Ngoh Hiang and etc which you might be interested to try any of them during the 15 days of lunar new year feasts.

Friday 8 November 2013

Featuring Three One Pot Dish Recipes

Weekend is just less than an hour from now and here I am sharing 3 hearty one pot dish recipes which you might be interested to take a look. These are our all-time favourite dish and I hope it can help to give you some ideas while preparing a quick meal for your family during weekend or busy weekday nights. Moreover if you read through the recipe(s) the ingredients are pretty straight forward and I am sure you have most of them in your pantry to get you started with the dish too.


CLAYPOT CHICKEN RICE WITH SALTED FISH


I love Claypot Rice especially the burnt bottom of the rice which is crispy and flavorsome (but however it is very heaty to eat those) and I have also made a few version of claypot rice even with one using Happy Call Pan (recipe). The main ingredients are chicken pieces or chicken fillet seasoned with dark soy sauce plus preserved sausage and salted fish. Although we can make decent taste of claypot rice at home but it never beats those cooked using charcoal stove which gives it a better flavour.

Monday 6 August 2012

Cook For Family - Our 3 Generations Cooking Together for the #CookForFamily Initiative

I am so thrilled to be among one of hundred bloggers who had being invited by Daniel, from Daniel's Food Diary to take part in this #CookForFamily initiative started by him. As we know, his main objective is to get more bloggers, and hopefully their fans and followers, to start cooking and having family bonding with their families.

As for myself, I always tried to cook at least 2 meals per days during weekdays and hopefully one on weekend, especially Sunday.  And to support this #CookForFamily initiative, even my 8 years old boy who often helps up in the kitchen (washing and cutting) also volunteer to cook simple dish for us.  Below you can see some of the shots and dishes that he had cooked under our supervision. Overall we had fun and laughter in the kitchen sharing our family bonding and cooking skill together which makes meal time a fun time too.


#CookForFamily


I love to have soup during my meals and I brew soup almost everyday. Out of all the different kinds of soup we usually had, herbal soup is one of our family favourite. Here I specially made this "Herbal Black Chicken Soup" for mum with added Dang Shen, Ginseng and Dried Longan to regulate blood chemistry, strengthen the body as well as circulate the Qi in the body.


(Serves: 4      | Preparation: 10 minutes        | Cooking: 60 minutes)

Ingredients:
1 Black Chicken (乌鸡) / Half Portion of Chicken (600g)
2 Pieces of Dried Ginseng(人渗)
5 Pieces of Dang Shen(党参), cut into halves
8 - 10 Pieces of Big Red Dates(红枣)
20g Dried Longan (龙眼干)
10g Wolfberries (枸杞)
1.8 Litres Boiling Water

Method:-
1. Rinse the dry herbs and set aside. Bring a pot of water to boil and blanch the prepared black chicken which had being trimmed and cleaned.

2. Meanwhile using a soup pot (i used a big claypot), bring 1.8 litres of water to boil and add in all the ingredients including the blanched black chicken.

3. When the mixture comes to boil again, lower the heat and simmer over the lowest heat for at least an hour (careful of the heat and don't let the soup dried up). Alternatively,

4. You can transfer the soup to a slow-cooker and cook it on AUTO mode for about 2 hours.

5. Serve warm before meal or at night before sleep. This soup has a natural sweetness due to the herbs used so usually I won't add in extra seasoning or salt.

Stir-fry Celery With Sea Cucumber is one of my favourite vegetable dish which mum always cooked for us. And here for the #CookForFamily post, she prepared this dish especially for me while I take care of the herbal soup section.


(Serves: 4        | Preparation: 10 minutes         | Cooking: 6 minutes)

Ingredients:
2 Sticks of Celery
1 Small Red Capsicum, sliced
5 Fresh Shiitake Mushroom, sliced
1 Packet of Sweet Peas
2 Pieces of Sea Cucumber, sliced
2 - 3 Slices of Ginger
Some Chicken Stock Powder for seasoning

Method:-
1. Using a vegetable peeler, remove the outer skin of the celery and cut it into thick slices. Set aside.

2. Saute ginger with 1/2 tablespoon of cooking oil till fragrant, add in celery and mushrooms, toss for a 30 seconds in the Happy Call Pan (HCP).

3. Next add in the remaining ingredients such as red capsicum, sweet peas and sea cucumber.

4. Add in the seasonings and give it a quick stir, cover the pan and let it simmer on low heat for 3 minutes.

5. Drizzle some cooking wine, stir to mix well and dish up to serve.


My little boy on the other hand also volunteer to join us with the #CookForFamily task where he marinated the chicken wings using Wokkingmum's "Grilled Chicken Wings with Fermented Beancurd" recipe. He choose this recipe because he knows that both grandma and I love fermented beancurd which we always had it with our porridge.

Recipe adapted from Wokkingmum website HERE.

(Make: 12 Chicken Wings    | Preparation: 5 minutes   | Cooking: 25 - 30 minutes)

Ingredients:
12 Chicken Wings, halved
2 Tablespoons of sauce from Fermented Beancurd
1.5 Pieced of Fermented Beancurd
1 Tablespoon Sugar
1 Teaspoon Cooking Wine


Method:-
1. Using the back of the spoon mashed fermented beancurd and mix it with the sauce.

2. Next stir in sugar till well mixed.

3. Marinate chicken wings with the mixture together with some cooking wine for at least an hour before cooking.

4. Arrange marinated chicken wings on baking tray which is lined with baking paper, grill in the preheated 220 Degree Celsius oven for about 25 - 30 minutes or chicken is cooked.


As mum love fish compared to meat, I always tried to incorporate at least 1 dish with fish whenever she comes over for dinner. Here we have a simple steamed fish dish using Threadfin fish head and ready pack Portuguese sauce. To success remember to get fresh fish head, steamed it to just done (do not over cooked), drizzle with some Portuguese sauce and steamed for another 1 minutes.


SOME OF THE MEALS WE COOKED IN JULY


All these photos (except the one with my boy doing cooking) are taken from my daily Instagram shots which I have shared online.


Any simple dish will bring a smile on your loved ones face. In fact it can be just a bowl of instant noodle with an egg or even simple ham and cheese sandwiches for breakfast. For me it is more of the thoughts, loves and bonding time together that counts rather than the expensive ingredients or time spent on preparing the meals.

Photo credited to Daniel from Daniel Food Diary

So from today onwards, let's start to prepare something simple for your family as as head start and don't use the excuse that you can't cook or u are too busy. I am sure frying an sunny egg or boiling a hard boiled egg that served with bread and beverages won't even take up more than 15 minutes of your time a day.

Thursday 5 May 2005

Coke Pork Ribs

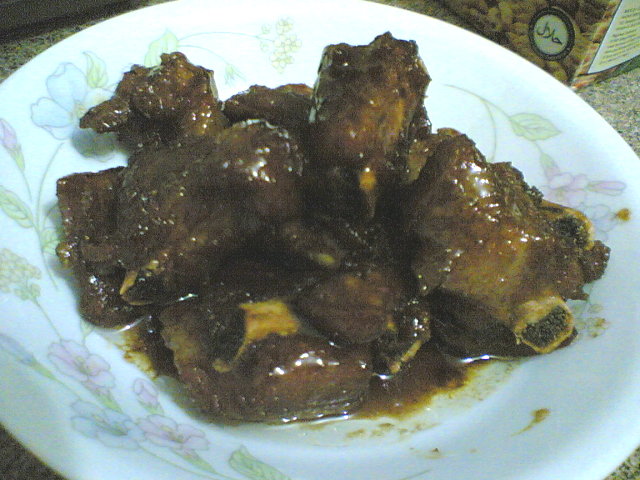
  Coke Pork Ribs (using Happy Call Pan version) was one of the dishes that I cooked yesterday and we all agreed that it taste similar to  "Pai Gu Wang". Before trying this recipe I still have doubt that it might not taste nice by just using Coke as the main ingredients and also the smell of the dish also seems funny during the cooking process. But after about an hour of stewing in low heat, the colour starts to turn more appetizing instead of light pink and the sauce was thicken up too. So if you are curious with its taste, do try out this recipe since you only required 3 ingredients such as; spare ribs, coke and LKK Char Siu Sauce.

Ingredients:
500g Prime Pork Ribs, cut smaller pieces
2 Tablespoons Lee Kim Kiet Char Siew Sauce
½ Can Of Coke

Methods:
1. Wash and pat dry the ribs then marinate it with char siu sauce, ½ Tablespoon cooking wine, 1 teaspoon dark soy sauce and dash of pepper.
2. Set aside in the fridge for at least an hour or overnight.
3. Pour all the spare ribs together with the marinade sauce into a non-stick saucepan or pot. Add in coke and simmer on low heat until meat is soften and sauce had thicken.

Notes:
a) You had to turn the ribs a few time so as to get it coated with the sauce in the pan.
b) If you want your pork ribs to have a nice dark brown colour, you can add another 1/2 teaspoon of dark soy sauce while simmering.

Monday 21 May 2012

[2-In-1 Dishes] Recipes Using IKEA 365+ Pot plus Stabil Steamer


Preparing meals in the kitchen can be one of the most "headache" household chores for modern working mothers/ladies. The thoughts of having to clean up the greasy kitchen top, cooking utensils, floor and etc always make it a "OFF MODE" no matter how enthusiastic or simple the meal(s) can be.

For me, even though I might love to experiment different dishes or bakes in the kitchen, still I would always go for simple and easy to prepare recipes with either steamed or oven baked method if I am not using my reliable Happy Call Pan.

IKEA always has a wide range of kitchen products such as cookwares, ovenwares, utensils, food storage and etc. And recently I have just got a set of this 365+ Potboiling insert as well as steamer insert to replace my old soup pot in order to help me reduce the time in preparing quick and healthier meals within 30 minutes to an hour.

For more information and prices of the above-mentioned, please refer to the review HERE.


HUAI SHAN, LOTU ROOTS AND SWEETCORN CHICKEN SOUP


As you can see from the photo above, I have use the IKEA 365+ pot to boil soup and stack up the Stabil steamer insert half way through in order to steam the egg dish while I could continue to boil the soup at the same time. And by the end of 30 - 35 minutes,  we able to enjoy simple and yet delicious homecook food without any hassle or greasy kitchen floor. (less washing to be done too)


(Serves: 2-3             | Preparation: 10 minutes            | Cooking: 30 minutes)

Ingredients:
2 Chicken Drumsticks, skin removed
150g Huai Shan, skin removed
150g Lotus Root, skin removed, sliced
1 Sweet Corn, Cut into section, halved
100g Pumpkin(optional), skin removed cut into thick wedges
6 Big Red Dates
Some Fresh Gingko Nuts, Optional

Method:-
1. Fill the IKEA 365+ pot with water to about 1.5 litre mark and bring it to boil.  At the meantime blanched chicken in another saucepan for about 2 - 3 minutes, remove and rinse well. Set aside.

2. When the water comes to boil in the soup pot, add in all ingredients except pumpkin(add only at the last 10 - 15 minutes of cooking time), put the lid(don't worry it would not overflow due to the steam vent ventilation) on and let it boil on medium heat for about 3 minutes, lower the heat and simmer the soup mixture for 30 minutes and season to taste with salt before serving.

OR

3. Simmer the soup for about 15 minutes, remove the lid, drop in the pumpkin and stack up the STABIL Steamer insert on top, place the prepared steamed egg mixture and steamed on medium low heat for 13 - 15 minutes till done.


STEAMED EGG WITH MINCED MEAT


There are quiet a few ways which you can prepared this steamed egg dish using different ingredients which you prefer. Example:- you can do a seafood steamed egg using fish fillet or flower crab(recipe), firm tofu(recipe), ginseng(recipe), salted and century egg plus many other combinations.  For this recipe, I am preparing my mum's version of  "Steamed Egg with Minced Meat and Century Egg" which she always prepared for us.


(Make: 5" x 5" Square          | Preparation: 5 minutes |           Cooking: 13 - 15 minutes)

Ingredients:
2 (55g) Egg
1 Century Egg, cut into small cubes
1.5 Tablespoon Marinated Minced Meat, optional
100ml Drinking Water
1/2 Tablespoon Of Wolfberries
Some Chopped Spring Onion, Chilli and Shallot Oil

Method:-
1. If you are using minced meat, spread the mixture evenly at the base of the steaming bowl/plate.

2. Lightly whisk/beat the eggs in a bowl, add in 100ml of drinking water and continue to beat till combined.

3. Using a strainer, strain the egg mixture into the prepared steaming bowl. Scatter wolfberries on top, using heatproof cling wrap cover the top of the bowl leaving a small gap at one of the corner to prevent water droplets during steaming.

4. Place the bowl on the steamer rack, cover the lid and steam on medium low heat together with the soup(below) for about 13 - 15(with meat) minutes.

5. Remove the steamed egg together with the steamer and garnish egg dish with some extra chopped spring onion, shallot oil and chilli. Serve together with soup and steamed rice.

~~~~~~~~~~~~~~~~~~~~~~~~~~~
Note:-
~ If you are not using marinated minced meat, add about 1/2 teaspoon of chicken stock powder into your egg mixture at step 2 to season your dish.


STEAMED EGG CAKE
(Ji Dan Gao - 鸡蛋糕)


Steamed Egg Cake can be consider as one of the easiest and yet tricky traditional steamed cake which requires a few simple ingredients such as Eggs, Flour, Sugar and carbonated Beverage like Cream Soda or 7-Up that act as a leavening agent for the cake.


(Makes: 14 cupcake size      | Preparation: 15 minutes     | Cooking Time: 25 minutes)

Ingredients:
3 (55g) Eggs
160g Caster Sugar
170g Cake Flour Or All Purpose Plain Flour
1 Teaspoon Vanilla Extract
60ml 7-Up or Cream Soda
1/2 - 3/4 Teaspoon of Pandan Paste, optional

Method:-
1. Please refer to my previous Steamed Egg Cake post for the step-by-step preparation method HERE.

~~~~~~~~~~~~~~~~~~~~~~~
Tips:-
~ Adding extra pandan leaves in the boiling water will enhance the aroma and flavour of the steamed cake.

~ By adding 1/2 - 3/4 Teaspoon of Pandan Paste to the cake batter will help to enhance the colour as well as get ride of the strong "egg" smell/taste from the steamed egg cake, leaving in jade green in colour with fragrant pandan(also known as screwpine) aroma.

Lastly I hope you would find this post useful if you do own a stock pot with steamer rack so that at least you can have an idea on how to prepare more than 1 dish at the same time to maximum the usage of time and the cookware. Till then, cya on the next post.

Monday 27 February 2012

Homemade Muah Chee In 15 Minutes

Pin It
Muah Chee which also known as "麻糍" is a very common street food found in local Pasar Malam(night market) which cost about S$1.00 - S$2.00 per box. Since young this has being one of my favourite local snack other than Popiah(spring roll) and Nonya Kueh.

And from what I heard from the older generation they used to make "muah chee" by steaming the glutinous rice flour mixture rather than those shortcut methods that was invested using some modern kitchen gadget such as microwave. So with easy to follow recipe(s) and modern gadget(s) it is not difficult to make our own homemade muah chee as when we like.


MUAH CHEE
(麻糍)


Here with the help of my Happy Call Pressure Pan(HCP) I could easily make my favourite muah chee anytime of the day in less than 15 minutes time. You could control the texture of the muah chee from the amount of water use. For example; to achieve a softer texture the ratio of flour and water will be 1:1 whereas if you prefer more "Q(chewy)" texture you could reduce the water from 1 to 3/4 cup. If you are looking for new flavour you could also add in 1 - 2 tablespoons of black sesame powder into the glutinous rice flour and stir till combine with water.

This is the sample of the peanut powder that I used for making this Muah Chee, you can read more about this HERE.


Chinese version of this post and recipe is available at this link HERE.

(Serves: 2-3 | Preparation: 5 minutes | Cooking: 5-7 minutes)

Ingredients:
1 Cup Glutinous Rice Flour
3/4 - 1 Cup Water
1/2 Teaspoon Sugar
1.5 - 2 Tablespoons Shallot Oil/Cooking Oil

Peanut Coating:
1.5 Cup Peanut Powder
1 - 2 Tablespoons Caster Sugar, optional
1 Tablespoon White Sesame Seeds, optional


Method:-
1. Prepare shallot oil either using microwave method(HERE) or directly from the HCP. (saute 4 thinly sliced shallot with 2 tablespoons of oil in HCP over low heat till golden brown, remove the shallot and leave the oil in the pan)

2. Place glutinous rice flour and sugar in a mixing bowl, slowly stir in water with a whisk till well combined.

3. With HCP on medium low heat together with the shallot oil, slowly swirl in the flour mixture and stir it using a wooden spoon/chopstick or spatula till it begins to form a soft dough.

4. Lower the heat and continue to toss and cook the dough for another 3 - 5 minutes (depending on the heat) till the dough is smooth and slightly transparent on its surface. Remove and set aside on a oiled plate/container.

5. Using kitchen paper towel, wipe off the oil from the HCP and add in the sesame seeds. Toss it over low heat for about 2 minutes(stirring in between) before adding the peanut powder and stir till fragrant(another 2 minutes or so). Set aside to cool for about 3 minutes before stirring in the caster sugar and mix well.

6. Transfer the cooked glutinous rice dough to the peanut mixture, toss well and cut it into bite size pieces and serve.

Lastly if you don't have any HCP or non-stick pan but would like to try making this Asian snack, you could either use the Microwave Method from Little Teochew website(HERE) or Steaming Method at Anncoo Journal(HERE). I am sure either one of this would enable you to have some decent homemade Muah Chee for family gathering or party.

Saturday 3 September 2005

Homemade Pizza

Pizza is one of the most easy to prepare dish where you can add in any ingredients of your choice then top it with generous amount of cheese. Now you can try out this perfect base for your Homemade Pizza with these easy recipe shown below. And if you don't have any oven at home, don't worry you still can whip out a decent pizza by using oven toaster or Happy Call Pan

Friday 24 October 2014

[30 Minutes Meal] Express Meal Using Lee Kum Kee Menu-Oriented Sauces

Have you ever tried preparing a decent "3 dishes + 1 soup (三菜一汤)" meal within 30 minutes (excluding preparation of ingredients and marinating)? In this post I would be sharing some tips and recipes on how to cook-up four delicious home cook dishes and get them ready on the dining table within 30 minutes.

Since this task is part of the criteria from Lee Kum Kee MOS Blogger Competition which I am taking part, I decided to put myself on a test to see whether am I able to complete the assigned task within the time frame.

Thursday 5 May 2016

[Recipes + Videos] Mother's Day Cake Ideas

Mother's Day is just a few days away and to avoid the festive crowds I am sure many of you have already celebrated it ahead. But if you are still planning to bake something for mum this coming Sunday, perhaps you might like to take a look at 3 of our feature recipes below.

To cater for different preference we have light and spongy Sakura Matcha Chiffon that filled with light floral scent. Or for a good after meal dessert go for 1-Pot Chocolate Cake which is rich and moist to serve with a scoop of vanilla ice-cream.

Monday 26 September 2011

Orange-Scented Flourless Chocolate Cake

Flourless Chocolate Cake has being queuing in my "must-try" lists for at least more than 2 years. Whenever I saw beautiful photos and recipes from fellow bloggers who lay their hand on this delicious looking cake I will be fascinated to give it a try. But the "fate" between me and this cake only begins to spark last week while I was planning to bake something for my neighour and my boy's school teacher.

From the name "Flourless" you can more or less figure out that this recipe does not require any Flour, but somehow or rather it did call for a minimum amount of cocoa powder to enhance the taste. So in order to have better texture and taste for this cake, I would suggest you get some decent brand of cocoa powder which would give it that dark and luxury outlook.

I love this recipe because it is so easy to prepare and you can even let your kid(s) handle most of the beating and folding job with maybe a bit of help from the Adult. Furthermore those of us who tried this cake were surprised of it's taste and texture which is moist, fluffy and tasty even without any use of "BUTTER or MILK".

Ingredients: (make 4, 9cm x 9cm square disposal baking case)
4 Egg Yolks
4 Egg Whites
110g Caster Sugar
12g Valrhona Cocoa Powder
100g Valrhona(Guanaja - 70%)Dark Chocolate, melted
1 Teaspoon Grand Marine/Vanilla Essence
Zest of 1 or 2 Oranges

Method:-
1. Preheat oven to 180 degree.

2. Separate egg yolks and whites in two different mixing bowl. (i use a bigger bowl for my yolks mixture in order to mix in the whites later on)

3. Whisk egg whites in a bowl with a mixer until soft peaks form. (do not over beat till stiff peak)

4. Next whisk egg yolks and sugar in another mixing bowl until pale and airy before folding in cocoa powder, orange zest and grand marine.

5. Stir in melted chocolate till well combined. Fold in 1/3 of the egg whites at a time and mix well. (since chocolate mixture will be heavier than egg whites, try to scrap and stir from the bottom when mixing to get an even texture)

6. Pour mixture into prepared cake pan or disposal baking cases. Bake in preheated oven for 18 minutes(9cm square paper case), 25 minutes(7"/15cm round cake pan) or when skewer insert and comes out clean.

7. Cool the cake completely on baking rack before sprinkle it with icing sugar and decorate with whipped cream, ice-cream or assorted fresh berries of your choice and serve.

Tips:-
1. You can either melt the chocolate over a double-boiler or place them in microwave safe bowl and cook on HIGH heat for about 90 seconds, stirring at an interval of 30 seconds to prevent burnt.

2. Eggs use in the recipe is 60g each in weighs.

As you can see from the photos, the top of the cake has a delicate crispy crust which gives this cake a few layers of texture such as crisp top, moist and fluffy cake with orange-scented flavour on each bites. And since this is my 1st trial, I hope I would be able to achieve a bit slightly fudgy texture perhaps with a 3 minutes under bake on the timing.

For more recipes on different type of Flourless Chocolate Cake, you can refer to the follow site which I bookmark too.
1. Flourless Chocolate Gateau from Happy Home Baking
2. Flourless Chocolate and Almond Cake from Little Teochew

ShareThis