
 Saw this interesting and easy to make Bread recipe in one of my blogger friend Evan's blog. Her Ham Bread was very nicely done and it really give me an inspiration to try making this bread. I do a slight change on the sequence of adding certain ingredients based from another bakery book which will decrease the wetness and easier handling of the dough.
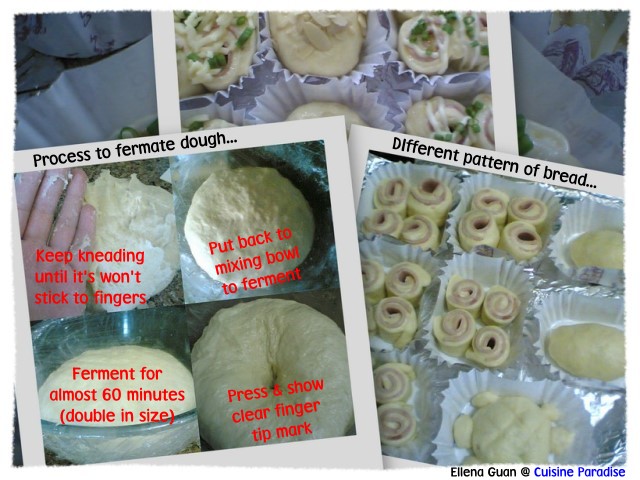 The most tedious part of making bread at home without bread machine is the kneading part. Because you had to knead at least 20 to 30 minutes until the dough is smooth, elastic and stick free from your fingers. So it's might not be a easy job if you thought of giving it up half way through.
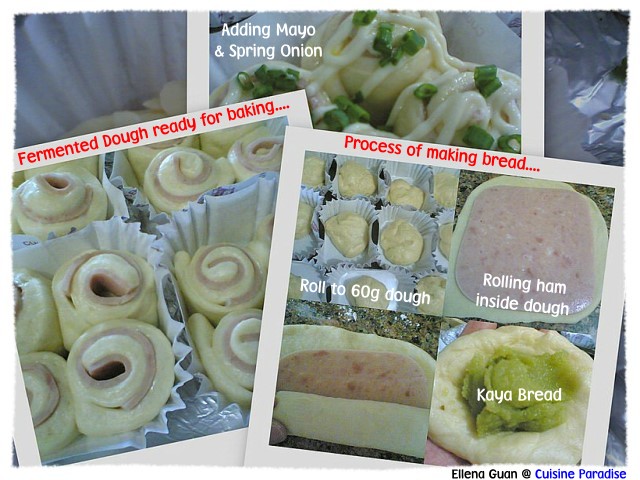 But come to think about it..... When you can have homemade bread anytime with any fillings you prefer. It's really a wonderful things. Especially to fill the bread filling with the help of another family member or kids.... I am sure they will enjoy more of the bread which is done by them.
 This recipe that Evan shares with us is really a very test-proof recipe. Since we can do it.... I am sure those who wants to try on this recipe will be able to do it as well... Just remember during the kneading process.. DO NOT GIVE UP.... Keep on kneading with your fingers without adding EXTRA FLOUR(which I used to do previously) or OIL..... I am SURE your dough will be ready within 30 minutes or less.... Do give it a try..... and I am sure you won't regards it....
Recipe taken from Evan's Kitchen Rantings.....
Ingredients: (make around 12 60g portions)
300g Bread Flour
100g Plain Flour
80g Sugar
1 Egg
1/2 Teaspoon Salt
2 Teaspoon Instant Dry Yeast
175ml Ice Water
50g Butter Or Margarine
For The Filling :
Picnic Ham
Spring Onions, Chopped
Mayonnaise(optional)
1 Beaten Egg, For Glazing
Methods:
1. Mix bread flour, plain flour, salt, sugar and dry yeast till well blended in a big mixing bowl.
2. Next add in Egg, and use finger to mix it well and slowly add in the cold water while you knead the mixture till combine then add in the butter and knead to form a pliable & elastic dough.
3. This process may take quite a while, about 30 mins or so.
4. The dough will be wet & sticky at first (and kinda messy as well), but keep on kneading (without adding oil or water) until dough no longer sticks to fingers & is glossy on surface.
5. And if you're about to give up just like I did, DON'T!
6. Place the dough in the mixing bowl, wrap it up and set aside in a warm place to allow dough to fermentate, approx. 45 minutes - 60 minutes,(depend on the weather, or you can place it in the oven with a bowl of hot water beside it) the dough must at least double in size after fermentation.
7. Use finger to press into the dough, it should show a clear finger tip mark but the dough should not sink and it's ready to use the dough.
8. Punch to release some air. Separate dough into individual 60g portions & refrigerate for about 10 mins.
9. Taking a portion of the dough out of the fridge, knead into a flat sheet just abit bigger than a slice of picnic ham.
10. Place ham on top of the dough and roll up.
11. Cut into 5 portions and place them onto a small round dish or flan tin.
12. Repeat steps 9-11 for the rest of the dough.
13. Leave on to fermentate for another further 35 mins.
14. Glaze with egg wash, drizzle with some mayonnaise & sprinkle with chopped spring onions.
15. Bake in a preheated oven of 200 degree for about 10 mins until golden brown. Brush top with margarine for a shiny glaze.
Notes: You can use the same dough for different kind of fillings: eg; red bean or green tea paste, curry chicken, hotdog or etc.


Ellena, lovely bread you've got there. :)
ReplyDeleteThanks Angie..it's all becos of Evan's easy bread recipe..will try your bread recipe next.. :) hope it will turn out well also....
ReplyDeletehey ellena, didnt know u actually made bread & posted in THIS blog! to think i kept visiting your other "soup blog" LOL.
ReplyDeletei juz realized something. u don't hv to do anything to decrease the wetness of the dough for easier handling. all u hv to do is while u r handling, use well-oiled hands! by rubbing oil onto yr fingers, the dough won't stick. i shd hv known it earlier!
oh ya, think i shd also link your this blog up.