Wednesday, 12 July 2006

Home-style Korean Bibimubahu

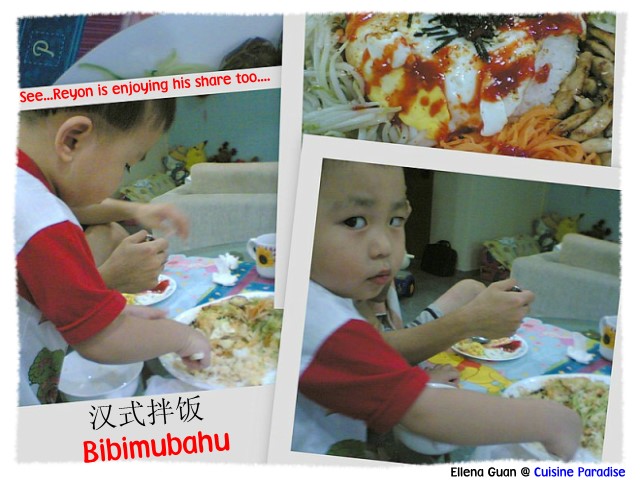
Bibimbap is served as a bowl of warm white rice topped with sauteed and seasoned vegetables, beef, a fried egg, and gochujang (chile pepper paste). The ingredients are stirred together thoroughly just before eating. Vegetables commonly used in bibimbap include julienned cucumber, zucchini, carrot, mu (white radish), mushrooms, doraji (bellflower root), and laver, as well as spinach, soybean sprouts, and gosari (bracken fern stems).


Dubu (doufu), either plain or sauteed, or a leaf of lettuce may be added, or beef may be substituted with chicken or seafood. Although what had I prepare is not the traditional or authenticate koran bibimbap, but it really taste good and suits our family. We all agreed that this is a very healthy dish which contains alot of different vegetables and less meat.

Ingredients: (serves 2 - 3)
2 Cups Of Cooked White Rice
1/2 Tablespoon Sesame Oil
200g Chicken Fillet, cut into strips
1 Cup Bean Sprout, remove tails
1 Small Carrot, Shredded
1 - 2 Japanese Cucumber, Shredded
1/2 Small Cabbage(150g), Shredded
8-10 Small Fresh Shiitake Mushrooms
4 Cloves Garlic
100ml Chicken Stock/Water
2 Eggs

Marinade:
1 1/2 Tablespoons Soy Sauce
1 Tablespoon Sesame Oil
1/2 Teaspoon Chilli Powder
1 Teaspoon Sugar
1 Teaspoon Cornstarch

Toppings:
1 Tablespoon Dried Shredded Seaweeds
1 Tablespoon Of White Sesame Seeds, pan-fry till fragrant
1 Teaspoon Assorted Chili Pepper(Nanami Togarashi)
Some Gochujang(Korean chili paste)


Methods:
1. Marinate the chicken strips and set aside in the fridge for at least 30 minutes.
2. Remove the tails of the bean sprouts then rinse in water, drain and set aside.
3. Place the cooked rice in the middle of a big plate. Preheat 1 Tablespoon of Sesame oil in a pan and drizzle on top of it.
4. Next add some oil in the pan, break in the eggs, fry into sunny-side-up egg and place it on top of the rice.
5. Add in shredded carrots and stir for a few seconds then remove and arrange it on the side of the rice together with the shredded cucumber.
6. Add in abit more oil, saute two minced garlic then add in bean sprout and stir for a 1 - 2 minutes, add in some salt and season to taste. Remove and arrange on place.
7. Clean the pan, saute another 2 minced garlic with some oil and stir-fry the shredded cabbage and mushroom for 1 - 2 minutes then add in the chicken stock and simmer for 3 minutes, drain the mixture and arrange the cabbage and mushroom separately on the place.
8. Lastly, preheat the washed pan with some sesame oil and stir-fry the chicken strips till half done then add in some sesame seeds and stir till fragrant and cooked.
9. Remove and arrange on plate. Sprinkle some extra sesame seeds, shredded seaweeds and Korean chili paste.

Notes:
You can use any vegetables such as spinach, bean sprouts, or mushrooms (oyster, enoki).
Blanch mushrooms, squeeze, add some sesame oil, salt and sesame seeds.

For those who are looking for korean food ingredients, you can go to this shop:
Shine Korea
175 Bencoolen Street
#01-10/11
Burlington Square
Tel: 6238 8897Posted by Picasa

Tuesday, 11 July 2006

Stuffed Creamy Chicken & Vegetables Soup In Loaf

This is a very easy and quick to prepare meal. You can either use the it to stuff into a loaf or as a sauce for spaghetti or baked rice and it can be served in anytime of the day like breakfast or dinner.

The ingredients used can be varies from individual preference. Like you can choose any type of mushrooms like button mushroom, shiitaka mushroom or even can mushroom. You can add in celery if you prefer or change the soup base to corn, mushroom or pumpkin etc.....

For this meal, I stuffed all the cook ingredients into a pre-baked medium French loaf and serve with some extra fruits to make it more colourful and appetizing.

Ingredients:
3-4 Medium French Loaf
1/2 Chicken Breast
1/4 Broccoli
10-15 Baby Potato, cut into halves
1 Small Carrot, cut into cubes
1/2 Brown Onion, cut into small wedges
8-10 Mushroom, cut into quarter
500ml Instant Creamy Soup(2 packets or 1/2 can)
300ml Water

Methods:
1. Wash, trim and cut the chicken breast into small cubes. Marinate it with some white pepper, soy sauce and cornstarch and set aside in the fridge for at least 30 minutes.
2. Wash, peel and cut the potato, carrot, mushroom and onion into small bite size.
3. Cut the broccoli into small florets and soaked in water for about 15 minutes, rinse and blanch in hot water, rinse and set aside.
4. Prepare the instant soup(I used Campbell instant cream of mushroom and chicken) according to the cooking instruction stated.
5. Preheat a small saucepan with 1 tablespoon of olive oil, saute the chicken pieces(coat with some extra cornstarch first) until golden brown then add in the brown onion and mushroom.
6. Keep on stirring until fragrant then add in the carrot and potato and saute for 1 - 2 minutes then add in the prepared soup and bring to boil.
7. When boiled, lower the heat and simmer for 15 - 20 minutes on low heat until the potatoes and carrots are tender. (stir the soup on and off to prevent it from sticking to the pot)
8. Lastly add in the blanch broccoli florets and stir till combined. Remove the pot from the stove and sprinkle some extra pepper on top.

Assemble The Loaf:
1. Put the loaf either in the oven or toast for 1 minutes to make it abit crisp and hard.
2. Use a sharp knife to cut the top 3/4 off so that it resemble like a box with opening, then dig out all the fresh to make it hollow. Repeat for the rest of the loaf.
3. Put hollow loaves into the toaster or oven again to bake for another 3-5 minutes until crispy and harden.
4. Remove, spread a thin layer of margarine on it then scoop the chicken & vegetables soup into it and serve immediately. Posted by Picasa


Thursday, 6 July 2006

Thai-style Deep-fry Doufu

I had eaten this "Thai-style Deep-fry Doufu" twice from the Sembawang SAF Yacht Club restaurant. I love the crispness of the fried doufu with the sweet and spicy Thai sauce. It's really amazing how this simple doufu dish can be so appetizing.

Doufu(豆腐) or bean curd is a food of Chinese origin, made by coagulating soy milk, and then pressing the resulting curds into blocks. The making of doufu from soy milk is similar to the technique of making cheese from milk.


For soft silken doufu (嫩豆腐) or soy beancurd(豆花) the soy milk is curdled directly in the doufu's selling package. For standard firm Asian doufu, the soy curd is cut and strained of excess liquid using cheese cloth or muslin and then lightly pressed to produce a soft cake. Firmer doufu, such as Asian dry doufu(荳乾) are further pressed to remove even more liquid. The doufu curds are allowed to cool and become firm

Doufu is low in calories, contains beneficial amounts of iron (especially important for women of child bearing age) and has no cholesterol (a risk factor for heart disease). Depending on the coagulant used in manufacturing, the doufu may also be high in calcium (important for bone development and maintenance) and magnesium (especially important for athletes).

Ingredients:
1 Packet of Pressed Doufu,板豆腐
3-4 Tablespoon Cornstarch
1 Beaten Egg

Methods:
1. Soaked the whole box of doufu in water for about 1-2 hours(this is to harden to doufu for deep-frying purpose).
2. Remove the doufu from the packing then cut into 12 equal pieces then use kitchen paper towel to dry it well.
3. Next coat the doufu pieces with some cornstarch then dip in beaten egg and coat with cornstarch again.
4. Set it aside for 1-2 minutes before deep-frying it in hot oil for 2 minutes or until golden brown.
5. Drain and set aside.

Ingredients For Salad Base:
1 Japanese cucumber
1 Medium Carrot
1 Red Apple/Mango
1 Medium Tomato, cut into wedges
Rind Of 1 Lemon

Methods:
1. Wash all the above, shred them finely, mix well and place in a mixing bowl.
2. Set aside in the fridge while you prepare the doufu.

Sweet & Spicy Sauce:
2 Tablespoon Thai-style Sweet Chilli Sauce
2 Small Red Chilli, finely chopped
1 Tablespoon Drinking Water
2 Tablespoons Thai Fish Sauce
1/2 Teaspoon Sugar
2 Cloves Of Garlic, finely grated
Juice Of Half Lemon
1/2 Tablespoon Finely Chopped Coriander

Methods:
1. Mix all the above ingredients together in a small bowl and stir till well combined.
2. Set aside for later use.(you can prepare it ahead and place in the fridge)

Assemble The Dish:
1. Remove the salad from the fridge, place it as a base on the serving plate.
2. Arrange the tomato wedges around the plate, drizzle 1/4 of the sweet & spicy sauce on the salad.
3. Place the fried doufu on top of the salad base, then drizzle the rest of the sauce evenly on the doufu and serve hot.

Notes:
You can use any vegetables for the salad base as you prefer.

If you don't like the garlic smell, you can omit it from the sauce. And if you prefer a hotter sauce, you can add more chopped chillies. Posted by Picasa

8 Treasure Chicken Soup - 八宝鸡汤

I am sure you heard of "8 Treasure Porridge-八宝粥", "8 Treasure Rice-八宝饭" or even "8 Treasure Chicken/Duck-八宝鸡". So for my 8 Treasure Chicken Soup-八宝鸡汤 is to add another collection to you treasure box......This soup is good to calms spirit and smooth the intestines function and clear constipation. It also promote and ease urine flow. It's a very good soup for the whole family especially for those who are suffering for minor stress. To know more information of each herbs, you can click on the Basic Chinese Herbs link.


Ingredients:
2-3 Chicken Drumsticks
20g Dried Lily Bulbs, 百合
20g Fox Nut,茨实
20g Lotus Seeds, 莲子/湘莲
20g Chinese Barley,中国薏米
10-12 Fresh Gingko Nuts,白果
3-4 Red Dates,红枣
1/2 Tablespoon Guo Qizi,枸杞子
150g Fresh Huai Shan,鲜淮山

Methods:
1. Wash, trim and blanch the chicken in boiling water, drain and set aside.
2. Wash and peel the fresh huai shan then cut into 3 thick sections.
3. Rinse and drain the rest of the dried herbs and set side.
4. Bring 1.5 litres of water to boil, add in all the herbs and chicken then bring to boil again.
5. Transfer to a slow cooker and simmer on low heat for about 2 hours.
6. Season with salt and serve.

Notes:
If you do not have fresh huai shan, then replace it with 4 - 5 slices of dried huai shan.

In this recipe, I used two types of dried lotus seeds, one with skin and one without.Posted by Picasa

Wednesday, 5 July 2006

Steam Rice Wine Chicken

I believed most of you had being to "Soup Restaurant- 三盅两件" and eaten their famous Samsui Ginger Chicken before. This steam chicken is debone and sliced up and the ginger is placed in the centre of the big plate along with a plate of fresh lettuce. The art of eating this dish is by dipping the piece of chicken meat into the ginger sauce and wrapping them with the lettuce. I love to eat this ginger chicken because of it's ginger dipping sauce. Although my "Steam Rice Wine Chicken" do come with the ginger dipping sauce, but the chicken style is a bit different. My chicken wings were marinated with some salt then drizzle with some glutinous rice wine and steam over medium heat till tender.


Ingredients:
1/2 Portion Of Chicken or 6 Chicken Wings
1/2 Teaspoon of Salt
Some Sesame Oil
3-4 Slices Of Young Ginger
2 Stalk Spring Onion, cut into 5cm sections
2 Tablespoon Glutinous Rice Wine/Cooking Wine

Methods:
1. Wash and pat dry the chicken then rub it with some sesame oil and salt and set aside for 10 minutes.
2. Arrange some ginger slices and spring onion on the base of the plate, place the chicken pieces on top then top with the remaining ginger and spring onion.
3. Drizzle the Rice wine on top and simmer over medium heat for 20 minutes or until tender.
4. Remove from the steamer and serve with extra tomato or cucumber slices and the ginger dipping sauce.

Ginger Dipping Sauce
3" Piece Of Young Ginger
1/4 Teaspoon Of Salt
3 Tablespoon Of Cooking Oil
1 Tablespoon Finely Chopped Spring Onion, optional

Methods:
1. Wash and peel the young ginger then grate it finely and put into a small bowl.
2. Add in the chopped spring onion and salt.
3. Preheat a small pan with the oil till hot then pour into the grated ginger.
4. Stir well and set aside to cool, then transfer it to a glass bottle and put into the fridge till serve.(if you do not have any glass bottle then just cover the bowl with clingwrap) Posted by Picasa

Tuesday, 4 July 2006

Trio Carrot & Fish Paste Meatball Soup

Saw this original recipe from one of the cookbook call "Local Taiwan Food, 台湾小吃". In the recipe, it used pork strip instead of pork mince to coat with the fish paste. And for the soup base, they only use red and white carrot instead of the trio carrot that I used.

The process of making the fish paste meatballs is rather easy, it's sort of like the "Fuzhou Fishball, 福州鱼丸" that we had here. As you can see from the picture, I used the cookie cutter to cut out leaves and carrot shape from the carrots slices to make the soup look more appearling so that my dear son will find it interesting.


Ingredients:
200g Pork Mince/Pork Fillet
200g Fish Paste, 鱼浆
1 Medium Red Carrot, 红萝卜
1 Medium White Radish, 白萝卜
1 Medium Green Radish,清萝卜
4 Red Dates,红枣
1/2 Tablespoon Gou Qizi,枸杞子
1/4 Chinese Cabbage,白菜
1.5 Litres Water
1 Teaspoon Salt
Some White Pepper
Some Dried Shallot and Oil

Methods:
1. Marinate the pork mince with 1/2 Tablespoon Soy Sauce, 1 Teaspoon Sesame Oil, 1 Teaspoon Cooking Wine, 1/2 Tablespoon Cornstarch and 1/4 Teaspoon White Pepper for at least 30 minutes in the fridge.
2. Wash and cut the carrots into small cubes or patterns that you prefer.
3. Wash the Chinese cabbage and cut into bite pieces.
4. Bring a pot with the 1.5 litres to boil, then add in the carrot pieces, red dates and gou qizi then bring to boil and simmer for 20 minutes on low heat until carrot tender.
5. Roll the pork mince into small round shape then coat with the fish paste to form another round shape like the size of a fishball.(wet your hand with some water so that the fish paste won't stick to your hand)
6. Bring a small pot of water to boil, drop in the meatballs one at a time, and cook until all meatballs float up, dish and drained.
7. Bring the soup to boil again, add in the Chinese cabbage, simmer until tender then add in the meatballs and bring to boil again.
8. Season with salt and serve with some dried shallot and chopped spring onion.

Notes: If you are using pork fillet, just wash the pork, cut into thin strips then coat with fish paste and drop into the pot of boiling water and cooked until float then remove. Posted by Picasa

Steam Cod Fish With Crispy Bean

The very first time I had this similar dish is from Crystal Jade restaurant which is their famous "Steam Fish With Crispy Bean". It was very delicious to go with plain rice. But after searching almost all places for that "crispy bean,豆酥 " sauce, I finally gave up. Because I asked alot of places and they don't seems to know what is this crispy bean. Until recently, I saw one of my friend pamy's blog, she managed to find this bottle crispy bean paste in Cold Storage at Takashimaya. So without any delay, I quickly go and grab a bottle to try out this "Steam Cod Fish With Crispy Bean". Like what pamy mention, this small bottle can only used around 2 to 3 times and it's rather costly.


Ingredients:
1 Piece Of Cod Fillet, about 500g
50g Crispy Minced Bean
1/4 Teaspoon Salt
Some Spring Onion and Chilli, finely chopped

Methods:
1. Rinse cod fish, pat dry and place on a plate.
2. Marinate it with salt for about 10 minutes.
3. Place cod into steamer, steam over high heat for about 10 minutes, remove.
4. Saute the crispy bean in a non-stick pan over low heat until golden and fragrant.
5. Remove and pour over onto the cod, sprinkle with some spring onion and chilli, serve hot.

Notes: Actually there is another type of crispy minced bean(豆酥) which is sold in a ball shape and needs to be ground before use. The finer it is ground the more flavourful the taste it. But too bad, we can't really find it in Singapore. For those who know where to get it, please kindly leave me a message. Thanks.Posted by Picasa

Monday, 3 July 2006

Korean Chicken Soup

This Korean Chicken Soup is one of the MUST HAVE soup for the Korean during summer days. They usually stuff all the ingredients in a small chicken and double-boiled it over slow heat. But for smaller family, you also can use chicken drumsticks or pork ribs to achieve a similar taste and texture for this soup.


I find this is rather an interesting soup because of the ingredients used. Like Gingko nut, which is normally used for dessert instead of savory soup. And from the above photo you will also wonder, "Is this Soup or Porridge?". Because I used the slow cooker to simmer this soup over low heat for about 2 hours and it became slightly thicken due to the glutinous rice which will make it taste even better. But for those who prefer a clearer soup base, perhaps you can follow the cooking method below or just simmer in slow-cooker for 1.5 hrs instead. Other than gingko nut and glutinous rice, I also use a new ingredient known as Burdock(click link to find out more) which give a unique Root fragrant to this soup, which taste a bit like Ginseng.

Ingredients: (serves 2 - 3)
1/4 Cup Glutinous Rice,糯米
2 Chicken Drumsticks,鲜鸡腿
2 Medium Dried Mushroom,香菇
1 Stem Of Burdock,牛蒡
2 Cloves Garlic,蒜
8 Fresh Gingko Nuts,鲜白果
8 Fresh Chestnuts,鲜栗子
3-4 Ginger Slices,老姜片
4 Red Dates,红枣
1/2 Tablespoon Salt
3 Cup Water, 750ml
1 Stalk Spring Onion
Some Black Pepper Powder

Methods:
1. Soak mushroom till soft with 1 cup of water, cut away the stalk and retain the water for later use.
2. Wash and soak glutinous rice for at least 30 minutes, drain and set aside.
3. Wash, trim and blanch chicken drumsticks in boiling water then rinse and set aside.
4. Wash and cut the burdock into 3cm long, blanch in boiling water, drain and set aside.
5. Wash the garlic and light pound it with the back of the knife. Cut spring onion into thin slices and set aside.
6. Remove the shell and skin of the fresh Chestnut(click link to find out more on removing the shell).
7. Add all ingredients in a pot together with 3 cups of water and 1 cup of the mushroom water and bring to boil.
8. Simmer over low heat for about 20 - 30 minutes, season with salt to taste then sprinkle with some spring onion and black pepper, served.

Notes: This version of Korean Chicken Soup contain more ingredients, for those who prefer less ingredients you can also try this: Ginseng Chicken Soup With Glutinous Rice Posted by Picasa

Thursday, 29 June 2006

Cranberries Cinnamon Roll

Opps! Another bread collection for Today's Breakfast. As I was making a batch of the Cranberries Cream Cheese Bread for my aunty, I decided to use half of the dough to make this Cranberries Cinnamon Roll. It's indeed very easy to prepare, just need to sprinkle some brown sugar and cinnamon powder to it.... so simple and yet so delicious........Sometime I think bread making is very simple and full of creative ideas, just as long as you get hold of the kneading process of the dough. Then with the dough, you can creative different kinds of bread according to your creation.

Ingredients: (make about 7 buns)
150g Bread Flour
50g Plain Flour
10g Milk Powder
30g Sugar
1 Medium Egg
½ Teaspoon Salt
1 Teaspoon Instant Dry Yeast
85ml Ice Water
25g Butter/Margarine
40g Dried Cranberries, finely chopped

Methods:
1. Mix bread flour, plain flour, milk powder, salt, sugar and dry yeast till well blended in a big mixing bowl.
2. Next add in Egg, and use finger to mix it well and slowly add in the cold water while you knead the mixture till combine then add in the butter and knead to form a pliable & elastic dough.(you might not need all the ice water, just add slowly while kneading so that it will come to a rough dough consistency then add in the butter)
3. This process may take quite a while, about 30 mins or so.
4. The dough will be wet & sticky at first (and kinda messy as well), but keep on kneading (without adding oil or water) until dough no longer sticks to fingers & is glossy on surface.
5. And if you're about to give up just like I did, DON'T!
6. When the dough is done, add in the chopped cranberries slowly and mix till well combine.
7. Place the dough in the mixing bowl, wrap it up and set aside in a warm place to allow dough to fermentate, approx. 45 minutes - 60minutess,(depend on the weather, or you can place it in the oven with a bowl of hot water beside it) the dough must at least double in size after fermentation.

For The Cinnamon Fillings:
1/2 Tablespoon Or more Cinnamon Powder
1 Tablespoon Brown Sugar
1 Tablespoon Soft Butter
1 Egg, lightly beaten
Some Almond Flakes

Methods:
1. Roll the fermented dough roughly into a 30cm by 25cm rectangle shape.
2. Spread a thin layer of butter on the dough surface and sprinkle some cinnamon powder and brown sugar evenly around the surface.(Adjust the amount by personal preference.)
3. Roll up the dough on the wider side downwards evenly, cut the rolled up dough into 6 or 7 equal parts.
4. Place the cut dough into paper mould with the cut surface facing upwards.
5. Leave it to continue ferment until it fill 80% of the mould.
6. Brush the dough with egg wash and sprinkle some almond flakes on the surface, you can spinkle some extra cinnamon powder if you prefer.
7. Bake in a preheat 180 degree oven for about 15 minutes or till golden brown, remove and set aside to cool. Posted by Picasa


Green Carrot & Cordyceps Soup

Last few weeks it seems abit difficult to find Green Carrot around my area. So when I managed to get hold of one yesterday, I decided to use it for this Green Carrot & Cordyceps Soup. With the Green Carrot and Cordyceps stem, this soup give up a very fragrant, refreshing and sweet taste which make you wanted to have a second refill in the soup bowl. You might want to give this a try during hot weather as it's a very good soup to clear the heats in the body.


Ingredients:
300g Pork Ribs(排骨)/2 Chicken Drumsticks
1 Medium Fresh Huai Shan(鲜淮山), around 200g
1 Medium Red Carrot(红萝卜)
1 Medium Green Carrot/Green Radish(青萝卜)
1/2 Tablespoon Gou Qizi(枸杞子)
4 Red Dates(红枣)
2 Tablespoons Foxnuts(茨实)
1.5 Tablespoons Cordyceps Stems(干冬虫草)

Methods:
1. Wash and blanch the pork ribs in boiling water, rinse and set aside.
2. Wash, peel and cut the red carrot, green carrots and huai shan into thick sections.
3. Rinse the rest of the herbs ingredient and set aside.
4. Bring a pot of 1.5 litres of water to boil and add in all ingredients, boil on medium heat for 10 minutes then simmer on low heat for about 1.5 hours.
5. Or you can transfer to a slow cooker on Low heat and simmer for 2 - 3 hours.
6. Season with some salt or chicken stock cubes and serve warm.Posted by Picasa
This is the picture of Green Carrot/Green Radish. You can find it in most vegetable stalls in the wet market. It will give out a very refreshing and sweet taste when used to make soup.

Monday, 26 June 2006

Bacon, Mushroom & Cheese Tart

Make this Bacon, Mushroom and Cheese Tarts for my guest yesterday night dinner and everyone love it very much. The taste of the filling is just right and the case is very crisp and yummy. Thank Tazz for sharing this wonderful recipe.... Another test proof recipe from Tazz's kitchen.....

For my version, I actually pan-fry the chopped bacon in some olive oil for a while till fragrant then I spread it evenly onto the tart case itself. As I thought this might make the bacon more fragrant when bake..... Posted by Picasa

Vareniki Dumplings

Made this as dinner for my friend who visited us yesterday. Wow..... You must be wondering what is "Vareniki Dumplings". You might have heard of Pork Dumplings, Shrimp Dumpling, Vegetable Dumplings or etc.... But what is Vareniki Dumplings?

Vareniki are square or crescent shaped dumplings of unleavened dough, stuffed with cheese, mashed potatoes, cabbage, meat or hard-boiled eggs or sometime with fruit filling. It's very popular in Russia as a quick-fix dish. During preparation, the filling is wrapped with dough, boiled for several minutes, and then covered with oil. So in another word, it is a Russian Dumpling just similar to our Asian Pork Dumpling but stuff with different filling and cooking method.


I come across this interesting recipe from one of blog that my friend Tracy introduce to me. It consists of alot of interesting recipes which Suyin records all her cooking adventure during her study in Australia. You can find the original recipe from her link which also include with a cooking video. For my version, I add in some extra vegetables, fruits and Parmesan cheese for extra colour and favour.

Ingredients For Dough: (make about 20 wrappers)
1 Cup Plain Flour, sifted
1 Teaspoon Salt
1/2 Tablespoon Olive Oil
1 Egg Yolk
100ml Of Drinking Water

Methods:
1. Sift the flour into a large mixing bowl, then stir in the salt.
2. Make a well in the middle of the dry ingredients and add the egg yolk and oil.
3. Using a wooden spoon, stir in the egg, gradually drawing in the flour. After a few minutes the dough will be too stiff to use a spoon and you will need to use your fingers.
4. Once all the flour has been incorporated, turn the dough out on to a floured surface and knead for about 3-5 minutes, until the dough is smooth and elastic.
5. If you find the dough is too wet, add a little more flour and continue kneading. But if the dough is too dry, then sprinkle some water and knead till smooth.
6. Cover with cling wrap and set aside for at least 15-20 minutes.
7. The dough is now ready, roll the dough out into thin sheet then use a round cutter(8cm) to cut into round wrappers.
8. Wrap each wrapper with 1 Tablespoon Of Potato mixture and repeat it with the rest of the wrappers.
9. Bring a big pot of water with 1 teaspoon of salt and olive oil to boil, then add in the wrapped dumplings.
10. Continue to simmer until all the dumplings floats up, remove, rinse with tap water and drain well. (put around 6 dumpling at a time, don't over crowded the pot)
11. Set aside for later use.

Potato Filling: (can make 50 dumplings)
3 Medium Size Potatoes
30g Soft Butter
1/2 Onion, finely diced
1/2 Cup Grated Mozzarella/Cheddar
2 Tablespoons Sour Cream
Some Black Pepper & Salt

Methods:
1. Wash the potatoes, cut into half then steam it for about 15 - 20 minutes until tender.
2. Scoop out the potato flesh into a mixing bowl then mash it with a fork until smooth.
3. Preheat a pan with butter then saute the diced onion till soft and fragrant.
4. Remove from heat, add in the mashed potato, and stir till combine, then add in cheese, sour cream, pepper and salt.
5. Continue to stir till all mixture is well combined then set aside for the wrapping.

Assemble:
50g Of Bacon, cut into slices
1/2 Packet Of Sweet Bean
6 Cherry Tomato
100g Blueberry, optional
Parmesan Cheese Powder
Extra Virgin Olive Oil

Methods:
1. Preheat the pan with 1 Tablespoons of Olive Oil, then saute the bacon until fragrant then add in the cooked dumpling in two batches.
2. Pan-fry until both sides are golden brown then remove and place on serving plate. Continua with the rest.
3. Add in some extra olive oil, then stir-fry the sweet bean and cherry tomato till fragrant then add in the blueberry and stir for another minute.
4. Remove and divide it evenly onto the top of serving dumpling then sprinkle with some extra virgin olive oil and Parmesan cheese powder and serve.

Notes:
The original Vareniki Dumpling is served with drizzle oil on top but for my version, I add in extra bacon, vegetables and cheese to give it more favour.

As for the left over potato fillings, you can either kept in the fridge for making a 2nd batche or you can make half of the recipe instead. Sometime it depend on the size of the potatoes or the amount of fillings you wanted to wrap. Posted by Picasa

Sunday, 25 June 2006

Meme - 10 Things I Miss of Mum's Cooking

Wow... never thought I had a chance to tag on this MEME game as well. I had read it from a few of the food blogger friends that I knew and I really find it very interesting. And now I am so surpised to be tag by Margaret(jingle26) for participating this.

But when it's my turn to write this Meme, it seems to be a lost. As I don't know how or where to start........ 10 Things... em..... since primary school till I grown up and get married, my mum had being working either morning/afternoon shift work so most of the cooking are done by my dad. So this Meme is sort of a bit hard for me to come out 10 items....lolz....but I will try my best.....


1. Haninese Chicken Rice - Since my mum is a Haninese she this is one of her Super Dish of the family. She used to cook it twice a month and the fragrant of the rice, the taste of the tender chicken and most of all the dipping chilli sauce.....all of these are so much better than those selling outside.

2. Haninese Pork Chop - Other than her Chicken Rice, this is one of her special dish that grandpa passed to her. It's their famous Haninese Pork Chop, it's so crispy outside and yet the meat is so tender and juice. Really miss those crunch, I used to fight those pieces of pork chop with my brother.

3. Salted Fish Meatball With Cabbage- This is another simple and easy soup that my mum used to cook. She will mixed the chopped salted fish with pork minced, marinate and shape it into round shape and cook with cabbage and fishball for soup.

4. Stir-fry Prawn With Oyster Sauce - I love this dish very much, and I often cook this dish when my friend come to my place and they loves the sauce to go with the rice.

5. Ngoh Hiang - Last time my mum only used to make this during Chinese New Year time, and her Ngoh Hiang is always the most popular dishes in the new year feast.

6. Steam Ji Dan Gao - My mum used to steam a few big bamboo basket of these steam egg cake before Chinese new year to pray the ancestors. Her steam egg cake is very fragrant and spongy which is very different from those selling outside.

7. Sweet and Sour Pork - One of the regular dish that my mum used to cook on weekend because my brother loves it so much.

8. Nonya Chicken Curry - My mum used to make her own curry paste instead of those instant pre-pack one that we are using now. I love to eat this with French loaf.

9. Soya Sauce Duck - I love the taste of the sauce and the duck meat is tender, it's so fragrant and not the oily. I always eat this with white porridge because it can actually bring out the taste of this dish.

10. Vegetarian Dishes - Since my mum is a Buddhism, she always prepare a few vegetarian dishes during the 1st day of Chinese New Year or during the 1st and the 15th day of the Luna Month.

Wow... finally I managed to list 10 things that my mum used to cook. Because since my dad had pass a way and we are all grown up and not around by her side. She don't really cook all these wonderful food anymore. :(

Now... I should let Pamy, and Shirley to tell you more about what they had miss on their mum's cooking.

Friday, 23 June 2006

Cranberries & Cream Cheese Bread

Since today is Friday and I am preparing a very simple dish for today's dinner. I took so time on and off during my son's afternoon naptime to prepare this Cranberries & Cream Cheese Bread. I used half of the previous dough ingredients that Evan suggested and add some dried cranberry in it. This bread is wonder with the cream cheese filling and some assorted jam spread on top. Although it might look complicated but it is indeed very easy to prepare.


Ingredients: (make 7 buns)
150g Bread Flour
50g Plain Flour
10g Milk Powder
30g Sugar
1 Medium Egg
½ Teaspoon Salt
1 Teaspoon Instant Dry Yeast
85ml Ice Water
25g Butter/Margarine
40g Dried Cranberries, finely chopped

Methods:
1. Mix bread flour, plain flour, milk powder, salt, sugar and dry yeast till well blended in a big mixing bowl.
2. Next add in Egg, and use finger to mix it well and slowly add in the cold water while you knead the mixture till combine then add in the butter and knead to form a pliable & elastic dough.
3. This process may take quite a while, about 30 mins or so.
4. The dough will be wet & sticky at first (and kinda messy as well), but keep on kneading (without adding oil or water) until dough no longer sticks to fingers & is glossy on surface.
5. And if you're about to give up just like I did, DON'T!
6. When the dough is done, add in the chopped cranberries slowly and mix till well combine.
7. Place the dough in the mixing bowl, wrap it up and set aside in a warm place to allow dough to fermentate, approx. 45 minutes - 60 minutes,(depend on the weather, or you can place it in the oven with a bowl of hot water beside it) the dough must at least double in size after fermentation.

Nowsday, you can find alot of bread with cranberry as one of the mixture from most bakery. Cranberries are a source of polyphenol antioxidants, chemicals which are known to provide certain health benefits to the cardiovascular system and immune system. By adding these chopped dried cranberries to the bread, it really gives a extra sweetness and crunch when eating.

For The Cream Cheese Filling :
100g Soften Cream Cheese
20g Icing Sugar
1 Teaspoon Lemon Juice
1 Grated Lemon Rind

Methods:
1. Sift the icing sugar into a small mixing bowl, then add in the lemon juice and stir well.
2. Next add in the soften cream cheese and lemon rind and stir till well combined.
3. Set aside in the fridge for later use.

Theoriginall recipe actually coated the bread withdesiccatee coconut and top with some blueberries jam. But since I do not have any of those items at home. I replace it with some assorted nuts and jams that I found in my fridge. So this is my version of Cranberries Bread With Cream Cheese Filling.

For Decoration:
1 Extra Egg For Glazing
Some Almond Flake/Pumpkin Seeds
Some Assorted Jam

Methods:
1. Divide the fermented dough into 7 lumps of 60g each and leave the lumps to rise for another 20 minutes.
2. Wrap about 1/2 Tablespoon of the cream cheese paste with the lumps and shape into round balls.
3. Use a small rolling pin or your thumb to press an deep indent in the middle of the bun to place the jam filling later.
4. Leave the filled balls to ferment until they have double their original size(about another 20 minutes).
5. Brush the fermented bun evenly with some beaten egg wash and top with some jam fillings in the indent and sprinkle some almond flake or pumpkin seeds on the surrounding.
6. Bake in a preheated oven of 200 degree for 10 mins until well risen & golden brown.
7. Glaze buns with margarine while hot.

Notes: You can used any types of jam that you prefer for the top fillings. Posted by Picasa


Pork Chop La Mian-排骨拉面

I always like to eat the 排骨拉面 from Crystal Jade Noodle House. So when I saw this similar recipe from one of the cookbook, I decide to give it a try. I bought the Fresh La Mian(拉面) from NTUC supermarket which can use to serve 3 - 4 person. This dish is very simple, just need to marinate the pork chop then deep-fry it and serve with soup noodle. It cost about $3.00 per bowl base on the ingredients used.


Ingredients: (serves 2)
2 Pieces of Big Pork Chop With Bone
1 Packet of La Mian(拉面)
A Few Stalks Of Xiao Bao Cai/Cai Xin(小白菜/菜薪)
600ml Of Soup Stock
Some Shallot/Sesame Oil
2 Tablespoon Sweet Potato Flour + 1 Tablespoon Cornstarch

Seasoning:
1 Tablespoon Cooking Wine
2 Tablespoon Light Soy Sauce
1 Teaspoon Sugar
3-4 Cloves Crush Garlic
1/2 Teaspoon Five-spice Powder

Methods:
1. Wash and chop the pork chop with the back of the knife to make it tenderize.
2. Marinate it with the seasoning for at least 30 minutes or more in the fridge.
3. Before deep-frying, coat it evenly with the flour mixture and set aside for 2 - 3 minutes.
4. Preheat the oil and deep-fry the pork chop in medium heat one at a time until golden brown and crisp.
5. Blanch the noodle in boiling water, then rinse with tap water to remove the starch on the noodles.
6. Then cook the noodles accordingly to the packet instructions.
7. Wash and blanch the vegetables in the boiling soup, remove and set side.
8. Place the cooked noodles in a serving bowl, top with blanch vegetables and deep-fry pork chop.
9. Pour over the soup stock and sprinkle some dried shallot, sesame oil and spring onion then serve.

Notes: You can use any types of noodle that you prefer. Or you can change the pork chop to pork ribs.Posted by Picasa

Thursday, 22 June 2006

Pumpkin & Assorted Bean Soup

Remember the Cranberry Bean(click link for more details) that I had used for some of the soup recipes before. Today we are going to have another soup using these beautify peal bean together with some kidney beans and pumpkin to stew a wonderful soup of the day.

Kidney Beans-红腰豆
A dried kidney shape bean that is reddish brown in color, strong flavored and has a slight mealy (powdery) texture. The beans can be cooked as their own dish or can be added into other dishes, such as chili, casseroles, refried beans and salads. They are available dried or in cans, precooked. Kidney beans also provide large amounts of foliate and tryptophan. It also benefits the Spleen and invigorates the Stomach, expels Heat and Dampness. As with all dried beans, they should be sorted and washed before cooking. Soaking ahead of time reduces cooking time.


Ingredients:
1/4 Pumpkin(南瓜), about 300g
20 Pods Cranberry Bean(珍珠豆)
100g Kidney Beans(红腰豆)
300g - 350g Pork Ribs(排骨)
1 Medium Fresh Huai Shan(鲜淮山), about 200g
1/2 Tablespoon Gou Qizi(枸杞子)
1 Piece Of Dried Tangerine Peel, 陈皮

Methods:
1. Wash, trim and blanch the pork ribs in boiling water. Rinse and set aside for later use.
2. Wash, peel and cut the pumpkin into 4 large pieces.
3. Wash and soak the kidney bean for about 30 minutes, drain and set aside.
4. Soak dried tangerine peel till soft, then scrape off the pith.
5. Remove the cranberry bean from the pod, wash and set aside.
6. Bring a pot of 1.2 litre of water to boil, then add in all the ingredients except the cranberry bean, reduce the heat and let it simmer for about 1 hrs or until the kidney bean is tender then add in the cranberry bean and continue to simmer for another 20 minutes.
7. Or you can transfer the boiled soup to a slow-cooker and simmer on LOW heat for 2 hours then add in the cranberry beans and continue to simmer for another 30 minutes season with salt and serve. Posted by Picasa

Wednesday, 21 June 2006

Kapitan Chicken Curry

This Ayam Kapitan is a very special curry paste that I had not try before and it actually used Fresh Turmeric Leaves as one of the ingredients. It has a very refreshing and special aroma when the dish is done. When you taste the curry sauce, it has a lemon scent of the turmeric leave taste and it make the curry less greasy which I find is a new taste for those curry paste that I had tried before.


Ingredients:
1 Packet Ayam Kapitan Curry Paste
500g Chicken Wings
10 Baby Potato
1 Brown Onion, finely chopped
1/2 Cup Coconut Milk
1 1/2 Cup Water
1 Tablespoon Finely Shredded Fresh Turmeric Leave

Methods:
1. Wash and trim the chicken wings then set aside for later used.
2. Mix the coconut milk with 1/2 cup of water and stir well.
3. Preheat a pot with 1 tablespoon of oil and saute the brown onion until fragrant then add in the curry paste and stir till well mixture.
4. Next add the chicken wings and potato then stir till well coated with the curry paste and let it cook for a few minutes then add in the coconut milk mixture.
5. Stir well and when it boil, add in the water and let it simmer until the sauce is almost thicken then add in the shredded turmeric leaves and simmer for another 5 minutes and serve with bread or rice.

My mum got these instant Maggi Curry Paste from one of those shopping mall in Malaysia. So I think for those who usually visit the shopping mall over there, maybe you can try to take a look at these products and give it a try... it's very special and you don't find it in Singapore. Posted by Picasa

Tuesday, 20 June 2006

Apple Yakult Cake

Got this very interesting Chilled Yakult Yogurt Cake recipe from one of my new blogger's friend Tazz(click link for her original recipe). You might be wondering... Wow.. since when Yakult(it is a kind of fermented milk drink ) can used to make cake as well..... From her recipe, I change two of her ingredients which I had some left over from making a Cheesecake. So it's kind of adventure when you got something new in the original recipe because you might not know what can goes wrong.......

But luckily the cake turns out well and everyone enjoys it so much. The texture of the cake is sort of like Lily's(Hugbear) Peach Marshmallow Cake, but as usual some of the ingredients had being recipe for a different favour and texture. For my version of Apple Yakult Cake, I used the new Konnyaku Apple Favour Jelly for the topping instead...

Ingredients For The Base: (6"/7" cake pan)
7 Pieces Of digestive Biscuits
40g Melted Butter
Ingredients For The Filling:
100g Plain Natural Yogurt
150ml Yakult, apple flavour
1 Tablespoon Lemon Juice
150ml Thicken Cream
1 Tablespoon Gelatin
3 Tablespoons Sugar
150ml Water

Method:
1. Crush the digestive biscuit in a zip-lock bag until fine crumbs then mix with melted butter, and press firmly to the base of the cake pan, set aside in the fridge for later use.
2. Dissolve gelatin and sugar in 150ml of water in a saucepan over low heat, then set aside to cool.
3. Whisk plain yogurt, yakult and lemon juice until well blended then pour in the cooled gelatin mixture and mix well.
4. Whip the thicken cream till soft peak form.
5. Slowly fold in the yogurt mixture into the whipped cream and mix well.
6. Pour the combined mixture onto the chilled biscuit base and leave it in the fridge for about 2 hours or more to set.

Jelly Topping:
1 Teaspoon of Kiwi Seeds
1/2 Packet Of Konnyaku Jelly Powder, apple favour
250ml Water

Methods:
1. Soak kiwi seeds in 1 glass of water for 20 minutes and remove those that are floating on top. Drain and rinse on the sieve.
2. Fill a saucepan with 250ml of water, pour the jelly powder and soaked kiwi seeds in.
3. Switch on the heat and gradually stir the mixture until boil, upon boiling, remove from stove and stir till bubbles disappear.
4. When the cake is set, spoon the cooled jelly solution on the cake and refrigerate again.
5. Keep in the fridge for about 2 hours or overnight then remove from cake ring and cut into slices and serve.

Notes:
1. You can add some fruit slices on top if you prefer.....
2. You can used any favour of yakult and jelly powder that you prefer.
3. Even for the biscuit base, you can change to chocolate biscuit instead of digestive Biscuits.
Just try to explore and be creative with your end-products.


Stir-fry Rainbow Vegetables

RAINBOW vegetables...... For those who is a regular visitor of my blog, you will notice that I usually used a lot of colours in my dishes. That's because I love my food to be colour and presentable. For today's veggi dish, I used all common ingredients that is good and health for everyone in the family... I call it Stir-fry Rainbow vegetables because I used 7 different types of colourful vegetables for this. And it really gives different kind of texture when you chew in your mouth.


Ingredients:
10 Sweet Bean
2 Stalks Of Celery, cut into slices
1 Small Carrot, cut into slices
8 Gingko Nuts
5 Cherry Tomato, cut into halves
3 Fresh Lily Bubs, remove the petals
1 Packet of Honshimeiji Mushroom
2 Slices Of Ginger
1 Teaspoon Finely Chopped Garlic
100- 150ml Chicken/Vegetables Stock
1 Tablespoon Cornstarch + 1 Tablespoon Water

Methods:
1. Wash, trim and cut all the vegetables then set aside. (you can used cookie cutter to stamp shapes for the carrot and celery slices)
2. Remove the Honshimeiji mushroom from the packet, cut off the end stems and rinse with water, drain and set aside.
3. Preheat a non-stick pan with 1 tablespoon of oil then saute the ginger slices and garlic till fragrant then add in the sweet bean, carrot and celery to stir till combine for 1 minutes then add in the rest of the vegetables and pour in the stock.
4. Let it bring to boil and simmer for another minutes then thicken the sauce with cornstarch mixture and remove to plate.

Notes: Stir-fry vegetables on medium high heat and must be quick do not over cooked the vegetables or else the colour will turn dark and the texture will not be crunch.Posted by Picasa

ShareThis