Showing posts with label Chocolate. Show all posts

Wednesday 19 October 2011

{Halloween Special} Jack O' Lantern, Black Cat Pumpkin Soup, Eyeballs Fettuccine And Death By Chocolate

Halloween is the celebration typically held on 31st October each year where this date marked the end of the summer and beginning of the cold winter which was often a time of death. As usually this year you could also join in some Halloween event at some of the tourist attraction such as Universality Studios Singapore, Halloween Horror Nights(here), Sentosa Spooktacular (here), FrightFest@Singapore Flyer (here) and etc.

This is the second year (read last year post, here) I cooked Halloween theme dishes despite that we don't actually celebrate this festival. Same as last year I have cooked a creamy pumpkin soup but with fusion of Asian and Western ingredients. And for this year we have a set Dinner Menu that comes with salad, soup, pasta and dessert with Halloween theme decorated.

Monday 26 September 2011

Orange-Scented Flourless Chocolate Cake

Flourless Chocolate Cake has being queuing in my "must-try" lists for at least more than 2 years. Whenever I saw beautiful photos and recipes from fellow bloggers who lay their hand on this delicious looking cake I will be fascinated to give it a try. But the "fate" between me and this cake only begins to spark last week while I was planning to bake something for my neighour and my boy's school teacher.

From the name "Flourless" you can more or less figure out that this recipe does not require any Flour, but somehow or rather it did call for a minimum amount of cocoa powder to enhance the taste. So in order to have better texture and taste for this cake, I would suggest you get some decent brand of cocoa powder which would give it that dark and luxury outlook.

I love this recipe because it is so easy to prepare and you can even let your kid(s) handle most of the beating and folding job with maybe a bit of help from the Adult. Furthermore those of us who tried this cake were surprised of it's taste and texture which is moist, fluffy and tasty even without any use of "BUTTER or MILK".

Ingredients: (make 4, 9cm x 9cm square disposal baking case)
4 Egg Yolks
4 Egg Whites
110g Caster Sugar
12g Valrhona Cocoa Powder
100g Valrhona(Guanaja - 70%)Dark Chocolate, melted
1 Teaspoon Grand Marine/Vanilla Essence
Zest of 1 or 2 Oranges

Method:-
1. Preheat oven to 180 degree.

2. Separate egg yolks and whites in two different mixing bowl. (i use a bigger bowl for my yolks mixture in order to mix in the whites later on)

3. Whisk egg whites in a bowl with a mixer until soft peaks form. (do not over beat till stiff peak)

4. Next whisk egg yolks and sugar in another mixing bowl until pale and airy before folding in cocoa powder, orange zest and grand marine.

5. Stir in melted chocolate till well combined. Fold in 1/3 of the egg whites at a time and mix well. (since chocolate mixture will be heavier than egg whites, try to scrap and stir from the bottom when mixing to get an even texture)

6. Pour mixture into prepared cake pan or disposal baking cases. Bake in preheated oven for 18 minutes(9cm square paper case), 25 minutes(7"/15cm round cake pan) or when skewer insert and comes out clean.

7. Cool the cake completely on baking rack before sprinkle it with icing sugar and decorate with whipped cream, ice-cream or assorted fresh berries of your choice and serve.

Tips:-
1. You can either melt the chocolate over a double-boiler or place them in microwave safe bowl and cook on HIGH heat for about 90 seconds, stirring at an interval of 30 seconds to prevent burnt.

2. Eggs use in the recipe is 60g each in weighs.

As you can see from the photos, the top of the cake has a delicate crispy crust which gives this cake a few layers of texture such as crisp top, moist and fluffy cake with orange-scented flavour on each bites. And since this is my 1st trial, I hope I would be able to achieve a bit slightly fudgy texture perhaps with a 3 minutes under bake on the timing.

For more recipes on different type of Flourless Chocolate Cake, you can refer to the follow site which I bookmark too.
1. Flourless Chocolate Gateau from Happy Home Baking
2. Flourless Chocolate and Almond Cake from Little Teochew

Tuesday 13 September 2011

Chocolate Lemon Yogurt Cake

Pin It
About two weeks back I have an entry on Lemon Yougurt Butter Cake which was quite well-received by most of my friends. So during my Kids' Pizza and Bento Workshop last week I decided to twist the recipe a bit in order to suit the kids with this Chocolate Lemon Yogurt Cake.

Each bites on this chocolate cake leaves you with a light and refreshing lemon fragrant mixing together with that rich chocolate taste that stays in your mouth for quite sometime which I am sure it would makes a perfect tea cake for the kids.

In order to make it more chocolatey, I added extra 100g of mini chocolate chips so that i will make the cake more moist and full of chocolate flavour.

Recipe adapted from Lemon Yogurt Butter Cake HERE.

Ingredients: (makes 2 small loaf tins, 17cm x 8cm x 6cm) 
175g Unsalted Butter, room temperature
200g Caster Sugar
3 Eggs, 60g each
200g Self Raising Flour
45g Valrhona Cocoa Powder
100g Mini Chocolate Chips
Juice of 1/2 Lemon
Zest of 1 Lemon
4 Tablespoons Plain Yogurt


Method:-
1. Cream butter and sugar with mixer till creamy and pale (about 3 - 4 minutes on medium speed).

2. Add in eggs, one at a time and beat well after each addition. If necessary scrap mixture off the side of the mixing bowl and make sure everything is well beaten.

3. Fold in the mixture of sifted self-raising flour plus cocoa powder in 3 batches.

4. Next add in lemon zest, juice, yogurt, mini chocolate chips and fold thoroughly till combined.

5. Divide batter equal into 2 mini loaf tins that are lined with greaseproof paper.

6. Bake in preheat 180 degree oven for about 35 - 40 minutes or when skewer insert and come out clean.

7. When cake is done, remove it from the oven and allow to cool in the pan for 10 minutes.

8. Transfer cake to cooling rack and cool completely before cutting it into serving slices.


Friday 29 July 2011

{Recipe and Game} Chocolate Ice Cream Cone Cupcakes With Vanilla Ice Cream Plus Blind Taste Test

Isn't these "ice-cream cone cupcakes" look great for special occasions such as Birthday party, school function or even tea-time. I am sure not only the Kids fancy this,  Adults like us will also love eating our favourite cake in a cone instead of on a plate too. So why not give this a try and start making your favourite cupcakes in ice-cream cones instead of paper cases. Or just like us if you don't fancy frosting your cupcakes you can even eat it on it's own or top it with an extra scoop of your favourite ice-cream.

I always love dessert such as Chocolate Brownie or Molten Chocolate Cake that serves with a generous scoop of premium Vanilla ice-cream. And when compared to other flavour, vanilla ice-cream is said to be the most popular flavour like by most consumers which is why you can always see vanilla ice-cream appears in most dessert corner or menu in major cafes/restaurants.

Since I am making some ice-cream cone cupcakes for my neighbours as one of our tea snacks we decided to play a small game while waiting for the cupcakes to cool off. To start off we gathered 3 different brands of vanilla ice-cream to do a blind taste test and see which is the most popular choice among us. In this game, each family contribute one of their favourite brand of vanilla ice-cream and I would scoop it into 3 different cups and let all the participants take a blind taste test on each of them.

For this test we had 9 participants from 3 different families with age group ranging from the youngest; 5 years old to the oldest 60 plus. Each participants will get to sample the prepared Vanilla Ice-cream from Haagen Dazs, New Zealand Natural and Ben And Jerry's without any knowledge of which brand they are tasting. So can you make a guess which is the most popular choice out of the 3 brands that most of them pick?(result is shown at the end of this post) But before we scroll down to read the "taste test" result, let's take a look at the Chocolate Ice-cream Cone Cupcakes recipe shown below first.


CHOCOLATE ICE-CREAM CONE CUPCAKES
WITH VANILLA ICE CREAM


I have bookmarked this recipe for quite sometime but was not very keen to attempt due to the frosting part. So with some read-up and brainstorm with my facebook friends, I decided to give it a try without doing the frosting and replace it with a good scoop of Vanilla Ice-cream.

Recipe adapted from Donna Hay

Ingredients: (make 8 flat base ice-cream cones)
60g Butter, soften
80g Caster Sugar
1 Large Egg
50g Valrhona(Guanaja - 70%)Dark Chocolate, melted
95g Plain Flour
1 Tablespoon Dutch-process Cocoa Powder
1/2 Teaspoon Baking Powder
50ml Fresh Milk
8 Flat Base Ice-Cream Cones
40g Valrhona(Guanaja - 70%) Dark Chocolate, extra

Topping:
Premium Vanilla Ice-cream


Method:-
1. Melt 50g of dark chocolate in microwave on High for 40 seconds with an interval of 20 seconds each.

2. Arrange ice-cream cones on baking tray and place 2 feves of dark chocolate at the base of each cone.

3. Preheat oven to 160 degree. Beat butter and sugar in a bowl till light and creamy, add in egg and beat till well mixed.

4. Next sift over flour mixture(plain flour, baking powder and cocoa powder) and continue to beat until mixture became a gluey batter.

5. Fold in milk and stir with either a spatula or hand-held whisk till combine before stirring in the melted chocolate.

6. Spoon batter into each cone and fill up 0.5cm away from the rim. Bake in preheat oven for 15 minutes; increase oven temperate to 170 degree and continue to bake for another 10 minute or when skewer insert and comes out clean .


7. Allow cupcakes to cool for 10 minutes, running a small knife round the "hump" on top of the cake and remove it before stuffing it with a scoop of Premium Vanilla Ice-cream.

8. You can either drizzle extra melted chocolate, sprinkler or use the cut-off cake to place on the ice-cream to act as toppings.

Chocolate Ice-cream Cone Cupcakes on FoodistaChocolate Ice-cream Cone Cupcakes

These cupcakes taste great even without any frosting. The cake itself is soft, moist and infused with "Triple" chocolate content. With each bites you can taste 3 different texture in one mouthful such as the crispy ice-cream cone, moist chocolate cake and cold ice-cream all mingling in your mouth.

For your information these cupcakes are best to be eaten within an hour or warm so that the ice-cream cones will reminds crispy instead of soft and soggy after a few hours. But if you intend to keep for longer time you might want to consider reheat it in a 200 degree oven for about 3 minutes to revive the "crispness" of the ice-cream cones.


Result Of Our
BLIND TASTE TEST


Tata!!!!! Have you make the correct guess? Or you are surprised with the result shown above? Yes! I myself was surprised when I saw the results; out of the 9 participants, 4 voted(2 Young Adults, 1 Teenage and a Kid) for New Zealand Natural immediately after they tried all the 3 different cups of ice-cream whereas the other 5 participants still took sometime to decide which product to cast their vote.

As for products wise you can still see tiny bits of vanilla pods in both New Zealand Natural and Ben And Jerry's. But in term of taste New Zealand Natural has the smoothest texture and mild creamy taste which does not overpower the vanilla fragrance. So if you like vanilla ice-cream perhaps you can also gather a few brands and do a blind taste test like us, have fun and enjoy the process as well as the eating those cold and delicious ice-cream especially during hot and humid days.


Tuesday 17 May 2011

Japanese Steamed Double Chocolate Cake

Apart from the "Japanese Steamed Sweetcorn Bun(Mushipan)" and "Japanese Steamed Matcha Cake" that I made recently. Here is another Steamed Chocolate Cake recipe which I have adapted from Nami from Just one Cookbook. Both Joyce(@ahpoohbear) and I have tried making this recipe and we both love its moist and soft texture using cake flour. And my boy who is very picky about cake texture also requested for a second helping after he sample some. So I recommend this recipe as a good keeper for those who wish to whisk up something quick and easy for afternoon tea in less than 30 minutes.

If you cannot find any Dutch-process cocoa powder you can always replace it with any brand of baking cocoa powder that you own. And for a chance you can also add in half banana(mashed) to achieve a more fragrant and moist texture.

(Original recipe adapted from Just One Cookbook)
Ingredients: (makes 3 - 4 cakes)
75g Cake Flour
1 1/2 Tablespoon Dutch-Process Cocoa Powder
1 Teaspoon Baking Powder
1 Large Egg
3 Tablespoons Drinking Water
2 Tablespoons Caster Sugar
2 Tablespoons Corn Oil
2 Tablespoons of Mini Chocolate Chips

Method:-
1. Sieves cake flour, baking powder and cocoa powder together. (sieves at least twice)

2. Using a balloon whisk, beat egg and sugar till foamy and pale (about 5 minutes).

3. Stir in water and oil in sequence then follow by the flour mixture till well combined.

4. Lastly toss in 1.5 tablespoons of chocolate chips. Spoon mixture into prepared foil/ramekins cups that are lined with paper liners.

5. Place the cups in steamer/wok(with boiling water in it), cover and steam over high heat for about 10 - 12 minutes(depending on the size) or until a skewer inserted into one of the buns and comes out clean.


I am submitting this Japanese Steamed Chocolate Cake to Aspiring Bakers #7: Chocolate Delight (May 2011), hosted by Doris of Tested and Tasted.


Tuesday 26 April 2011

[Cupcake Pop Mold Giveaway] Assorted Cream Cheese Cake Pops

Ever since I saw and bought these cute cupcake pop molds, I have always wanted to try making some Cake Pops which is one of the latest trend among online bakers other than cupcakes and macarons. And recently I also saw Starbucks having some cute Cake Pops featuring in their food menu too.

What is Cake Pops? Cake Pops can be defined as little/mini cakes on a stick that is coated with chocolate/icing and decorated with all sort of sprinkles or toppings which made famous by Bakerella( read more on the link HERE).

There are a few ways of making these cake pops from either using crashed Oreo or graham biscuits to vanilla or chocolate cake crumbs. But no matter which method(s) you prefer I am sure both Adults and Kids will enjoy the fun process of rolling, molding and decorating these cute Cake Pops.

Ingredients: (make 10 mini cake pops)
200g Butter/Marble Cake, break into pieces
150g Cream Cheese, soften
*1/2 Tablespoon of Grand Marnier/RUM/Kahlua, optional

Decorations:
Assorted Chocolate of Your Choice, melted
Assorted Toppings

*Note:
~ You can either add more cream cheese or a bit cold milk to bind the crumbs if it is too dry.

Method:-
1. Break the ready bought marble cake into smaller pieces and place it in a large mixing bowl.

2. Beat the cake pieces at low speed until it resemble find crumbled (refer to the photo above), drizzle Grand Marnier evenly over the cake and beat for another few second till combined.

3. Next using a spatula or hand mix and knead the soft cream cheese mixture with the crumbs till it forms a smooth dough.

4. Roll the mixture into a 1” round balls and place on a tray lined with foil/baking paper.

5. When done, place them in the freezer for about 5 minutes before molding them using the cupcake mold.


To Assemble:
1. Place one of the chilled dough in the cupcake mold, gently press down to fix the mould and closed it tight to remove any excess dough that are being cut off.

2. You have to work fast and mold all the prepared dough into cupcake shape then freeze them for another 5 minutes to firm it up before dipping with melted chocolate.

3. Melt your choice of chocolate in a microwave safe bowl at 30 seconds intervals on high heat, stirring in between until chocolate melts and become smooth.

4. Slowly lower the cake into the melted chocolate to coat the bottom half portion by holding the tip of the cake. When done carefully insert a lolliop stick from the bottom base of the cake to secure it. (after coating the base, I leave it on the baking paper and freeze for another 3 minutes before doing the top)

5. After the chocolate coating, rest the sticks of cake pop on styrofoam block(can get from daiso) or in a tall cup to dry while decorating the pops with sprinkles or toppings.

6. You can refer to the related VIDEO(click HERE) on making these cake pops by using this cupcake mold.


Remeber the monthly Aspiring Bakers(founder, small small baker) events that I always participate, for this month of April, the key ingredients will be cheese. Jean suggest that it should be something cheese related on either bakes/frozen desserts. So I will be submitting this to Aspiring Bakers #6: Say Cheese! (April 2011) hosted by Jean from Noms I Must.

Secondly I would like to thanks those of you who had participated in the "Gyoza Mold Giveaway" and "Sandwich Sealer plus Heart Shaped Food Picks" events which ended last week. Here is the 3rd “Giveaway” for the month of April to celebrate Cuisine Paradise's 6th Anniversary which falls on 30th April 2011. And I hope with this handy "Cupcake Pop Mold" you can make use of it to shape into different design of Cake Pops where you can refer to their official website HERE.

If you are interested to win this set of "Cupcake Pop Mold", just leave your Name and your favourite Cake Pop and topping (strawberries, Oreo, dark chocolate, mint), example "I Love Chocolate Cake  Pop With Oreo Toppings" in the comment box and I will pick ONE Lucky winner on Sunday, 01 May 2011. Result will be announce on 02 May 2011.


[Updated on 02 May 2011 09 May 20111]

GIVEAWAY RESULTS!!!!!


GIVEAWAY RESULTS ARE OUT! Are you the Lucky One!!!!!

Wednesday 13 April 2011

Chocolate Madeleines

Chocolate Madeleine
Out of all bread and parties available in the bakery shops, my boy has this passion towards Chocolate Madeleine. So whenever we are near ION, Orchard he would definitely get some Madeleine from “Bread Society”. He loves the moist and chocolatey texture of the cake which he could have at least 3 for his tea-snack.

And recently while arranging the bookshelves, I happened to come across this wonderful recipe which I jotted down from one of Donna Hay’s cookbook some years back. With that I decided to try making a batch of these chocolate madeleine for my boy.

Monday 28 March 2011

Chocolate Pumpkin Butter Cake

All along I prefer butter cake compared to those frosted cream cake, chiffon, fresh fruits or etc that is available in the bakery. And personally I crave for those traditional rich and moist butter cakes that served together with a cup of freshly brewed English tea that will refresh your soul for a great afternoon tea session.

After trying the 1st batch of Pumpkin Butter Cake that I made into small muffin cups, we love the soft texture, buttery taste as well as the natural flavour from the mashed pumpkin. And since I have another ½ portion of leftover pumpkin in the fridge, I decided to combine this recipe with the recent Marble Cake (HERE) that I have made and come out with the "Chocolate Pumpkin Butter Cake".

For these two recipes here, I used Lurpak Unsalted Butter which I prefer its smooth and creamy taste that is does not make you feel queasy even after having a slices of two of the cake. As for the pumpkin I used the Butternut because I love its sweet and nutty taste that is great for soups, casseroles, breads, and even cakes.

(adapted from 茄子, 袅袅烘焙香 HERE)
Ingredients For Pumpkin Butter Cake: (makes 6 muffins)
100g Pumpkin(without skin), steamed and mashed
150g Cake Flour/Top Flour
1/2 Teaspoon Baking Powder
1/2 Teaspoon Vanilla Extract
100g Caster Sugar
100g Unsalted Butter, cubes and soften
3 Large Eggs

Toppings:
Some Pumpkin Seeds
Some Shredded/Sliced Pumpkin


Methods:-
1. Cream butter and sugar till light and fluffy, add in eggs one at a time and beat till well combined.

2. Stir-in vanilla extract then fold in the sifted flours (cake flour + baking powder) in two round till there is no trace of flour in the batter.

3. Add in mashed pumpkin (refer to the preparation method below) and preferably using a balloon whisk to give the mixture some quick stir to combine the pumpkin with the flour batter.

4. Spoon the pumpkin batter into prepared muffin case, top with shredded pumpkin or pumpkin seeds.

5. Bake in pre-heated 170 degree oven for about 15 - 18 minutes until a skewer inserted into the centre comes out clean.


To Prepare The Mashed Pumpkin:


1. Place pumpkin cubes(without skin) into a microwave heatproof bowl together with 1 tablespoon of water.

2. Cook in high heat for 3 - 4 minutes with an interval stirring between each minute.

3. Mash the cooked and soft pumpkin with a fork and set aside to cool while preparing the batter. OR

4. You can steam the pumpkin cubes in a pot of boiling water using steaming rack for about 10 minutes or till pumpkin is soften.


As you can see from the photo despite of the beautiful swirl colours from the pumpkin and chocolate batter there are some setback of air holes which appears due to my oversight of mixing the two batters. But thanks God these flaws did not affect the texture and taste of this moist and buttery cake.

Ingredients For Chocolate Pumpkin Butter Cake: (makes 17cm cake )
120g Pumpkin(without skin), steamed and mashed
150g Cake Flour/Top Flour
1/2 Teaspoon Baking Powder
1/2 Teaspoon Vanilla Extract
100g Castor Sugar
100g Unsalted Butter
3 Large Eggs
1 Tablespoon Dutch Cocoa Powder, sieved

Toppings:
Some Pumpkin Seeds, optional


Methods:-
1. To prepare the chocolate pumpkin butter cake, follow step 1 and 2 shown above for preparing the flour batter.

2. Scoop about 3 - 4 Tablespoons of flour batter into a small bowl together with 1 tablespoon of cocoa powder, whisk till well combined. Set aside.

3. Whisk in mashed pumpkin into the remanding flour batter.

4. Drop 1 - 2 spoons of the pumpkin and chocolate batter alternately into the prepared tin.

5. When all the mixture has been used up, tap the bottom on the tin on your work surface to ensure that there aren't any air bubbles.

6. Take a skewer and swirl it around the mixture in the tin a few times to create a marbled effect.

7. Bake the cake for 25 - 30 minutes or until a skewer inserted into the centre comes out clean.

8. Cool the cake completely before removing it from the baking tin/case, cut into slices and serve with coffee/tea.


Chocolate Pumpkin Butter Cake on FoodistaChocolate Pumpkin Butter Cake

Monday 11 October 2010

Chocolate Chiffon Cake with Multigrain & Mixed Fruits

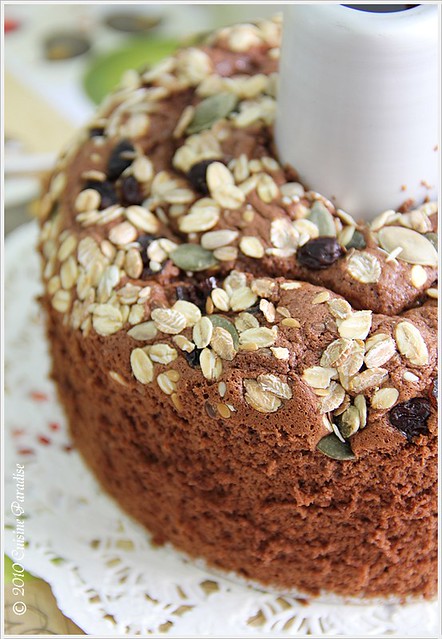
I have almost forgotten this yummy chiffon cake that has being hiatus inside my half-drafted post section since late August till now. As regular readers of this blog, I am sure you knew we love anything that is made of chocolate. So for this chiffon cake I used some cocoa powder, mini chocolate chips and dark chocolate chunks as main ingredients. And in order to enhance it’s outlook, I sprinkle generous amount of store bought Multigrain mixture and dried mixed fruit for that extra texture and colour.

Wednesday 6 October 2010

Chocolate Banana Muffins

Last month I have made some “Banana & Oreo Muffin” where you can make use of those oreo cookies in a new way rather than dipping them in fresh milk for snack. With the same concept, I replace the oreo cookies with some cocoa powder and mini chocolate chips to create another lovely flavour for chocolate lovers.

As you can notice from most of my posts, I love to make muffins especially those mini or mouthful size type. I find making these makes it easier for my kid to have it as tea snack or sometime it can be also act as a lovely gift for friends too.

Wednesday 2 June 2010

Matcha Madeleines with Azuki Bean

Madeleines are very small traditional sponge cakes with a distinctive shell-like shape which traditional recipes always include ground almonds and lemon zest. But for the Madeleines in this post, I did not included the the two ingredients mentioned by rather I add in some Matcha - 抹茶(Green Tea) powder and cooked Azuki Bean - 紅豆 for a Japanese snack fusion. 

Monday 8 February 2010

Prefect Valentines Gift

Valentine's Day is just a few days around the corner and I am sure most of us are cracking our head on what's the prefect gift to get for our love ones. But no matter what's your gifts are, I am sure anything that has CHOCOLATE in it will made a lovely gift for your darling or friends.

For me, I am a chocolate lover and I love anything that consists of Dark Chocolate. And to me, "Chocolate Brownie" makes a prefect snacks and gifts for all occasions. I have tried this recipe which given by one of my best pal, Tracy sometimes back but the end-result was not very satisfied because I seems to have over-baked it. But this round, I finally managed to get my prefect brownie with moist and gluey melted chocolate in it....... For those who are interested in this recipe, here it goes...

Ingredients:
250g Butter, melted
1 Cup Brown Sugar
1/4 Cup Caster Sugar
4 Eggs
1 1/3 Cup Flour
1/2 Cup Cocoa Powder
1 Teaspoon Baking Powder
150g Dark Chocolate, roughly chopped
40g Roasted Almond, roughly chopped
40g Roasted Macadamia Nut, roughly chopped

Method:
1. Put the butter in a microwave safe bowl and melt it on high 2 minutes, pause to stir after each minute.
2. Sift all the flour ingredients together and set aside.
3. Next add both the sugar to the melted butter and stir till the sugar became almost melted and gluey.
4. When the sugar mixture is cool off, add in the egg one by one and use a balloon whisk and beat till well combine.
5. Next slowly whisk the flour mixture into the egg mixture till well combine.
6. Lastly stir in half each of the chopped dark chocolate and nuts then pour into a square or rectangle brownie tin.
7. Sprinkler the remaining chocolate and nuts on top of the mixture, give the whole tin a few bang to knock off the air bubbles inside.
8. Bake in a preheat 180 degree oven and bake for about 18 - 20 minutes depend on the tin size.
9. The brownie will pull away from the sides of the pan and when test with a skewer, it will be a bit moist inside.
10. Cool. Cut into bars.

Notes:
a) If using those black coated baking tin, you have to reduce baking time by 3-5 minutes.


After the brownie has cooled off, cut it into bite size. Grab a nice and lovely gift box, packed it with the brownie cubes and perhaps some extra chocolate or candy. I am sure this will make a Prefect Valentine's Gift for anyone...... Posted by Picasa


Saturday 28 November 2009

Christmas Chocolate Cupcakes

Christmas is about family, friends, fun and great food. But it is often the food and gift that form the stress part of this approaching holiday season. So why not whip-up something simple and yet special from your very own kitchen, gift-wrapped it into a heart-warming and gorgeous Christmas gift for your friends and relatives..........

Usually around mid of November onwards, you will be to find all kind of Christmas Goodies on sale at most pastry shop and shopping mall. Eg. Christmas Logcake, Gingerbread man/house, Minced Pie and etc...... Since now is the festive baking season, Rey and I have come up with these quick and easy Christmas Chocolate Cupcakes. After which we gave them a make-over, packed them in gift-bags and ready to distribute out.

The Main ingredients for this Chocolate Cupcakes are Dark Chocolate, Egg, Sugar and Butter. You may also wish to get your kids to be involved in the stirring, mixing as well as the decoration of Christmas Ornaments on the end products. Since afterall, Christmas is a family festive season where everyone is encourage to be involved in the preparation. These cupcakes are so rich and simple to make that you won't hesitate to make another batch in anytime of the week.

Ingredients: (makes 6)
150g 70% Dark Chocolate, chop into small cubes
150g Unsalted Butter, cut into small cubes
3 Medium Size Egg
60g Caster Sugar
100g Self Raising Flour
1 Teaspoon Dutch-process Cocoa Powder
1 Teaspoon Snow Powder/Icing Sugar, for dusting
Extra 1 Teaspoon Dutch-Process Cocoa Powder, for dusting

Method:
1. Set a medium glass bowl over a pan of gently simmering water, melt the chocolate and butter together(refer to the picture above, 2nd row, 1st picture), stir well till everything is completely melted then set a side to cool a little.
2. Sieves the self-raising flour and 1 teaspoon of cocoa powder together and set aside.
3. Beat the eggs and sugar in a large bowl until pale and thick, fold in the flour mixture into the egg mixture till combined.
4. Next slowly add in the melted chocolate mixture and stir till well blended.
5. Preheat the oven to 160 degree, scoop the mixture into the prepared cup cases and bake for 20 minutes (depend on the size of cupcake case, baking time will range from 15 – 20 minutes which you can test by inserting a toothpick to test if it is cooked through)
6. The cupcakes will be soft and gooey in texture and appearance.
7. Remove from the oven and cool for 5 minutes, dusted with extra cocoa powder and icing sugar to create the snow effect.
8. Lastly decorate it with some store bought Christmas Ornaments for that extra festive outlook.

Note:-
1) The cupcake case that is used in this recipe yield 150ml of mixture per case at 3/4 full.
2) If you prefer not to have that gooey texture cake, you can baked for another further 2 - 3 minutes for dryer texture.


After the baking, dusting of icing sugar, placing of Christmas decoration, it is time for gift wrapping. You can get some fancy wrapping bags and ribbons from Daiso or any leading Baking Accessories shop like Phoon Huat (Singapore) and Bake It Yourself.

I am sure anyone will feel great and heart-warming to receive such a wonderful homemade gift. So if you can bake any simple cookies or cupcakes, why not grab some nice wrapping bag and start making your very own Christmas goodies for your love one, colleagues or relatives. I believed they will be surprised and delighted by your special thoughts and bakes. Posted by Picasa


ShareThis